background image

www.centurybaby.com

www.centurybaby.com

2

Quick Guide

Guía Rápida

2.  Attach and rotate axle rod to rear wheels 

until it snaps into place. Attach wheels to rear 

of stroller.

4.  Attach front wheels to stroller as shown. 

CHECK that wheel is securely attached by 

pulling on wheel assembly.

1.  Open storage latch. Lift handle of stroller up.

3.  Connect the basket tube to the stroller frame 

as shown

2.  Sujete y gire la varilla del eje a las ruedas 

traseras hasta que se trabe en su lugar. Sujete 

las ruedas a la parte trasera del cochecito.

4.  Sujete la rueda delantera al cochecito como 

se indica. 

VERIFIQUE que la rueda esté 

apretadamente sujetada tirando del 

ensamblaje de la rueda.

1.  Abra la puerta del almacenamiento. Levante la 

manija del cochecito hacia arriba.

3.  Conecte el tubo de la canasta al armazón del 

cochecito como se muestra.

1

3

2

4

CLICK! 

¡CLIC!

CLICK! 

¡CLIC!

CLICK! 

¡CLIC!

SNAP! 

¡RUIDO!

SNAP! 

¡RUIDO!

2X

2X

NWL0001179316D Stroll On Duo USA R02.indd   2

NWL0001179316D Stroll On Duo USA R02.indd   2

1/29/21   3:19 PM

1/29/21   3:19 PM

Summary of Contents for Stroll On

Page 1: ...tario Copyright Century Children s Products 2020 NWL0001179316D 1 21 LIGHTWEIGHT DOUBLE STROLLER COCHECITO LIGERO DOBLE Stroll On Duo NWL0001179316D Stroll On Duo USA R02 indd 1 NWL0001179316D Stroll On Duo USA R02 indd 1 1 29 21 3 19 PM 1 29 21 3 19 PM ...

Page 2: ...as ruedas traseras hasta que se trabe en su lugar Sujete las ruedas a la parte trasera del cochecito 4 Sujete la rueda delantera al cochecito como se indica VERIFIQUE que la rueda esté apretadamente sujetada tirando del ensamblaje de la rueda 1 Abra la puerta del almacenamiento Levante la manija del cochecito hacia arriba 3 Conecte el tubo de la canasta al armazón del cochecito como se muestra 1 3...

Page 3: ...cochecito como se indica Tire de la barra para los brazos para asegurarse de que esté sujetada 7 El portavaso para padres se puede montar en el lateral del armazón del cochecito 5 7 TO FOLD 6 Quick Guide Guía Rápida SNAP RUIDO B A C A Deslice la perilla del pulgar B Oprima la palanca de la manija y luego C Empuje la manija hacia abajo levante las ruedas delanteras del suelo para comenzar a plegar ...

Page 4: ...r Barra para los brazos 3 F Child s Tray Bandeja para niños 3 G Parent Cup Holder Portavaso para padres 3 H Car Seat Adapters Adaptadores del asiento de automóvil 3 ASSEMBLY ENSAMBLAJE Pages Páginas 10 17 4 A Canopy Capota 4 B To Secure Child Sujetar al niño 4 C To Recline Para reclinar 4 D Infant Lie Flat Bassinet Moisés para bebés totalmente reclinable 4 E Brakes Frenos 4 F To Attach Century Inf...

Page 5: ...le jogging skating etc USE OF THE STROLLER with a child weighing more than 50 lb 22 5 kg or taller than 45 in 114 3 cm will cause excessive wear and stress on the stroller TO PREVENT A HAZARDOUS UNSTABLE CONDITION never place purses shopping bags parcels or accessory items on the handle or canopy TO PREVENT A HAZARDOUS UNSTABLE CONDITION do not place more than 10 lb 4 5 kg in the storage basket TO...

Page 6: ...at Adapters from the rear seat and place them in the storage pocket when the ICS is not in use Storage pockets are only for storing Century Carry On Infant Car Seat Adapters do not place objects other than carseat adapters in the pockets Child may slip into leg openings and strangle Never use seat in a reclined carriage position unless footrest is raised to cover the front opening Improper use of ...

Page 7: ...r patinar etc EL USO DE UN COCHECITO con un niño que pesa más de 50 libras 22 5 kg o es más alto que 45 pulgadas 114 3 cm causará desgaste y tensión excesiva en el cochecito PARA PREVENIR UNA SITUACIÓN PELIGROSA E INESTABLE nunca ponga carteras bolsas de compras paquetes o accesorios en la manija o capota PARA PREVENIR UNA SITUACIÓN PELIGROSA E INESTABLE no ponga más de 10 libras 4 5 kg en la cana...

Page 8: ... con el arnés Saque los adaptadores del asiento de automóvil para bebés Century Carry On del asiento trasero y colóquelos en el bolsillo de almacenamiento cuando el asiento de automóvil para bebés no esté en uso Los bolsillos de almacenamiento son solamente para guardar los adaptadores del asiento de automóvil para bebes Century Carry On no coloque ningún objeto que no sean los adaptadores del asi...

Page 9: ...85 0249 No requiere herramientas 2X 2X 2 Front Arm Bar Barra delantera para los brazos Rear Axle Eje trasero Century Carry On Infant Car Seat Adapters Adaptadores del asiento de automóvil para bebés Century Carry On Stroller Cochecito Front Wheels Ruedas delanteras Parent Cup Holder Portavaso para padres Front Canopy Capota delantera Rear Canopy Capota trasera Rear Wheels Ruedas traseras Child Tra...

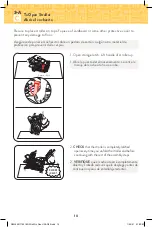
Page 10: ...amiento Levante la manija del cochecito hacia arriba 1 Open storage latch Lift handle of stroller up 2 VERIFIQUE que el cochecito esté completamente abierto y trabado cada vez que lo desplege y antes de continuar los pasos de ensamblaje restantes 2 CHECK that the stroller is completely latched open every time you unfold the stroller and before continuing with the rest of the assembly steps CLICK C...

Page 11: ...2 Sujete las ruedas traseras al cochecito 1 Sujete y gire la varilla del eje a la rueda trasera hasta que se alinee y se trabe en la rueda Repita el procedimiento con la segunda rueda trasera 2 Attach wheels to rear of stroller SNAP RUIDO CLICK CLIC CLICK CLIC NWL0001179316D Stroll On Duo USA R02 indd 11 NWL0001179316D Stroll On Duo USA R02 indd 11 1 29 21 3 19 PM 1 29 21 3 19 PM ...

Page 12: ...checito en ambos lados y luego vuelva a trabar los broches de la canasta 1 Note Unsnap the snaps on the basket tube before attaching Attach the basket tube to the stroller frame on both sides and then reconnect the basket snaps 3 C SNAP RUIDO NWL0001179316D Stroll On Duo USA R02 indd 12 NWL0001179316D Stroll On Duo USA R02 indd 12 1 29 21 3 19 PM 1 29 21 3 19 PM ...

Page 13: ... Attach front wheels to stroller as shown 1 Sujete la rueda delantera al cochecito como se indica SNAP RUIDO 1 To remove press button on wheels and pull off 1 Para retirarlas empuje el botón de las ruedas y tire para sacarlas Removing Front Wheels Para sujetar las ruedas delanteras NWL0001179316D Stroll On Duo USA R02 indd 13 NWL0001179316D Stroll On Duo USA R02 indd 13 1 29 21 3 19 PM 1 29 21 3 1...

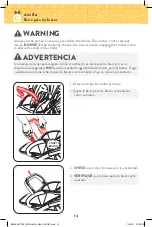
Page 14: ...s brazos no es un dispositivo de seguridad NO levante el cochecito agarrándolo de la barra para los brazos Tenga cuidado cuando trabe la barra para los brazos en el cochecito si hay un niño en el cochecito 1 Sujete la barra para los brazos al cochecito como se indica 1 Attach arm bar to stroller as shown 2 VERIFIQUE que la barra para los brazos esté sujetada 2 CHECK on arm bar to make sure it is a...

Page 15: ...las trabas de la barra para los brazos luego tire de la barra para los brazos hacia afuera del armazón Removing arm bar Cómo retirar la barra para los brazos 3 E NWL0001179316D Stroll On Duo USA R02 indd 15 NWL0001179316D Stroll On Duo USA R02 indd 15 1 29 21 3 19 PM 1 29 21 3 19 PM ...

Page 16: ... Attach child s tray clip to the bottom of the arm bar as shown 2 Gire la bandeja para niños para trabarla en su lugar 2 Rotate child tray to lock in place Child Tray Bandeja para niños 3 F ww NWL0001179316D Stroll On Duo USA R02 indd 16 NWL0001179316D Stroll On Duo USA R02 indd 16 1 29 21 3 19 PM 1 29 21 3 19 PM ...

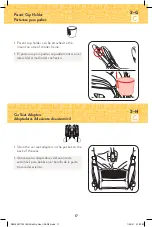
Page 17: ...ler frame 1 Almacene los adaptadores del asiento de automóvil para bebés en el bolsillo de la parte trasera del asiento 1 Store the car seat adapters in the pocket on the back of the seat 3 G www centurybaby com Car Seat Adapters Adaptadores del asiento de automóvil 3 H NWL0001179316D Stroll On Duo USA R02 indd 17 NWL0001179316D Stroll On Duo USA R02 indd 17 1 29 21 3 19 PM 1 29 21 3 19 PM ...

Page 18: ...nopy as shown 4 A Front Canopy Capota delantera 1 Sujete la capota trasera como se indica 1 Attach rear canopy as shown Rear Canopy Capota trasera SNAP RUIDO NWL0001179316D Stroll On Duo USA R02 indd 18 NWL0001179316D Stroll On Duo USA R02 indd 18 1 29 21 3 19 PM 1 29 21 3 19 PM ...

Page 19: ...ush backwards to close canopy 3 Tire la solapa hacia adelante para abrirla y hacia atrás para cerrar la ventana de la capota 3 Pull flap forward to open and backwards to close canopy window Use Uso 4 A NWL0001179316D Stroll On Duo USA R02 indd 19 NWL0001179316D Stroll On Duo USA R02 indd 19 1 29 21 3 19 PM 1 29 21 3 19 PM ...

Page 20: ...illa para liberar las correas de la cintura 1 To open press button on buckle to release the waist straps 2 Para cerrarlo deslice los conectores de las correas del hombro en las correas de la cintura y póngalos en la hebilla 2 To close slide shoulder strap connectors onto waist straps and insert into buckle NWL0001179316D Stroll On Duo USA R02 indd 20 NWL0001179316D Stroll On Duo USA R02 indd 20 1 ...

Page 21: ...tadamente Para cambiar ranuras del arnés del hombro vea la página 22 1 Para abrirlo oprima el botón de la hebilla para liberar las correas de la cintura 1 To open press button on buckle to release the waist straps 2 Deslice las conexiones de la correa para los hombros de las correas para la cintura 2 Slide shoulder strap connectors off of waist straps NWL0001179316D Stroll On Duo USA R02 indd 21 N...

Page 22: ...kle as shown 5 Use el ajustador deslizable de la cintura para ajustarlo más apretadamente 5 Use slide adjuster at waist for tighter adjustment 6 Para abrirlo oprima el botón de la hebilla para liberar las correas de la cintura 6 To open press button on buckle to release the waist straps NWL0001179316D Stroll On Duo USA R02 indd 22 NWL0001179316D Stroll On Duo USA R02 indd 22 1 29 21 3 19 PM 1 29 2...

Page 23: ...tador del arnés del hombro en las ranuras que estén más cerca a la altura del hombro del niño Use el ajustador deslizable para lograr ajustes adicionales 1 Push harness anchor through the front of the seat then re insert through desired slots at the same height level Use shoulder harness anchor in the slots that are closest to child s shoulder height Use slide adjuster for further adjustment NWL00...

Page 24: ...ara reclinar el asiento trasero empuje el botón hacia abajo y tire el asiento hacia atrás TO RECLINE REAR SEAT 1 To recline back seat push button down and pull seat towards the rear 2 Para levantar tire ambas correas hacia arriba 2 To raise pull both straps up CÓMO RECLINAR EL ASIENTO FRONTAL 1 Oprima la traba mientras agarra la parte superior del asiento luego recline el asiento TO RECLINE FRONT ...

Page 25: ...ten the hook and look strap 2 Flip the flap underneath the rear seat upward by releasing the hook and loop Nota Almacene los adaptadores del asiento de automóvil para bebés en el bolsillo de la parte trasera del asiento Asiento trasero solamente 1 Recline el asiento trasero en la posición totalmente reclinada Note Store the car seat adapters in the pocket on the back of the seat Rear Seat Only 1 R...

Page 26: ...vados tratando de empujar el cochecito 4 E SNAP RUIDO SNAP RUIDO 1 Empuje el freno hacia abajo para trabarlo 1 Push down on brake to lock 2 Empuje el freno hacia arriba para destrabar 2 Push up on brake to unlock NWL0001179316D Stroll On Duo USA R02 indd 26 NWL0001179316D Stroll On Duo USA R02 indd 26 1 29 21 3 19 PM 1 29 21 3 19 PM ...

Page 27: ...recline position Nota Saque los adaptadores del asiento de automóvil para bebés del bolsillo de la parte trasera del asiento Asiento trasero solamente 2 Sujete ambos adaptadores del asiento de automóvil incluidos al cochecito como se indica Note Remove the car seat adapters from the pocket on the back of the seat Rear Seat Only 2 Attach both of the included car seat adapters to the stroller as sho...

Page 28: ...r seat and b lift infant car seat out of the stroller Remove car seat adapters and store them in the pocket on the back of the seat 5 Verifique que el asiento de automóvil para bebé esté apretadamente sujetado tratando de tirarlo hacia arriba 5 Check that infant car seat is securely attached by pulling up on it 4 Coloque el asiento de automóvil para bebé en el asiento trasero sujetándolo a los ada...

Page 29: ...a bebé si está en uso b trabe el freno 2 a swivel front wheels backwards b bring front seat to the most upright position c rotate front canopy forward 2 a gire hacia atrás las ruedas delanteras b lleve el asiento frontal a la posición más vertical c gire la capota delantera hacia delante NWL0001179316D Stroll On Duo USA R02 indd 29 NWL0001179316D Stroll On Duo USA R02 indd 29 1 29 21 3 19 PM 1 29 ...

Page 30: ...fold stroller A Slide thumb switch B Squeeze handle lever and lift up slightly then C Push down on the handle and lift the front wheels off the ground to initiate the fold 4 VERIFIQUE que la traba de almacenamiento esté segura 4 CHECK that the storage latch is secure Open storage latch Abra la puerta del almacenamiento Expand stroller untill it locks open Extienda el cochecito hasta que se bloquee...

Page 31: ...se only Century replacement parts EXCESSIVE EXPOSURE TO SUN OR HEAT could cause fading or warping of parts IF STROLLER BECOMES WET open canopy and allow to dry thoroughly before storing IF WHEEL SQUEAKS use a light oil e g WD 40 3 in 1 or sewing machine oil It is important to get the oil into the axle and wheel assembly as illustrated WHEN USING YOUR STROLLER AT THE BEACH completely clean your str...

Page 32: ...s Reemplace las partes según sea necesario Use solamente repuestos marca Century EL CONTACTO EXCESIVO CON EL SOL o el calor podría causar que se destiñan o se tuerzan algunas piezas SI EL COCHECITO SE MOJA abra la capota y déjelo secar completamente antes de guardarlo SI LAS RUEDAS HACEN RUIDO use un aceite liviano por ej WD 40 3 en 1 o aceite para máquinas de coser Es importante hacer penetrar el...

Page 33: ...33 Notes Notas NWL0001179316D Stroll On Duo USA R02 indd 33 NWL0001179316D Stroll On Duo USA R02 indd 33 1 29 21 3 19 PM 1 29 21 3 19 PM ...

Page 34: ...34 Notes Notas NWL0001179316D Stroll On Duo USA R02 indd 34 NWL0001179316D Stroll On Duo USA R02 indd 34 1 29 21 3 19 PM 1 29 21 3 19 PM ...

Page 35: ...35 Notes Notas NWL0001179316D Stroll On Duo USA R02 indd 35 NWL0001179316D Stroll On Duo USA R02 indd 35 1 29 21 3 19 PM 1 29 21 3 19 PM ...

Page 36: ...d States of America As part of our Do More promise we encourage everyone to recycle or reuse their cartons and packaging See below for recycling instructions from our expert friends at the How2Recycle coalition or visit www centurybaby com domore for other ideas Para registrar su producto Century desde dentro de los EE UU visítenos en línea en www centurybaby com registration o envíe la tarjeta de...

Reviews: