1.
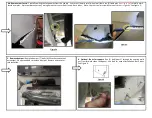
Remove tail lights:
Open tailgate and remove panels (each side) to gain access to tail light wiring. Disconnect wiring to tail lights (push red connector to disconnect). Remove plastic retaining
screw (use pliers if needed) (1) each side. Stand to the of the side of the vehicle, holding on to tail light push rearward to remove. Both sides. Secure in safe location.
2.
Remove appearance panel:
Loosen (2) plastic bolts (M10 socket) attached to spare tire well. Remove (4) screws (T20) holding appearance panel in place. Remove and save for reinstallation.
3.
Remove bolts from wheel well and fascia:
Remove (4) plastic screws (T15) from rear under side of fascia and plastic retaining blocks (pop out with flat screw driver). Remove (4) screws (T20)
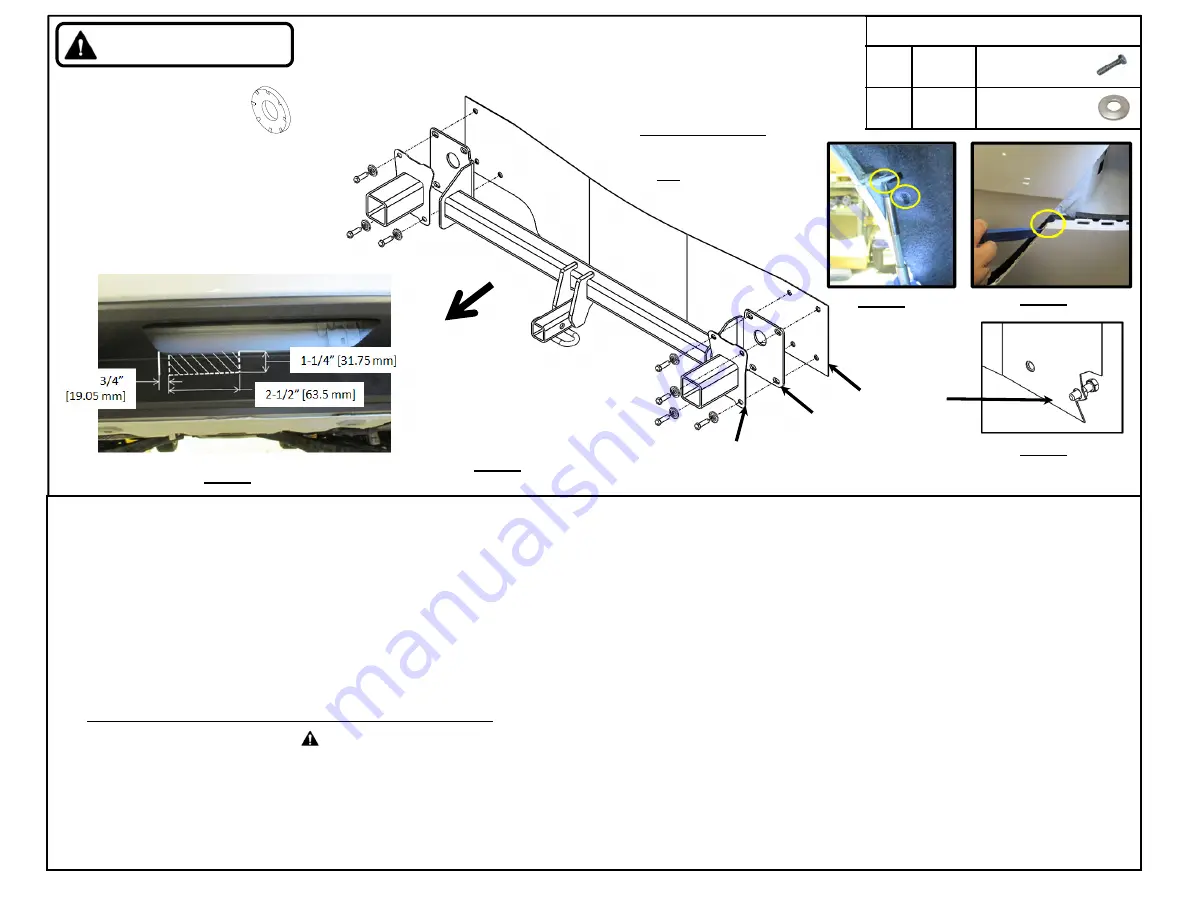
(each side) from wheel well, (3) facing the rear and (1) located at top between rear and side panels. See figure 2.
4.
Remove rear fascia:
Gently pull up from the rear wheel well panel each side, unclipping the tabs inside. Work up to taillights and continue to gently remove along plastic tail light support.
Using a small screwdriver or trim tool push down on cleats between the fascia and tail lights as needed. Continue to remove along inside bottom to the trunk, lifting fascia up from bottom as
needed. Carefully pulling the fascia away from the vehicle. Use care at lower part of wheel well there are (2) fixed pins, carefully work fascia over pins
(see figure 3a)
.
If present disconnect
any wiring harness or sensor from fascia. Both sides. Note: Use trim tool or screwdriver near corner – tight fit. See figure 3.
5.
Remove bumper:
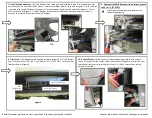
Remove bumper (7) bolts (M13 socket and socket extension), lift up as needed to remove bumper. Remove and save for reinstallation.
6.
Optional - Bolts for support:
Run (1) bolt (item 1) through the existing weld nut from forward side of end panel. Use bolt for ease of installation. Both sides. See figure 4.
7.
Install hitch and bumper
:
Lift hitch into position, resting on bolt installed in step 6. Raise bumper into position over hitch and install bolts (item 1) and conical washer (item 2) as
shown in figure 1. Once the hitch is secured with several fasteners to support it, remove the bolt used in step 6 and install properly. Center hitch on vehicle and tighten. If tab on
bumper interferes with installation it may be necessary to use a hammer to bend tab on bumper flush with bumper.
8.
Tighten all M8 CL8.8 fasteners with torque wrench to 20 Lb.-Ft. (27 N*M).
9.
Trim fascia:
From edge of fascia opening, measure and mark 3/4” [19.05mm] over. Measure over 2-1/2” [63.5 mm] down 1-1/4” [31.75 mm] . Carefully
trim, fascia
as shown in figure 5.
10. Reinstall fascia:
Lift fascia over receiver tube being careful not to scratch fascia. Starting from the center of the vehicle lineup and gently reinstall the rear fascia and all fasteners in reverse
order steps 1-4. (Note: reattach any wiring harness if removed)
Note: check hitch frequently, making sure all fasteners and ball are properly tightened. If hitch is removed, plug all holes in trunk pan or other body panels to prevent entry of water and exhaust fumes. A hitch or
ball which has been damaged should be removed and replaced. Observe safety precautions when working beneath a vehicle and wear eye protection. Do not cut access or attachment holes with a torch.
This product complies with safety specifications and requirements for connecting devices and towing systems of the state of New York, V.E.S.C. Regulation V-5 and SAE J684.
Figure 2
Fastener Kit : 24949F
①
Qty. (7)
Bolt
M8x1.25x30 CL8.8
②
Qty. (7)
Conical washer
3/8’’
Rear
Figure 1
Installation Instructions
PART NUMBERS: 24949, 77949, CQT24949
Proper torque is needed to keep the hitch secure to the vehicle when towing.
Always wear SAFETY GLASSES
when installing hitch
①
②
(Conical Washer)
Teeth side
against hitch
Figure 3
Figure 4
Figure 5
End panel
Authorized Drawbar Kit:
3590
(Sold Separately)
Drawbar must be used in the
RISE
position only
Hitch
Bumper
Complete vehicle bumper not shown for clarity


