background image

Lock-Off Button

Your saw is equipped with a lock-off button (2) which reduces the possibility of 
accidental starting. 
The lock-off button is located on the handle above the switch trigger. You must 
depress the lock-off button in order to pull the switch trigger. 
The lock resets each time the trigger is released.  

Note

: You can depress the lock-off button from either the left or right side. 

Variable Speed Controlled Switch Trigger

This tool has a variable speed switch (3) that delivers higher speed with 
increased trigger pressure. Speed is controlled by the pressure you apply to the 
trigger.
To turn your saw 

ON

, depress the lock-off button and pull switch trigger down. 

Release switch trigger to turn your saw 

OFF

.

General Cutting

Before cutting any type of material, be sure it is firmly anchored or 
clamped to prevent slipping. Always hold the saw in front of you and 
away from your body. Keep your hands and feet well away from the work 
piece. 

Never feed the blade into the work piece until the blade is at full speed. If 
the blade is not at full speed, the saw may kick back causing serious 
personal injury.

Put on eye protection.  

Clear the saw of any foreign material.  

Make sure the work piece is held securely in place. Hold smaller pieces in a
vice or attach to the workbench with clamps.  

Mark out the line to be cut so it is easily visible.  

Always use the right blade for the material.  

Make sure all bolts, screws and locking levers are secure before starting 
tool.

Depress the lock-off button and press the switch trigger down to start the
saw.

Set the baseplate against the work piece.  

When the blade reaches full speed, slowly feed the blade into the work 
piece.   

After you complete your cut release the trigger and allow the blade to 
come to a complete stop. 

Plunge Cutting

1. Mark out the line to cut so it is easily visible.
2. Start inside the area to be cut.
3. Set the baseplate against the work piece at an angle.
4. Lift the lower blade guard with the handle.
5. Depress the lock-off button and press the switch trigger down to start the

saw.

10

Summary of Contents for CT18VCIRCSWA

Page 1: ......

Page 2: ...portant Safety Instructions for the Battery Pack 6 Symbols 6 Product Information 8 Layout 8 Technical Specifications 8 Battery Charger Technical Specifications 8 Charging Battery Pack 9 Circular Saw Operation 9 Assembling and Removing the Saw Blade 9 Adjusting the Cutting Depth 10 Adjusting the Bevel Cutting 10 Lock Off Button 10 Variable Speed Controlled Switch Trigger 11 General Cutting 11 Plung...

Page 3: ...ric shock 4 Do not abuse the cord Never use the cord to carry the tools or pull the plug from an outlet Keep cord away from heat oil sharp edges or moving parts Replace damaged cords immediately Damaged cords increase the risk of electric shock 5 When operating a power tool outdoors use an extension cord suitable for outdoor use Use of a cord suitable fir outdoor use reduces the risk of electric s...

Page 4: ...entive safety measures reduce risk of starting the tool accidentally 4 Store idle power tools out of the reach of children and other untrained persons Power tools are dangerous in the hands of untrained users 5 Maintain tools with care Check for misalignment or binding of moving parts breakage of parts and any other condition that may affect the power tool s operation If damaged have the power too...

Page 5: ...orming any inspection maintenance or cleaning procedures Such preventive safety measures reduce the risk of starting the tool accidentally which could cause serious personal injury Be extra careful when cutting in high or hard to reach locations Avoid sawing overhead Be on the lookout for hidden wires and falling debris Do not use the Cordless Circular Saw if it has been damaged left outdoors in t...

Page 6: ...d cautionary markings on battery charger battery pack and product using battery Use only the charger which accompanied your product or direct replacement Do not substitute any other charger Use only same supplier approved chargers with your product Do not disassemble charger or operate the charger if it has received a sharp blow been dropped or otherwise damaged in any way Incorrect reassembly may...

Page 7: ...al attention is needed the battery electrolyte is composed of a mixture of liquid organic carbonates and lithium salts Contents of opened battery cells may cause respiratory irritation Provide fresh air If symptoms persist seek medical attention Charge the battery packs only in the charger which accompanied your product DO NOT splash or immerse in water or other liquids This may cause premature ce...

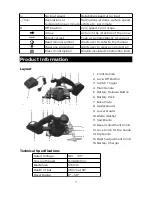
Page 8: ...r eye protection Class II contruction Double insulated construction tools Product Information Layout 1 Front Handle 2 Lock Off Button 3 Switch Trigger 4 Main Handle 5 Battery Release Button 6 Battery Pack 7 Base Plate 8 Upper Guard 9 Lower Guard 10 Blade Washer 11 Saw Blade 12 Bevel Adjustment Knob 13 Lock Knob for Rip Guide 14 Rip Guide 15 Depth Adjustment Knob 16 Battery Charger Technical Specif...

Page 9: ...ing charged 5 When the charging period is completed after approx 1 hour the green LED will illuminate and the red LED will extinguish Circular Saw Operation Always wear eye protection while operating this power tool Always remove battery pack before assembling and removing blade Failure to remove battery pack from saw could result in accidental starting causing possible serious personal injury A 5...

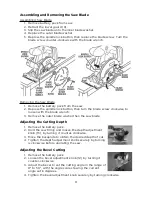
Page 10: ...de wrench 3 Remove the outer blade washer then the saw blade Adjusting the Cutting Depth 1 Remove the battery pack 2 Hold the saw firmly and loosen the depth adjustment knob 15 by turning it counter clockwise 3 Move the baseplate to obtain the desired depth of cut 4 Tighten the depth adjustment knob securely by turning is clockwise before operating the saw Adjusting the Bevel Cutting 1 Remove the ...

Page 11: ...ay from the work piece Never feed the blade into the work piece until the blade is at full speed If the blade is not at full speed the saw may kick back causing serious personal injury Put on eye protection Clear the saw of any foreign material Make sure the work piece is held securely in place Hold smaller pieces in a vice or attach to the workbench with clamps Mark out the line to be cut so it i...

Page 12: ... from vents and electrical contacts by blowing with compressed air Always wear safety goggles when cleaning tools with compressed air Keep tool handles clean dry and free of oil or grease Use only mild soap and a damp cloth to clean the tool keeping away from all electrical contacts Note Certain cleaning agents and solvents are harmful to plastics and other insulated parts Some of these include ga...

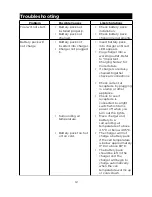
Page 13: ...g outlet Refer to Important Charging Notes for more details If chargers are daisy chained together check all connections Check current at receptacle by plugging in a lamp or other appliance Check to see if receptacle is connected to a light switch which turns power off when you turn out the lights Move charger and battery to a surrounding air temperature of above 4 5 C or below 40 5 C The charger ...

Reviews: