background image

10 


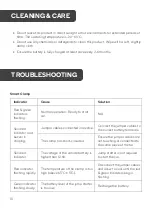
Do not leave this product in direct sunlight or hot environments for extended periods of 
time. The operating temperature is -20~60˚C. 


Do not use any chemicals or detergents to clean this product.  Wipe with a soft, slightly 
damp cloth. 


Ensure the battery is fully charged at least once every 3-6 months. 


Smart Clamp


Indicator 

Cause 

Solution 

Red & green 
indicators 
flashing. 

Normal operation.  Ready to start 
car. 

N/A 

Solid red 
indicator and 
buzzer is 
chirping. 

Jumper cables connected in reverse.  

Connect the jumper cables to 
the correct battery terminals. 

The clamp has short-circuited.  

Ensure the jumper cables are 
not touching or connected to 
the same piece of metal. 

Solid red 
indicator. 

The voltage of the vehicle battery is 
higher than 12.6V.   

Jump starter is not required 
to start the car. 

Red indicator 
flashing rapidly. 

The temperature of the clamp is too 
high (above 65˚C ± 5˚C).  

Disconnect the jumper cables 
and allow to cool until the red 
& green indicators begin 
flashing. 

Green indicator 
flashing slowly. 

The battery level of the jump starter 
is too low.   

Recharge the battery. 

       CLEANING & CARE 

       TROUBLESHOOTING 

Summary of Contents for CT3IN1JVCPA

Page 1: ...10 000mAh CAR JUMPSTARTER VACUUM POWERBANK CT3IN1JVCPA ...

Page 2: ...2 ...

Page 3: ...t a car when the battery capacity is below 50 Do not connect two clamps together when the jumper starter is powered on Do not connect both cable clamps to the same piece of metal If the vehicle s engine does not start on the first attempt disconnect it from the vehicle battery and wait at least 30 seconds before reconnecting Once the engine has successfully started disconnect the clamps within 30 ...

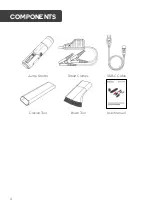
Page 4: ...4 Jump Starter Smart Clamps USB C Cable Crevice Tool Brush Tool User Manual COMPONENTS ...

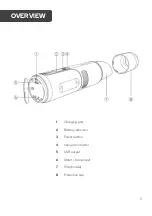
Page 5: ...5 1 Charging port 2 Battery indicator 3 Power button 4 Vacuum indicator 5 USB output 6 Smart clamp input 7 Filter inside 8 Protective cap OVERVIEW ...

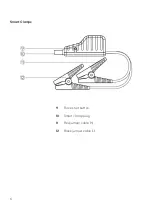
Page 6: ...6 Smart Clamps 9 Force start button 10 Smart clamp plug 11 Red jumper cable 12 Black jumper cable ...

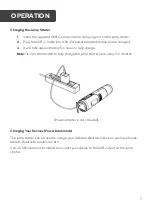
Page 7: ...imately 5 6 hours to fully charge Note It is recommended to fully charge the jump starter once every 3 6 months Power adapter is not included Charging Your Devices Power bank mode The jump starter can be used to charge your portable electronic devices such as phones tablets Bluetooth earphones etc Use a USB cable not included to connect your device to the USB output on the jump starter OPERATION ...

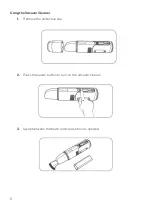
Page 8: ...8 Using the Vacuum Cleaner 1 Remove the protective cap 2 Press the power button to turn on the vacuum cleaner 3 Swap between the brush and crevice tool as needed ...

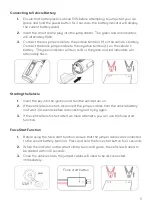
Page 9: ... will alternately flash Starting the Vehicle 1 Insert the key into the ignition and turn the vehicle turn on 2 If the vehicle fails to start disconnect the jumper cables from the vehicle battery and wait 30 seconds before reconnecting and trying again 3 If the vehicle fails to start after two more attempts you can use the force start function Force Start Function 1 Before using the force start fun...

Page 10: ...rping Jumper cables connected in reverse Connect the jumper cables to the correct battery terminals The clamp has short circuited Ensure the jumper cables are not touching or connected to the same piece of metal Solid red indicator The voltage of the vehicle battery is higher than 12 6V Jump starter is not required to start the car Red indicator flashing rapidly The temperature of the clamp is too...

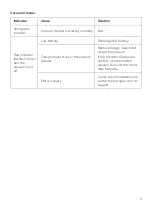
Page 11: ...s 3 times and the vacuum turns off Low battery Recharge the battery Foreign object stuck in the vacuum cleaner Remove foreign object and restart the vacuum If the indicator flashes red another 3 times and the vacuum turns off the motor may be faulty Motor is faulty Cease use immediately and contact help Kogan com for support ...

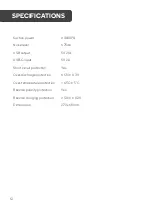
Page 12: ...SB output 5V 2 1A USB C input 5V 2A Short circuit protection Yes Over discharge protection 13V 0 3V Over temperature protection 65 C 5 C Reverse polarity protection Yes Reverse charging protection 12 6V 0 3V Dimensions 272 x 65mm SPECIFICATIONS ...

Page 13: ...13 NOTES ...

Page 14: ...14 ...

Page 15: ...15 ...

Page 16: ...ation We hope that this user guide has given you the assistance needed for a simple set up For the most up to date guide for your product as well as any additional assistance you may require head online to help kogan com ...

Reviews: