Base Unit
2019 Cervis, Inc.
3
1.1
Base Unit Installation
Caution
During installation, make sure the machine that the base unit will be attached to
is disabled.
Use the configuration diagrams supplied by Cervis, Inc. to guide you in mounting the base unit
and connecting your wiring harness cables. Base unit mounting is left much to your discretion
with the following guidelines:
Before installing, make sure that the configuration diagrams supplied with the system are
available. Keep them where they are available at all times.
Make sure the wiring harness cables are on hand.
Always mount the receiver away from any intense radio or electric disturbance sources.
Make sure the mount is secure. Mount the unit where you have enough room for your
wiring harness connections.
If exposed to rain or low-pressure water jets, Cervis, Inc. recommends installing the base
unit as shown, with the connectors down. Plus, a drip-loop formed with the cables is a
good-practice recommendation.
Caution
The base unit enclosure and connectors are NOT rated for high-pressure
washing. Doing so could damage the base unit or connectors.
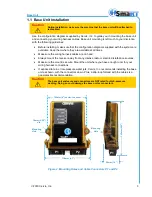
Figure 2. Mounting Holes and Cable Connectors P1 and P2
102mm (4") center-to-center
7.4mm (0.29")
dia.
P1
P2
Mounting
Hole
Mounting
Hole
P1
1
3
3
m
m
(
5
.2
5
"
)
36mm (1.4")
118mm (4.7")


