background image

Handheld Remotes Manual 

2013 Cervis, Inc. 


4.0 Battery Installation or Change 

SmaRT HH-xH06 handheld units are powered by three size AAA alkaline batteries. When 
installing batteries, be sure to observe proper polarity as marked on the inside of the 
compartment to avoid damaging the unit. To replace or install batteries in the handheld: 

1.  Remove the four small Phillips screws from the Battery Compartment cover and 

lift the cover from the handheld. 

2.  If installing batteries in an empty battery compartment, install three fresh size 

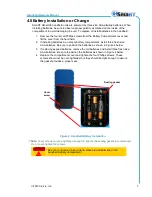
AAA batteries. Be sure to position the batteries as shown in Figure 4 below. 

3.  If replacing expired batteries, remove the old batteries and install three fresh size 

AAA batteries.  Be sure to position the batteries as shown in Figure 4 below. 

4.  Replace the compartment cover and tighten the four Phillips screws. These 

screws should not be over-tightened, but they should be tight enough to assure 
the gasket provides a proper seal. 


Figure 4. Handheld Battery Installation 

Note: Cover screws must be tightened enough to ensure the sealing gasket is compressed. 

Do not over-tighten the screws. 


Be sure to observe proper polarity when placing batteries in the 
handheld battery compartment. 


Sealing gasket 

Cover 
screw 

Summary of Contents for SmaRT DO-2H06

Page 1: ...2013 Cervis Inc HH xH06 Manual DN U076 0 4 SmaRT_HP 2 4 6_hhr...

Page 2: ...o the following two conditions 1 this device may not cause interference and 2 this device must accept any interference including interference that may cause undesired operation of the device Le pr sen...

Page 3: ...s For instance the SmaRT DO 206 handheld remote uses one button button 6 typical to both turn on the handheld remote and turn the units off OO On and Off Operation Where two buttons or buttons are use...

Page 4: ...n 11 7 0 Specifications 12 8 0 Spare Parts List 13 Appendix A HH x06 Product Variation List 14 Appendix B Exposure to Radio Frequency Energy 15 Appendix C Agency Identification Label Locations 15 List...

Page 5: ...perating Do not activate the remote control system until certain that it is safe to do so Turn off the handheld remote and remove power from the base unit before attempting any maintenance This will p...

Page 6: ...after which the handheld remote turns itself off to conserve power if no buttons are pushed The Cervis naming convention for SmaRT handheld remotes is indicative of unit details as shown in the Table...

Page 7: ...high impact polymer with a polycarbonate face plate securely sealed and attached by eight screws It is further protected by a removable rubber bumper that covers the back and sides of the unit extend...

Page 8: ...held remotes provide the advantage of more control when the handheld remote is powered ON and OFF A DO 206 for instance can have one of the six buttons Button 6 dedicated as an ON OFF toggle that when...

Page 9: ...ously press and hold the Associate B1 and Dissociate B2 buttons RX and ER light 4 Continue to hold both buttons until TX and RX light steady 5 When TX and RX light release B1 and B2 ER and BA light No...

Page 10: ...device 2 Stand near the base unit in unobstructed clear line of sight with the handheld in hand 3 Simultaneously press and hold the Associate B1 and Dissociate B2 buttons RX and ER light 4 Continue to...

Page 11: ...ee fresh size AAA batteries Be sure to position the batteries as shown in Figure 4 below 3 If replacing expired batteries remove the old batteries and install three fresh size AAA batteries Be sure to...

Page 12: ...d to base units as previously described Each button has an area adjacent to it in which you can use a pen or a marker to write an Identifier for the button Output buttons control a particular base uni...

Page 13: ...ON The OO handheld remote auto shutdown is set to four 4 minutes of button inactivity default To conserve battery power unless there is button activity within the four minute limit the OO handheld rem...

Page 14: ...hhr 10 Table 4 OO Button Output Assignments x 2 or 9 Applies to OO Type Pushbutton Output ON or OFF x06 x04 1 1 x06 x04 2 2 x06 x04 3 3 N A for x04 ON for x04 x06 x04 4 4 N A for x04 OFF for x04 x06 5...

Page 15: ...be sent or received the Amber BA LED will very briefly pulse once for approximately 1 25 seconds and the handheld remote will completely shut down Subsequent attempts to use the handheld results in im...

Page 16: ...ee Modulation DSSS Antenna Internal Enclosure Dimensions mm 136 38 x 68 96 x 28 42 Inches 5 37 x 2 68 x 0 92 Total Weight 200 gr 7 2 oz with lanyard Durability High Impact Polymer case Polycarbonate f...

Page 17: ...Parts List Table 6 Spare Parts List Item Cervis Bin Location Protective Rubber Bumper AA6 02 Lanyard AA8 01B Battery Cover with 4 Screws Call Cervis 724 741 9000 AAA 1 5V Alkaline Batteries pk 3 AA6...

Page 18: ...6567 900MHz 10mW ON OFF 2 Yes Belt Clip DO 9H06B 07116568 900MHz 10mW ON OFF 6 Yes Belt Clip DO 9H04B 07116569 900MHz 10mW ON OFF 4 Yes Belt Clip DO 9H02B 07116570 900MHz 10mW ON OFF 2 Yes Belt Clip P...

Page 19: ...osure to RF energy does not exceed the recommended guidelines always follow these instruction and precautions When using the handheld remote hold the remote so that the top buttons are away from the b...

Page 20: ...SmaRT HH xH06 U076 0 4 SmaRT_HP 2 4 6_hhr 16 Visit our Web site at www cervisinc com 2013 Cervis Inc All rights reserved Content is subject to change without notice...

Reviews: