background image

System Manual  

©

2019


Cervis, Inc. 

11 

2.7 

MU-9X15 Fuse Information 

Use Table 3 to find replacement fuse part numbers based on your system

’s rated input voltage 

rating.  

Table 3. MU-9X15 Fuse Identification 

Model 

Fuse Package  

Bank 1-4 Fuse P/N 

F01 Fuse P/N 

MU-9X15-HVA 

5x20 MM Glass 

0218005.HXP 

0217002.H 

MU-9X15-LVA 

5x20 MM Glass 

0218005.HXP 

0217002.H 

MU-9X15-LVD 

5x20 MM Glass 

0218005.HXP 

0217002.H 

2.8 

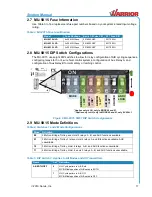
MU-9X15 DIP Switch Configurations 

The MU-9X15 uses eight DIP switches to allow for relay configuration of A/B cycling sequences, 
configuring relays for 3 or 4-wire hoist control systems, configuration of Aux Relay A, and 
configuration of Aux Relay B for momentary or latching control. 


Figure 8. MU-9X15 SW01 DIP Switch Assignments 

2.9 

MU-9X15 Mode Definitions 

Table 4. Switches 1 and 2 Mode Configurations 

Mode  Definition 

00 

3-Motion. Bridge, Trolley, and Hoist 3 relays. A, B, and AUX functions available. 

01 

3-Motion. Bridge, Trolley 3 relays, Hoist 4 relays. A and B functions available, AUX 
unavailable. 

10 

3-Motion. Bridge, Trolley, Hoist 4 relays. A, B, and AUX functions unavailable. 

11 

4-Motion. Bridge, Trolley, Hoist, 4

th

 axis 3 relays. A, B, and AUX functions unavailable. 


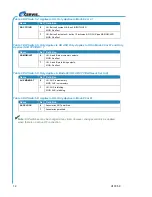
Table 5. DIP Switch 3: Applies to All Modes and All Transmitters 

Name 

Set  Definition 

AB BOTH/OFF 

0


HH: Cycle pattern is A, B, Both.  

MCB: Middle position of A/B switch is BOTH. 

1


HH: Cycle pattern is A, B, Off. 

MCB: Middle position of A/B switch is OFF. 

ASOC 

LOCK 

AUX 

MO

M


/ LAT


AB MO

M


/ LAT

**


A/B C

YC


/ IND*


MODE 

1


0


AB BO

T

H


/ O

F

F


UNUS

E

D


*Applies only to HH, only in MODE 00 and 01 
**Applies only to HH, only in MODE 00 and 01, only if SW4 = 1 

Summary of Contents for Warrior MU-9X15

Page 1: ...2019 Cervis Inc MU X15 System Manual U100 4 0...

Page 2: ...Sant Canada pour la population g n rale consulter le Code de s curit 6 disponible sur le site Web de Sant Canada https www canada ca en health canada services environmental workplace health reports pu...

Page 3: ...Handheld Remote HH2S 9XW10 14 3 1 HH2S 9XW10 Battery Installation 15 3 2 HH2S 9XW10 Battery Warning and Shutdown 16 4 0 Warrior MU X15 System Operation 17 4 1 System Startup 17 4 2 Associating a Handh...

Page 4: ...Control Cable Internal Wiring Description 25 List of Tables Table 1 MU 9X15 Diagnostic LEDs 7 Table 2 MU 9X15 Power Configurations 9 Table 3 MU 9X15 Fuse Identification 11 Table 4 Switches 1 and 2 Mo...

Page 5: ...ommunications technology Warrior Receiver Receiver mounted to the crane or machine Line of Sight aka Direct Line of Sight Term used to describe radio frequency RF communication where the pathway betwe...

Page 6: ...ntil certain that it is safe to do so Turn off the handheld remote and remove power from the machine unit before attempting any maintenance This prevents accidental operation of the controlled machine...

Page 7: ...ide variety of typical crane control applications Standard DIP Switch Set Configurations include 3 motion 2 speed control with A B Select configurations 3 motion 2 speed control with momentary or latc...

Page 8: ...he handheld memory so that it will not control any receiver The Warrior MU X15 HH2S 9XW10 has four LEDs that identify system status and provide diagnostics LEDs as shown in Figure 2 are Transmit Recei...

Page 9: ...ndent Horn Light relay two series relays that form the Main Line Contact MLC output and one Start relay The Start and MLC circuits share a common fused at 5 A Reference Appendix C for details regardin...

Page 10: ...1 The MU 9X15 has one internal LED indicator used for association and health status visible from outside the enclosure The strobe LED can be shut off for one hour by pressing the shutoff switch see th...

Page 11: ...nstallation to avoid injury Use the configuration diagrams supplied by Cervis Inc to guide you in mounting the receiver and connecting your wire harness Receiver mounting is left much to your discreti...

Page 12: ...U100 5 0 8 Figure 5 MU 9X15 Mounting Dimensions...

Page 13: ...ge Frequency MU 9X15 HVA High Voltage AC 115 230 Vrms 50 60 Hz MU 9X15 LVA Low Voltage AC 10 28 Vrms 50 60 Hz MU 9X15 LVD DC 7 36 V 2 5 MU 9X15 External Antenna The Warrior MU 9X15 comes with a 900 MH...

Page 14: ...X15 Cable and Field Wiring Note The control cable is individually marked on the insulation of each wire Negative VDC VDC should be connected directly to the power supply negative terminal Figure 7 MU...

Page 15: ...igure 8 MU 9X15 SW01 DIP Switch Assignments 2 9 MU 9X15 Mode Definitions Table 4 Switches 1 and 2 Mode Configurations Mode Definition 00 3 Motion Bridge Trolley and Hoist 3 relays A B and AUX function...

Page 16: ...inition AB MOM LAT 0 HH A and B are momentary outputs MCB No effect 1 HH A and B are latching outputs MCB No effect Table 8 DIP Switch 6 Only Applies in Mode 00 HH AB CYC IND Needs Set to 0 Name Set D...

Page 17: ...able 11 Table 10 Abbreviation Key Abbreviation Key BF Bridge Forward BR Bridge Reverse B2 Bridge Second Speed A Crane A Control TF Trolley Forward TR Trolley Reverse T2 Trolley Second Speed B Crane B...

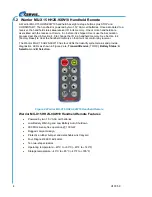
Page 18: ...ing to IEC 60529 The HH2S 9XW10 has four LEDs used for diagnostics that indicate wireless link transmit receive Battery and A B selection Figure 9 HH2S 9XW10 and LED Descriptions HH2S 9XW10 handheld r...

Page 19: ...the cover from the handheld The screws remain attached to the cover Make sure the compartment sealing gasket stays in place on the handheld 2 Install two fresh size AAA batteries Be sure to position...

Page 20: ...situation is present Replace them with two fresh AAA batteries as soon as possible The LED will flash at one second intervals until the batteries are changed or until the voltage level drops to 2 0 V...

Page 21: ...ver To unlock Association DIP Switch 8 must be changed from its default position 0 OFF to 1 ON Unlocking with the DIP switch unlocks association until DIP switch 8 changes back to the 0 OFF or LOCKED...

Page 22: ...e the B Select LED is active simultaneously press and release buttons A B and AUX 2 Handheld LEDs will begin cycling indicating the handheld is in maintenance mode 3 Simultaneously press and hold butt...

Page 23: ...System Manual 2019 Cervis Inc 19 indicating communication is established The selected receiver is stored in the handheld memory slot...

Page 24: ...held by pressing and releasing button 1 STOP 2 Within 1s of activating the handheld while only LED 4 is active simultaneously press and release buttons 9 and 10 The LEDs will start scrolling indicatin...

Page 25: ...sing Radio Frequency 906 924 MHz 100mW License No license required Modulation Channel Hopping DSSS Antenna External RP TNC Enclosure Dimensions mm 200 x 150 x 100 Inches 7 87 x 5 9 x 3 93 Weight 1 5 l...

Page 26: ...nse required Modulation Channel Hopping DSSS Antenna Internal Enclosure Dimensions mm 136 38 x 68 96 x 28 42 Inches 5 37 x 2 68 x 0 92 Weight 200 g 7 2 oz With lanyard or belt clip Durability High Imp...

Page 27: ...he torso Equipment containing the radio module was evaluated for RF exposure hazards by two approaches 1 Maximum Permissible Exposure MPE for mobile applications 2 Specific Absorption Rate SAR for por...

Page 28: ...r signal immediately causes the MLC path to open and all output relays to de energize If there is a software fault in the microprocessor the watchdog will not assert its enable output which will cause...

Page 29: ...System Manual 2019 Cervis Inc 25 Appendix D MU 9X15 Control Cable Internal Wiring Diagram Figure 14 MU 9X15 Control Cable Internal Wiring Description...

Page 30: ...connector to the receiver pigtail TS2L 2 pole Transfer Switch only Includes G4 02A 2 ea G4 02B TS 6P 1 Pre wired external Transfer Switch Assy up to 6 circuits Table 16 Aftermarket Support Spare Parts...

Page 31: ...System Manual 2019 Cervis Inc 27 Visit our Web site at www cervisinc com 2019 Cervis Inc All rights reserved Content is subject to change without notice...

Reviews: