background image


FRONT PANEL CONTROLS – CHANNEL CONTROL SECTION (continued) 


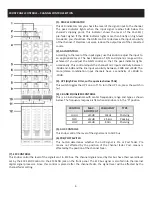
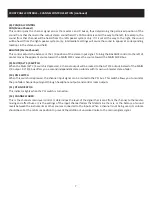
(8). PAN/BAL CONTROL 


PAN (Mono Channel) 


This control pans the channel signal across the master L and R buses, thus determining the perceived position of the 
sound from that channel in the output stereo sound field. If a PAN control is set all the way to the left, for example, the 
sound from that channel will be heard from the left speaker system only. If it is set all the way to the right, the sound 
will be heard from the right speaker system only. Intermediate settings will cause the sound to appear at corresponding 
locations in the stereo sound field.       

BALANCE (Stereo Channel) 


This control adjusts the balance or the L/R position of the stereo input signal. Turning the BALANCE control to the left of 
center moves the apparent source toward the MAIN MIX L moves the source toward the MAIN MIX R bus.   

(9). MUTE/ALT 3/4 SWITCH 


When the Mute/ALT 3/4 switch is depressed, a channel output will be routed to the ALT 3/4 output instead of the MAIN 
L/R output. ALT 3/4 bus offers you a second independent stereo sub mix with its own sub master stereo fader.   

(10). PFL SWITCH 


When this switch is depressed, the channel input signal can be routed to the PFL bus. This switch allows you to monitor 
the pre-fader channel input signal through headphone outputs and control room outputs. 


(11). PFL INDICATOR 


This indicator lights when the PFL switch is turned on.   

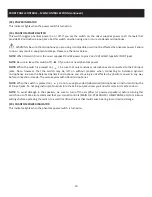
(12). CHANNEL FADER 


This is the channels main level control. It determines the level of the signal that is sent from the channel to the master 
mixing and effect buses. It is the settings of the input channel faders that determine the mix, or the balance of sound 
levels between the instruments or other sources connected to the inputs. When a channel is not being used, its volume 
should be set at the minimum position to prevent the addition of unwanted noise to the main program signal.   


Summary of Contents for CVM-1022

Page 1: ...C CVM 1224FXUSB CVM 1624FXUSB PROFESSIONAL AUDIO MIXER p 2 TABLE DE MIXAGE AUDIO PROFESSIONNELLE p 30 MESA DE MEZCLAS PROFESIONAL p 58 PROFESSIONELLEN AUDIO MIXER S 86...

Page 2: ...always use a soft dry cloth Unplug this product during lightning storms or when unused for long periods of time CAUTION The unit should be installed so that its location or position does not interfere...

Page 3: ...let 4 If the mains plug supplying this product incorporates a fuse then it should only be replaced with a fuse of identical or lower rupture value 5 Never use a damaged or frayed power cable this can...

Page 4: ...for a Class B digital device pursuant to Part 15 of the FCC Rules These limits are designed to provide reasonable protection against harmful interference in a residential installation This equipment g...

Page 5: ...B Main L R jack and XLR output and ALT 3 4 jack output 3 Band channel equalizer designed for 15 dB HF LF and 12 dB MF control on input channel Phantom power 48V switch for easy connection of condenser...

Page 6: ...input channels have a sensitivity of 20dB to 20dB 3 HPF High Pass Filter cut frequencies below 75Hz This switch toggles the HPF on or off To turn the HPF on press the switch in 4 3 BAND EQUALIZER CON...

Page 7: ...e MAIN MIX R bus 9 MUTE ALT 3 4 SWITCH When the Mute ALT 3 4 switch is depressed a channel output will be routed to the ALT 3 4 output instead of the MAIN L R output ALT 3 4 bus offers you a second in...

Page 8: ...ent from the internal digital effect to the AUX bus 4 VFX EFX ON OFF SWITCH This switch turns the internal digital effect on off 5 PFL SWITCH Set this switch on if you wish to output the effect signal...

Page 9: ...ing bus from the TAPE IN RCA jacks on the top panel 14 MASTER SEND Master AUX Control Adjust the level of the signal on the AUX bus to the corresponding AUX SEND jack Master EFX Control Adjust the lev...

Page 10: ...ondenser microphones are connected to the XLR input jacks Note however that the switch may be left on without problem when connecting to balanced dynamic microphones Be sure the balanced dynamic micro...

Page 11: ...een the head amplifier and the high pass filter These jacks allow you to use graphic equalizers compressors noise filters or other devices 3 CHANNEL INPUT JACKS These are unbalanced stereo line input...

Page 12: ...the digital effects ON and OFF 9 ALT 3 4 OUTPUT JACKS These are unbalanced 1 4 phone type output jacks which output the signals of the ALT 3 4 bus Use these jacks to connect to the input jack of a dig...

Page 13: ...PORT A standard Type A to Type B cable is required to connect the mixer to a computer or laptop The built in stereo USB audio interface allows you to record and playback from a desktop or laptop comp...

Page 14: ...increased in several ways The simplest is to click the loudspeaker icon in the system tray and adjust the slider volume level 4 Press Mixer in the volume slider window to open up the Volume Mixer win...

Page 15: ...ncreased in several ways The simplest is to click the loudspeaker icon in the system tray and drag the slider to the top A new window will appear showing a volume slider 4 To use the audio mixer as yo...

Page 16: ...elect USB Audio CODEC You may notice that the Volume slider sets itself to the full level This will allow you to have full range using audio mixer hardware input level controls 5 Next click in the Out...

Page 17: ...t is important to remember that all equipment which is connected to the mains is a potential source of hum and interference and may radiate both electrostatic and electromagnetic radiation In addition...

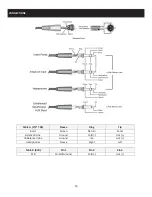
Page 18: ...IONS Table A 1 4 TRS Sleeve Ring Tip Insert Screen Return Send Balanced Line Ground Cold Hot Unbalanced Line Ground n a Hot Headphones Sleeve Right Left Table B XLR Pin 1 Pin 2 Pin 3 XLR Shield Ground...

Page 19: ...19 CONNECTIONS CONNECTOR AND CABLE CONFIGURATIONS...

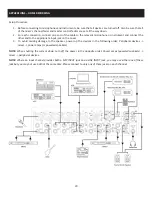
Page 20: ...the other end to the appropriate input jack on the mixer 3 To avoid causing damage to the speaker power up the devices in the following order Peripheral devices mixer power amps or powered speakers NO...

Page 21: ...21 APPLICATIONS LIVE PERFORMANCE...

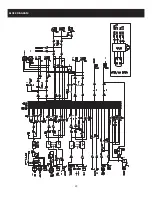
Page 22: ...22 BLOCK DIAGRAM...

Page 23: ...X REV 60dB LINE IN to CONTROL ROOM L R 44dB ST IN to MAIN L R 44dB ST IN to ALT 3 4 16dB AUX RETURN IN to MAIN L R 20dB TAPE IN to MAIN L R Crosstalk at 1kHz 70dB between input channels 70dB between i...

Page 24: ...Jack TRS T Out R In S GND Tape In 10 k 600 10 dBV RCA pin Jack OUTPUT Output Connector Output Impedance Nominal Impedance Rated Output Level Connector Type MAIN L R 75 10 k 4 dB Balanced Phone Jack A...

Page 25: ...or one of Gibson Pro Audio s Authorized Service Centers in the US will repair the defect s or replace the merchandise as it deems appropriate at its sole discretion Warranty Period from date of Purcha...

Page 26: ...horized dealer or upon which unauthorized repair or service has been performed GIBSON MAKES NO OTHER EXPRESS WARRANTY OF ANY KIND WHATSOEVER ALL IMPLIED WARRANTIES INCLUDING WARRANTIES OF MERCHANTABIL...

Page 27: ...ms liability for defects or damage caused by services performed by unauthorized persons or non warranty service not performed by Gibson or an Authorized Gibson Pro Audio Service Center When contacting...

Page 28: ...n electric musical instrument directly to the input of the DI Box mixing console rather than to an amplifier and loudspeaker which is covered by a microphone feeding the console direct output a post f...

Page 29: ...of phase signals result in cancellation polarity a term used to describe the orientation of the positive and negative poles of an audio connection Normally connections are made with positive to positi...

Page 30: ...les lois sur les droits d auteur Aucune partie de ce manuel ne peut tre copi e ou reproduite sous quelque forme que ce soit sans le consentement crit pr alable de CERWIN VEGA CERWIN VEGA ne peut tre...

Reviews: