background image

4


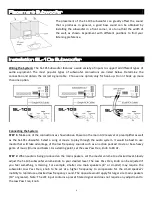
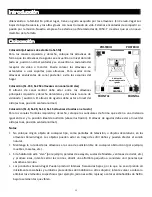
Placement Subwoofer


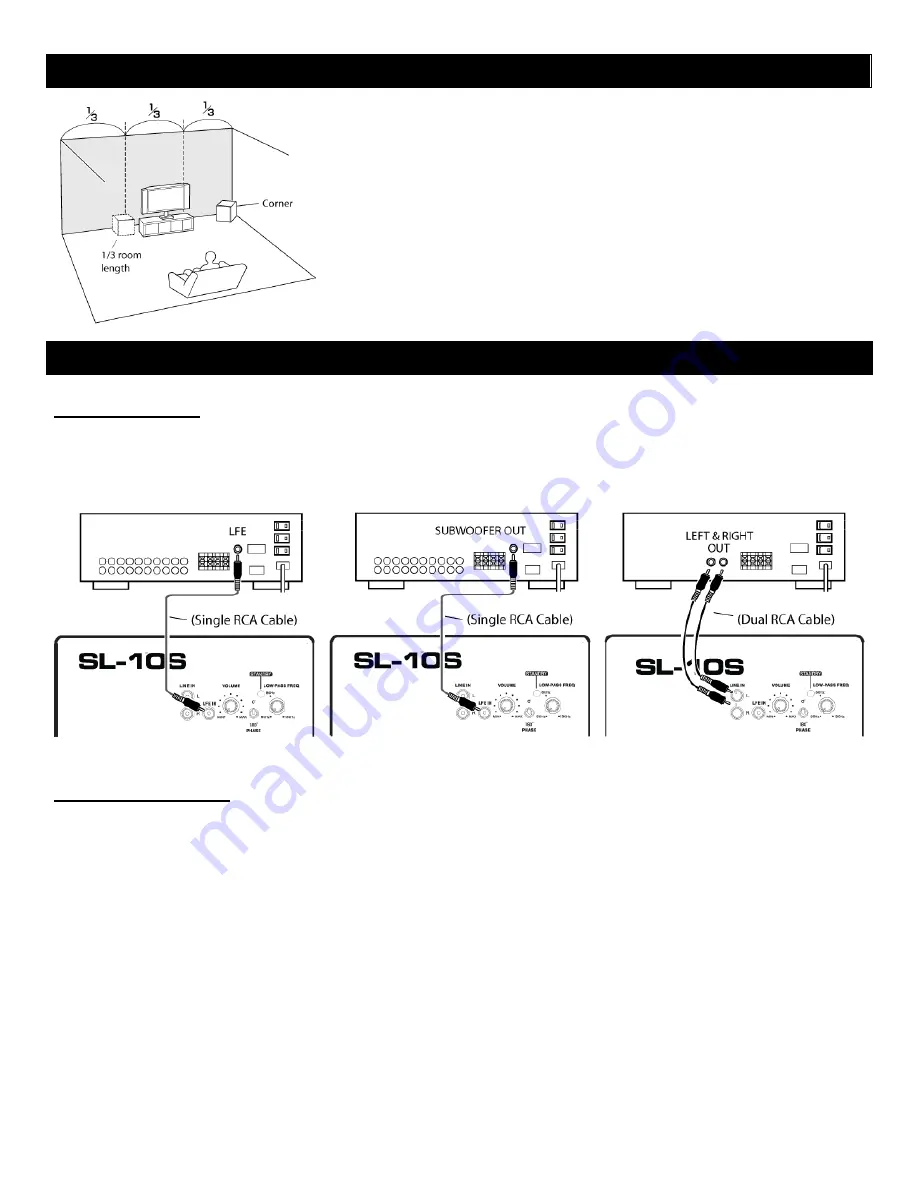
The  placement  of  the  SL-10S  subwoofer  can  greatly  affect  the  sound 
that  is  produces.  In  general,  a  good  bass  sound  can  be  obtained  by 
installing the subwoofer in a front corner, or at one-third the width of 
the  wall,  as  shown.  Experiment  with  different  positions  to  find  your 
listening preference. 


Installation SL-10s Subwoofer 


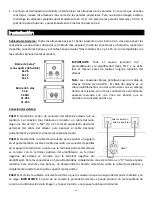
Wiring  the  System: 

The SL-10S Subwoofer features a wide variety of inputs to support all different types of 

audio  equipment.  The  most  popular  types  of  subwoofer  connections  are  listed  below.  Determine  the 
connection and obtain the correct signal cable.   Choose one option only for hook-up. Do not hook up more 
than one option. 


Connecting the System: 
STEP 1: 

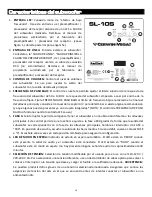
Make one of the connections as shown above. Power on the main A/V receiver or preamplifier as well 

as  the  SL-10S  subwoofer.  Select  a  song  or  movie  to play  through the  audio  system.  It  would  be best to use 
media  that  will  take  advantage  of  the  low-frequency  sounds  such  as  an  action  packed  movie  or  bass-heavy 
genre of music (drums and beats). As a starting point, set the Low Pass Freq. knob to 80 Hz

 
STEP 2: 

When audio is being produced on the main speakers, set the master volume to a desired level. Slowly 

adjust the SL-10S subwoofer volume knob to your desired level. The Low Pass Freq. knob can be adjusted if 
you  feel  something  is  missing.  For  example,  smaller  size  main  speakers  (8”  or  smaller)  may  require  the 
subwoofer  Low  Pass  Freq.  knob  to  be  set  at  a  higher  freqeuency  to  compensate  for  the  small  speaker’s 
inability to reproduce a desired low frequency sound. The opposite would apply for larger size main speakers 
(10” or greater). Note: The LFE input contains a preset fitered signal and does not require any adjustment to 
the Low Pass Freq. knob.


Summary of Contents for SL-10S

Page 1: ...OWNER S MANUAL GUIDE D UTILISATION MANUAL DE PROPIETARIO BEDIENUNGSANLEITUNG SL 5M SL 45C SL 25C SL 8 SL 28 SL 12 SL 15 SL 10S...

Page 2: ...quiring Service Unplug this product from the wall outlet and refer servicing to qualified service personnel under the following conditions a When the power supply cord or plug is damaged b If liquid h...

Page 3: ...o they are equal distance from each other and the ideal listening position see illustration The tweeter should be at ear level i e normal seated position Notes Do not place any objects of any type suc...

Page 4: ...common connection is using bare wire Strip 1 2 to 5 8 12 to 15mm of insulation from the ends of the speaker cable to expose the bare wire then twist the bare wires tightly STEP 2 Unscrew the binding...

Page 5: ...er or preamplifier as well as the SL 10S subwoofer Select a song or movie to play through the audio system It would be best to use media that will take advantage of the low frequency sounds such as an...

Page 6: ...akers Engage the PHASE switch to 180 At the listening position listen to the midbass output If it sounds weak set PHASE back to 0 Listen serveral times in each switched position to ensure the setting...

Page 7: ...To take the subwoofer out of the standby condition simply play audio to the input of the subwoofer LEVELS SOURCE Verify media source is playing For subwoofers you will need to make sure the media is c...

Page 8: ...entra ner une perte auditive 19 Dommage n cessitant une intervention D branchez l appareil de la prise secteur et le confier un technicien qualifi dans les conditions suivants a Lorsque le cordon d a...

Page 9: ...istance les unes des autres et de la position d coute id ale voir illustration Le tweeter doit tre au niveau des oreilles c d position de quelqu un assis Remarques Ne placez aucun objet tels que des c...

Page 10: ...nudez 12 15 mm 1 2 5 8 d isolant des extr mit s des c bles d enceinte pour exposer les conducteurs puis tordez les brins d nud s TAPE 2 D vissez le couvercle d une borne de connexion pour exposer le t...

Page 11: ...n film dans le syst me audio Il serait pr f rable d utiliser des sons o les graves sont bien pr sentes tels qu un film plein d action ou un genre de musique contenant des graves profondes batterie et...

Page 12: ...antes existent car certains peuvent d j tre quip s d un crossover int gr Remarque Le bouton FR QUENCE PASSE BAS ne fonctionne pas lorsque l entr e LFE est utilis e 5 PHASE Cet interrupteur vous permet...

Page 13: ...ISE DU CORDON D ALIMENTATION Branchez un cordon IEC dans cette prise fourni avec les subwoofers SL Si le cordon fourni ne correspond pas une prise de courant disponible achetez un cordon d alimentatio...

Page 14: ...subwoofer NIVEAUX ET SOURCES V rifiez que la source est en cours de lecture Pour les subwoofers vous devez vous assurer que les contenus sont compos s de sons de basse fr quence tels que tambours ryth...

Page 15: ...producto de la toma de pared y rem talo al personal del servicio t cnico cualificado bajo las siguientes condiciones a Cuando el cable de alimentaci n o enchufe presenten da os b En caso de que se ha...

Page 16: ...28 SL 12 SL 15 altavoces situados en el suelo Para los canales frontales izquierdo y derecho coloque los auriculares de forma que est n a una distancia igual entre s y la posici n ideal de audici n v...

Page 17: ...s conductores normalmente aparece marcado con una l nea de bandas que se considera la conexi n positiva Borne de 5 v as SL 8 SL 5M SL 45C SL 25C Conexi n del sistema PASO 1 Determine el tipo de conexi...

Page 18: ...o baja a 80 Hz PASO 2 Cuando se reproduzca audio en los altavoces principales fije el volumen maestro al nivel que desee Ajuste lentamente el bot n del volumen del subwoofer SL 10S al nivel que desee...

Page 19: ...que algunas pueden presentar ya una cruceta integrada NOTA El control de FRECUENCIA DE PASO BAJO no funciona cuando la entrada LFE se usa 5 FASE Este interruptor le permite compensar tener el subwoof...

Page 20: ...onible compre el cable CA correcto a su distribuidor de audio o en una tienda de suministros el ctricos FUSIBLE SUSTITUIBLE Protege el sistema de la sobrecarga con la calificaci n del fusible tal y co...

Page 21: ...ctividad Para sacar el subwoofer de la condici n de en espera simplemente reproduzca audio en la entrada del subwoofer NIVELES Y FUENTE Verifique la fuente multimedia que se est reproduciendo Para sub...

Page 22: ...in das Ger t ein da diese unter Hochspannung stehende Teile ber hren oder kurzschlie en k nnen wodurch es zu Feuer oder Stromschlag kommen kann Niemals Fl ssigkeiten irgendwelcher Art auf dem Ger t ve...

Page 23: ...s diese sich in gleichem Abstand voneinander befinden sowie in idealer H rposition siehe Abbildung Die Hochtonlautsprecher sollte sich auf Ohrh he befinden d h bei normal sitzender Position Notizen Le...

Page 24: ...lussmethode ist die Verwendung von Blankdr hten Isolieren Sie 1 2 bis 5 8 12 bis 15 mm der Isolation an den Enden des Lautsprecherkabels ab um den Blankdraht offen zu legen verdrillen Sie dann die Bla...

Page 25: ...r anfangs auf 80 Hz ein SCHRITT 2 Bei der Wiedergabe auf den Hauptlautsprechern stellen Sie die Hauptlautst rke auf das gew nschte Niveau ein Stellen Sie langsam den Sl 10S Subwoofer Lautst rkeregler...

Page 26: ...ellen ob es hierf r Empfehlungen gibt Einige sind eventuell bereits mit eingebautem Crossover ausgestattet HINWEIS NIEDRIGFREQUENZ Steuerung funktioniert nicht wenn der Tieftoneffektkanal LFE Eingang...

Page 27: ...enn das mitgelieferte Kabel nicht zu einem verf gbaren Wechselstromausgang passt kaufen Sie das richtige AC Kabel bei einem Audioh ndler oder in einem Elektrofachhandel AUSWECHSELBARE SICHERUNG Sch tz...

Page 28: ...ird nach 30 Minuten ohne Aktivit t aktiviert Um die Standby Funktion am Subwoofer auszuschalten spielen Sie einfach eine Audiowiedergabe als Eingang am Subwoofer ab EBENEN QUELLEN Pr fen Sie ob die Me...

Page 29: ...28 1 2 3 4 5 6 7 8 9 10 11 12 13 14 15 16 17 18 19 a b c d e f 20 21 10 KRK SYSTEMS...

Page 30: ...29 1953 SL 5M SL 45C SL 25C SL 8 SL 28 SL 12 SL 15 1 1 5 45 1 30 6 2...

Page 31: ...5 SL 12 SL 15 5 SL 28 SL 12 SL 15 A V OFF 16 AWG 5 SL 8 SL 5M SL 45C SL 25C 1 2 5 8 12 15 U 8 SL 45C 75 150 Watts SL 5M 30 60 Watts SL 8 35 75 Watts SL 28 75 150 Watts SL 12 75 150 Watts SL 15 100 200...

Page 32: ...31 SL 10S 1 3 SL 10s SL 10S A V SL 10S 80Hz SL 10S 8 10 LFE LFE RCA RCA RCA 1 3...

Page 33: ...32 1 1 2 RCA 3 4 50 130Hz A V 5 180 180 0 6 30 7 110 120V 220 240V 8 ON 30 OFF 9 IEC...

Page 34: ...33 A B A B SL 28 SL 12 SL 15 on IEC on 30 SL 10S SL 45C SL 25C SL 5M SL 8 SL 28 SL 12 SL 15 A V 80Hz...

Page 35: ...34...

Page 36: ...cted No part of this manual may be copied or reproduced in any form without prior written consent from GIBSON BRANDS INC GIBSON BRANDS INC shall not be liable for operational technical or editorial er...

Reviews: