background image

4 About CESeasy motor cylinders

4.1 About CESeasy motor cylinders

The CESeasy motor cylinder has been developed to grant access in a comfortable way. At the

same time, the smartphone or remote control are the keys. The digital keys required for this kind

of access are easily managed on the CESeasy web platform.

4.2 Scope of application

The CESeasy motor cylinder is suitable for doors with a lock with euro profile cylinders below the

handle set.

CESeasy products have not been developed, tested and/or approved for access to escape

and emergency routes. Do not use CESeasy products on fire doors or panic doors.

4.3 Notes about burglary protection

l

Use CESeasy products with break-in resistance together with a handle set.

l

To maintain the break-in resistance of a cylinder, it

must never project more then 3 mm

beyond the surface of the handle set

. Make sure to use the correct cylinder length for

your handle set.

CESeasy motor cylinder

Page 9 of 53

4   About CESeasy motor cylinders

Summary of Contents for 347100V

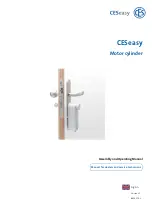
Page 1: ...CESeasy Motor cylinder Assembly and Operating Manual Manual for dealers and service technicians English Version VC BRO2275 2...

Page 2: ...r cylinders 9 4 1 About CESeasy motor cylinders 9 4 2 Scope of application 9 4 3 Notes about burglary protection 9 5 Mechanical cylinder for the motor cylinder 10 5 1 Before ordering Check cylinder le...
Page 3: ...platform 35 11 2 Extension functions 35 12 Operation 38 12 1 How to use it with the rotary knob 38 12 2 Operation with a mechanical key 39 12 3 How to use it with a remote control 39 12 4 Operation v...

Page 4: ...of this manual is shown on the cover page You can get the latest version free of charge from www ces eu 1 1 Design characteristics Refers to other documents Marks additional information and tips Mark...

Page 5: ...aused by deficient assembly l Damage caused by deficient maintenance l Damage caused by false operation l Damage caused by overvoltage l Damage caused by fire water or smoke All technical data and fea...

Page 6: ...constitute function related hazards for the user or third parties and may impair the handle set and other material assets Please observe all warnings and notices in this manual while assembling confi...

Page 7: ...atmosphere chlorine ammonia lime water l Do not use the device in areas with high dust formation l Do not use the device near heat sources Please observe the maximum permissible temperatures and the...

Page 8: ...ediately from the device Clean the contacts before inserting new batteries There is danger of injury from battery acid l Remove the empty batteries from the device l Please take note of the informatio...

Page 9: ...a lock with euro profile cylinders below the handle set CESeasy products have not been developed tested and or approved for access to escape and emergency routes Do not use CESeasy products on fire do...

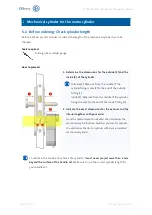
Page 10: ...Measure from the middle of the cylinder fixing screw 3 to the end of the inside fitting 2 2 Indicate the exact dimensions for the exterior and the interior together with your order From the measureme...

Page 11: ...ands the force exerted by the motor cylinder In order to offer break in resistance CESeasy motor units may only be combined with cylinders which have been pointed out as suitable by CES Tools required...
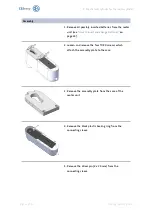
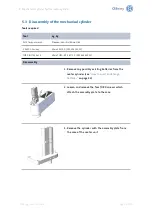
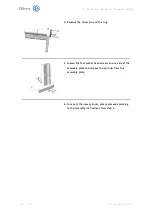
Page 12: ...ve the four TORX screws which attach the assembly plate to the case 3 Remove the assembly plate from the case of the motor unit 4 Remove the black plastic bearing ring from the connecting sleeve 5 Rem...

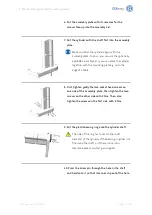
Page 13: ...cket head screws on one side of the assembly plate Then tighten the two screws on the other side with 2 Nm Then also tighten the screws on the first side with 2 Nm 9 Put the plastic bearing ring onto...

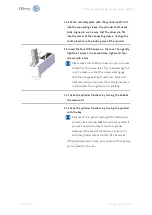
Page 14: ...e screws will engage with the already existing thread turn them anti clockwise until you can hear them falling into place in the thread Then tighten them carefully 13 Check the cylinder functions by t...

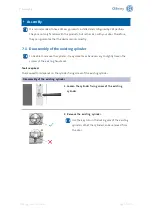
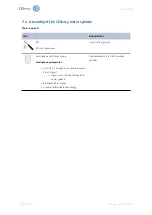
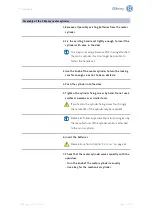
Page 15: ...867 1 Z 05066485001 Disassembly 1 Remove any possibly existing batteries from the motor cylinder see How to insert and change batteries on page 24 2 Loosen and remove the four TORX screws which attach...

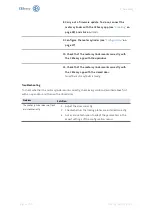
Page 16: ...screws on one side of the assembly plate and remove the cylinder from the assembly plate 6 To mount the new cylinder please proceed according to the assembly instructions from step 6 Page 16 of 53 CE...

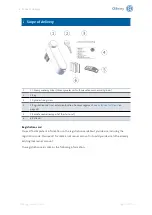
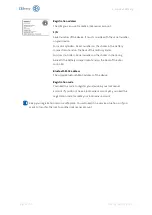
Page 17: ...page 35 5 1 Remote control only part of the starter set 6 6 Batteries Registration card You will find important information on the registration card about your device including the registration code...

Page 18: ...eath the battery compartment and on the back of the door controller Bluetooth MAC address The unique Bluetooth MAC address of the device Registration code You need this code to register your device in...

Page 19: ...emove the cylinder it may sometimes be necessary to slightly loosen the screws of the existing handle set Tools required The required tool depends on the cylinder fixing screw of the existing cylinder...

Page 20: ...crew Smartphone with CESeasy app Smartphone prerequisites l iOS iOS 9 2 or higher or Android Android 4 4 or higher l If you use an iPhone iPhone 4S or newer models l Bluetooth 4 0 or higher l suitable...

Page 21: ...ush the cylinder into the door 5 Tighten the cylinder fixing screw by hand Do not use a cordless screwdriver or similar tools If you fasten the cylinder fixing screw too strongly the service life of t...

Page 22: ...h the CESeasy app with the closed door Now the motor cylinder is ready Troubleshooting To check whether the motor cylinder works correctly check every solution described above first with an open door...

Page 23: ...ion If this function is used the motor cylinder automatically locks the door after it has been closed requires a door contact This function runs down the batteries more quickly l The opening times set...

Page 24: ...4 How to insert and change batteries Please refer to chapter Disposal on page 48 when changing the batteries Tools required You can manually remove the design screw of the battery compartment If the...

Page 25: ...partment downwards and remove it 3 If necessary take out the six empty batteries 4 Insert the six new batteries Please ensure that the batteries are inserted according to the labelling in the battery...

Page 26: ...r back onto the battery compartment 6 Tighten the design screw by hand The batteries are now inserted or have been changed 8 5 Battery disposal See Disposal on page 48 Page 26 of 53 CESeasy motor cyli...

Page 27: ...ther you are using an Android phone or iPhone and refers you to the correct app https ces qr1 at CESeasyApp Smartphone prerequisites l iOS iOS 9 2 or higher or Android Android 4 4 or higher l If you u...

Page 28: ...hone with CESeasy app Smartphone prerequisites l iOS iOS 9 2 or higher or Android Android 4 4 or higher l If you use an iPhone iPhone 4S or newer models l Bluetooth 4 0 or higher l suitable for Blueto...

Page 29: ...e smartphone 4 Open the CESeasy app on your smartphone 5 Make sure you are in the Locks menu of the app Click on the Scan button in the upper right corner In the menu options Update and Config you wil...

Page 30: ...first firmware update before configuring the device Otherwise your configuration will be overwritten by the first firmware update No subsequent firmware updates will overwrite your configuration 7 If...

Page 31: ...e you must have a remote control or the CESeasy app In an emergency this could lead to life threatening situations Before you activate the night locking mode be sure to note all requirements concernin...

Page 32: ...could damage both the motor cylinder and the lock irreversibly Only change the settings if you know exactly what you are doing Settings which have been changed in the expert menu are saved in the mot...

Page 33: ...device and communication module not connected The device is not coupled to a communication module connected Device is coupled to a communication module connected communication error Device is coupled...

Page 34: ...are Usually you do not notice the updating process 10 2 Manual firmware updates The following situations require a manual firmware update l The motor cylinder has been installed for the first time l T...

Page 35: ...ge your locks for 5 years on the web platform without any restrictions You can extend it for another five years by buying an additional Lock management function When Lock management has expired lock m...

Page 36: ...n allows you to issue keys not only to individuals but rather also to organisations The organisation which has received a key from you can pass it on to its employees This function is valid for five y...

Page 37: ...ven more if you buy this function several times If you manage several organisations with your organisation account these 100 additional employees are added only to the organisation you have selected w...

Page 38: ...omeone from turning the rotary knob of the motor cylinder from the outside through the mail slot The night locking mode is deactivated when the lock is opened by remote control or the CESeasy app To b...

Page 39: ...the functions assigned to the buttons of the remote control For details please refer to the manual for the CESeasy remote control Remote control range The remote control range depends on various fact...

Page 40: ...es l iOS iOS 9 2 or higher or Android Android 4 4 or higher l If you use an iPhone iPhone 4S or newer models l Bluetooth 4 0 or higher l suitable for Bluetooth Low Energy Location transmission To enab...

Page 41: ...emote controls and the communication module Bluetooth LE transceiver 2 4 GHz to communicate with mobile phones Encryption AES128 Memory capacity Number of digital keys 600 access group 1 access group...

Page 42: ...13 2 Dimensions 13 2 1 Case with a mechanical cylinder Page 42 of 53 CESeasy motor cylinder 13 Technical data...

Page 43: ...and thus automatically lock it The Automatic closure function increases the battery consumption You can use standard reed switches as door contacts To connect the door contact to the motor cylinder yo...

Page 44: ...contact cable into the intended port see image 4 Remove the lug in the cover of the battery compartment 5 Run the connecting cable through the recess into the motor cylinder see picture 6 Slide the co...

Page 45: ...the door contact onto the door frame opposite the door contact 9 Connect the connecting cable to the door contact If necessary you can shorten the connecting cable but you cannot extend it The door c...

Page 46: ...to connect the power supply unit Tools required Tool e g by 0 5 x 3 0 x 80 wrench Wera 335 5110001001 How to connect the power supply unit 1 Loosen the design screw by hand 2 Slide the cover of the ba...

Page 47: ...e battery compartment 6 Run the power cable through the recess into the motor cylinder see picture 7 Slide the cover back onto the battery compartment Make sure that the power cable runs into the cove...

Page 48: ...he contaminants contained in them can lead to health and environmental hazards In addition appropriate disposal allows recovery and re use of recyclable materials which is a substantial contribution t...

Page 49: ...cury Collection points for batteries and rechargeable batteries are identified by a variety of symbols Package Packaging of the components is made from environmentally friendly reusable materials In d...

Page 50: ...B Batteries Safety instructions 7 Battery consumption 23 Battery replacement 24 Building management extension function 36 C CESeasy app 27 CESeasy web platform 35 Configuration 27 Coupling 28 Couplin...

Page 51: ...3 E EU Declaration of conformity 6 Extension functions 35 F Firmware update 34 Functions extension functions 35 H High burglary protection 9 K Key mechanical 39 Key to organisation 36 L Lock managemen...

Page 52: ...e 38 O Organisation extension function 37 P Power supply unit 46 Connection 46 R Registration card 17 Remote control 39 Rotary knob 38 S Safety instructions 6 Scope of delivery 17 W Web platform 35 Pa...

Page 53: ...com CESfrance SARL 8 Impasse Charles Petit F 75011 Paris 33 1 44 87 07 56 33 1 43 07 35 78 infofr ces eu Austria C sar A C rcamo B ro Wiener Bundesstrasse 33 A 4050 Traun 43 660 73 20 311 43 732 21 0...

Reviews: