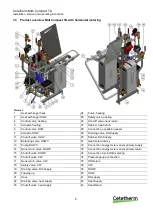
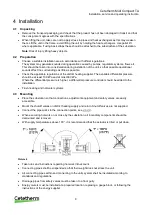
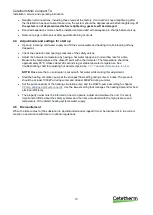
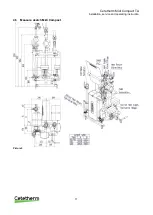
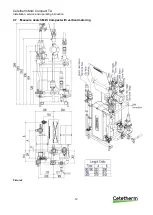
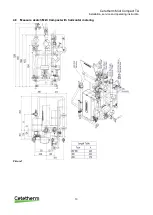
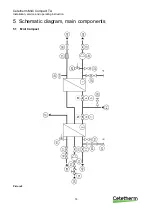
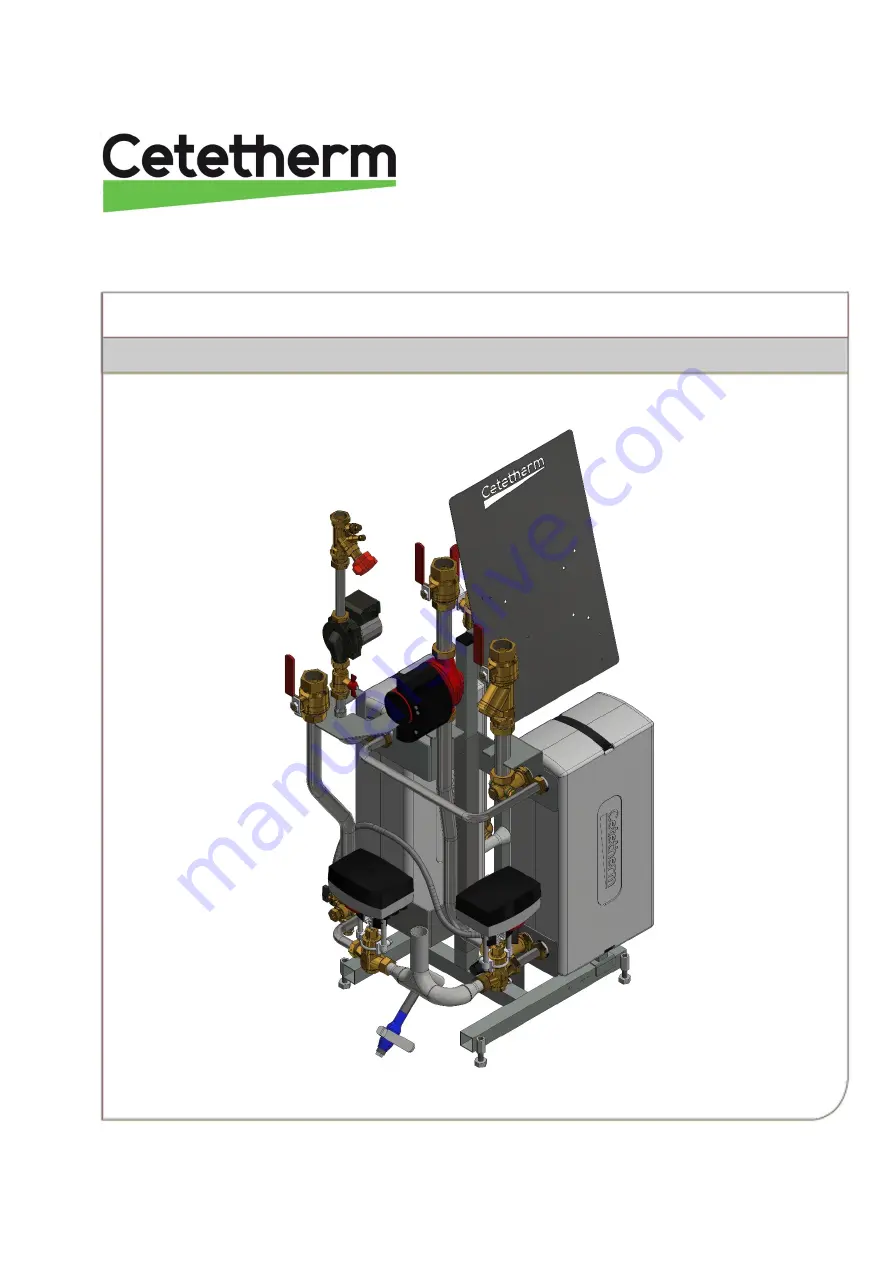
background image

DOC1314 Rev: 2020-06-01 

Installation, service and operating instruction Cetetherm Midi Compact TA DHWC 

Heating and domestic hot water substation for apartment houses (10-50 apts.) 

Summary of Contents for Midi Compact TA DHWC

Page 1: ...DOC1314 Rev 2020 06 01 Installation service and operating instruction Cetetherm Midi Compact TA DHWC Heating and domestic hot water substation for apartment houses 10 50 apts ...

Page 2: ...anual if it is necessary due to printing mistakes wrong information or changes in the hardware or software All these types of changes will be included in future release of the manual For additional on line information latest version of this manual please scan the qr code or use the link https www cetetherm com midicompact QR code ...

Page 3: ... pump Grundfos UPSO 15 55 capacity 17 6 3 Heating circuit pump Grundfos Magna3 25 100 settings and capacity 18 6 3 1 Heating circuit pump Grundfos Magna3 25 100 capacity 18 6 3 2 Grundfos Eye operating indications 18 7 Service instructions 19 7 1 Service instructions tap water 19 7 1 1 Tap water temperature too low 19 7 1 2 Tap water temperature too high 19 7 1 3 Hot water temperature unstable 19 ...

Page 4: ... hot water valve 28 9 7 Change the expansion vessel 28 10 Options 29 10 1 Actuator 29 10 2 4 point HB metering 29 11 Operation data and capacity 30 11 1 Operation data Midi Compact 80 30 11 2 Operation data Midi Compact 100 31 11 3 Operation data Midi Compact 160 32 11 4 Operation data Midi Compact 200 33 11 5 Technical data 33 ...

Page 5: ...lation this manual must be read Well planned pipe work make installation very simple The Midi Compact is designed to be placed on the floor 1 3 Long term security All the plates and pipes in the heat exchanger are made of acid resistant stainless steel for long life All components are adjusted together and undergo thorough function testing in accordance with ISO 9001 2015 quality assurance system ...

Page 6: ...ry Parts of the Midi Compact may get very hot and should not be touched Before the substation is connected to the electrical supply make sure that the secondary heating system is topped up with water Starting up the system without water will damage the circulation pump When starting up the district heating substation To avoid the risk of scalding make sure that no one draws any hot water until the...

Page 7: ...om pipes or components Weekly inspection to make sure that the operation of the heating and hot water control systems is stable and that the temperature does not fluctuate Temperature hunting causes unnecessary wear of valves actuators and heat exchangers Every three months check the safety valves and the pressure in the heating system To check the operation of a safety valve turn its wheel until ...

Page 8: ... 24 Pump heating 6 Control valve DHW 25 Safety valve heating 7 Actuator DHW 26 Shut off valve heat return 11 Shut off valve DHW 27 Strainer heat return 12 Balancing valve DHWC 28 Connection expansion vessel 13 Pump DHWC 29 Draining valve DH Supply 14 None return valve DHWC 37 DH Return 15 Shut off valve DHWC 38 CW 16 Shut off valve CW 39 DHWC 17 None return valve CW 40 DHW 18 Safety valve CW 41 DH...

Page 9: ...iner heat return 7 Actuator DHW 28 Connection expansion vessel 11 Shut off valve DHW 29 Draining valve DH Supply 12 Balancing valve DHWC 30 Strainer DH Supply 13 Pump DHWC 31 Heat meter dummy 14 None return valve DHWC 32 Connection energy meter sensor primary supply 15 Shut off valve DHWC 33 Connection energy meter sensor primary return 16 Shut off valve CW 37 DH Return 17 None return valve CW 38 ...

Page 10: ...HW 29 Draining valve DH Supply 11 Shut off valve DHW 30 Strainer DH Supply 12 Balancing valve DHWC 31 Heat meter dummy 13 Pump DHWC 32 Connection energy meter sensor primary supply 14 None return valve DHWC 33 Connection energy meter sensor primary return 15 Shut off valve DHWC 34 Connection 3 point HB metering 16 Shut off valve CW 35 Pressure gauge connection 17 None return valve CW 37 DH Return ...

Page 11: ...ing supplier The available differential pressure should be at least 100 kPa and at most 600 kPa Where the differential pressure is higher a differential pressure controller should be added to the installation Flush heating and hot water systems 4 3 Mounting Place the substation so that connections adjustment equipment and safety valves are easily accessible Mount the shutoff valves on district hea...

Page 12: ...emperature should be approximately 55 C It takes about 20 seconds to get stable tap water temperature See troubleshooting chart for adjusting hot water temperature 7 1 1 Tap water temperature too low NOTE Make sure that no cold water is mixed with hot water while making this adjustment Start the heating circulation pump at the strongest flow setting during some minutes The pressure should be at le...

Page 13: ...Cetetherm Midi Compact TA Installation service and operating instruction 11 4 6 Measure sketch Midi Compact Picture 5 ...

Page 14: ...Cetetherm Midi Compact TA Installation service and operating instruction 12 4 7 Measure sketch Midi Compact with vertical metering Picture 6 ...

Page 15: ...Cetetherm Midi Compact TA Installation service and operating instruction 13 4 8 Measure sketch Midi Compact with horizontal metering Picture 7 ...

Page 16: ...Cetetherm Midi Compact TA Installation service and operating instruction 14 5 Schematic diagram main components 5 1 Midi Compact Picture 8 ...

Page 17: ...Cetetherm Midi Compact TA Installation service and operating instruction 15 5 2 Midi Compact with vertical metering Picture 9 ...

Page 18: ...Cetetherm Midi Compact TA Installation service and operating instruction 16 5 3 Midi Compact with horizontal metering Picture 10 ...

Page 19: ...wo circulation pumps one for the hot water circulation DHWC pump and one for the heating circuit The DHWC pump is a traditional three speed circulation pump The DHWC pump has a switch where the speed capacity can be set The circulation pump for heating circuit is a pressure controlled pump 6 2 DHWC pump Grundfos UPSO 15 55 capacity Picture 11 Picture 12 ...

Page 20: ...y 6 3 2 Grundfos Eye operating indications Grundfos Eye Indication Cause No lights are on The power is off The pump is not running Two opposite green indicator lights running in the direction of rotation of the pump The power is on The pump is running Two opposite green indicator lights are permanently on The power is on The pump is not running One yellow indicator light running in the direction o...

Page 21: ...District heating strainer clogged See 9 1 Cleaning the district heating strainer Hot water valve and or actuator does not work See 8 1 Check the function of the hot water valve and actuator 7 1 2 Tap water temperature too high Reason Action Handle on control valve incorrectly positioned Adjust the handle on the control valve Adjust the tap water temperature by turning the handle clockwise for incr...

Page 22: ...the heating curve Heating circuit strainer clogged See 9 2 Clean the heating circuit strainer Heating valve and or actuator does not work See 8 2 Check the function of the heating actuator and valve 7 2 2 No heating Reason Action Circulation pump not running Check that the electrical power is on Check the heating parameters in operator control panel Air pockets in the substation or in the heating ...

Page 23: ... topping up Reason Action Leaks in the substation or in the system Check the substation and the system for leaks Leaks from the substation or the heating system cause pressure drop Contact your service technician if finding any leaks The heating system safety valve is leaking or does not work Check the heating system safety valve Check that the heating system safety valve is not leaking and that i...

Page 24: ...eration handle if you twist it a little forward and backwards when it is lowered a little 3 Try to operate the actuator manually by turning the handle Actuator opens the screw of the actuator moves against the red mark Actuator closes the screw of the actuator moves inwards against the blue mark When the actuator closes it pull the valve spindle in 4 Loosen the screws on the brace that holds the a...

Page 25: ... inwards against the blue mark When the actuator closes it pull the valve spindle in 4 Check the flow rate at the energy meter during break in of the valve If the system is lacking an energy meter disconnect the heating actuator from the valve 5 Loosen the screws on the brace that holds the actuator to the valve lift off the actuator Note The valve can be very hot Picture 15 6 Carefully press the ...

Page 26: ...start try starting it by removing the pump motor end nut and helping the pump with the aid of a screwdriver in the notch on the engine shaft 2 Use a short screwdriver If the pump is difficult to access disconnect the heating actuator 3 Connect the power supply to the pump and try to start again 8 4 Check the volume take up and pressure equalizing of the expansion vessel Check the expansion vessel ...

Page 27: ...icians can work with the district heating substation Incorrect operation may cause serious personal injury and result in damage to the building Before starting out repairs close the DH supply and DH return shutoff valves After finishing repair open the shutoff valves Start with DH supply and then the return line to avoid pollutions in the system Open the valves slowly to avoid pressure surges 1 Di...

Page 28: ...pply to the substation 9 3 Change the complete DHWC pump or pump components Maintenance and repairs must be carried out by an authorized service technician Before starting out repairs close the shutoff valves DH supply DH return cold water and hot water Note the setting of the balancing valve then close it Release the pressure using the DHWC safety valve After finishing repair fill up the hot wate...

Page 29: ...hen changing the complete pump release the brass nuts with a wrench and replace the pump Connect the pump cable b Only changing the pump head Loosen the screw in the clamp that holds the pump head and pump housing together Mount a new pump head fit and tighten the screw that holds the clamp to 8 Nm 1 Nm NOTE Do not retighten the screw if condensed water is dripping from the clamp 4 Fill up the hea...

Page 30: ...ways close the primary supply and return shutoff valves and drain the system After finishing repair open the shutoff valves Start with primary supply and then the return lines to avoid pollutions in the system Open the valves slowly to avoid pressure surges Do the same on the heating side open first heat return and then supply Fill up the system start the pump and vent 1 Unscrew the actuator from ...

Page 31: ...ating instruction 29 10 Options 10 1 Actuator With supply temperatures above 100 it is recommended that the actuator is tilted or closed down Picture 25 10 2 4 point HB metering Measure before and after filter together with before and after pump Picture 26 ...

Page 32: ...37 1 1 1 29 11 4 100 43 40 60 42 5 123 60 40 1 19L 1 20L 0 53 2 2 1 49 14 9 100 43 40 60 41 5 80 60 40 1 19L 1 20L 0 34 1 0 0 97 6 7 100 43 40 70 67 60 40 1 19L 1 20L 0 29 0 7 0 54 2 2 100 43 40 80 26 60 40 1 19L 1 20L 0 11 0 1 0 16 0 2 100 36 33 40 33 1 42 60 40 1 19L 1 20L 0 16 0 3 1 45 14 6 100 33 30 60 85 60 40 1 19L 1 20L 0 32 0 8 0 68 3 5 CB60 36L 2V Temperature program C DHW Capacity CB Pla...

Page 33: ... 50 1 24 L 1 25 L 0 65 2 2 1 81 15 0 100 43 40 60 41 5 100 60 50 1 24 L 1 25 L 0 43 1 0 1 21 7 0 100 43 40 70 87 60 50 1 24 L 1 25 L 0 38 0 8 0 70 2 5 100 43 40 80 33 60 50 1 24 L 1 25 L 0 14 0 1 0 20 0 3 100 36 33 40 33 1 52 60 50 1 24 L 1 25 L 0 19 0 3 1 79 15 0 100 33 30 60 109 60 50 1 24 L 1 25 L 0 41 0 9 0 88 3 9 100 33 30 60 32 8 100 60 50 1 24 L 1 25 L 0 37 0 8 0 80 3 3 CB60 36L 2V Temperat...

Page 34: ...1 40L 0 71 1 2 1 97 9 0 100 43 40 60 41 4 160 60 80 1 39L 1 40L 0 68 1 1 1 93 8 7 100 43 40 70 144 60 80 1 39L 1 40L 0 63 1 0 1 16 3 3 100 43 40 80 56 60 80 1 39L 1 40L 0 24 0 2 0 34 0 3 100 36 33 40 33 0 57 60 80 1 39L 1 40L 0 22 0 2 1 96 9 1 100 33 30 60 181 60 80 1 39L 1 40L 0 67 1 1 1 45 5 1 CB60 44L 2V Temperature program C DHW Capacity CB Plates Plates Plates Flow P dPp Flow S dPs kW type no...

Page 35: ...49L 1 50L 0 80 1 2 1 47 4 0 100 43 40 80 72 60 100 1 49L 1 50L 0 31 0 2 0 44 0 4 100 36 33 40 33 1 74 60 100 1 49L 1 50L 0 29 0 2 2 55 11 7 100 33 30 60 229 60 100 1 49L 1 50L 0 85 1 4 1 84 6 3 100 33 30 60 32 6 200 60 100 1 49L 1 50L 0 74 1 0 1 61 4 8 CB60 56L 2V Temperature program C DHW Capacity CB Plates Plates Plates Flow P dPp Flow S dPs kW type no primary secondary l s kPa l s kPa 80 23 10 ...

Page 36: ...Cetetherm AB Fridhemsvägen 15 372 38 Ronneby Sweden www cetetherm com ...

Reviews: