CHARTNAV 343
58
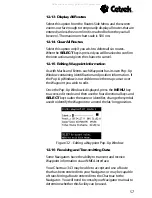
Figure 33 - Data Transfer Menu
Receive Data
Having entered a Route into your Navigator ensure the
Navigator is set up ready to transmit.
On the Chartnav access the Routes Menu and scroll down the
Side Menu to highlight TRANSFER ROUTE DATA, press
SELECT
and the Data Transfer Screen will be displayed.
RECEIVE DATA will already be highlighted on the Side Menu
so use the
and
keys to select the route number you
wish to store the data in. Once you have highlighted the
relevant route number press the
SELECT
key.
The Chartnav will confirm that it is awaiting the data and
gives the option of aborting the procedure, if required. The
data should now be transmitted by the Navigator and stored
in the appropriate Route.
If transferring data into an already used Route the
original Route will be lost.
Transmit Data
Access the Data Transfer Page as detailed above in Receive
Data. Use the
key to highlight the TRANSMIT DATA
option on the Side Menu. Ensure that your Navigator is set to
receive the data, then use the
and
keys to highlight
the route number you wish to send. Once this is selected
press the
SELECT
key. The Chartnav will then confirm that
the data has been transmitted.
All manuals and user guides at all-guides.com

