4 Operation Guide
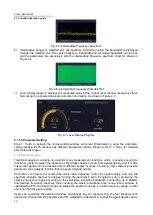
4.1 Function operation guide
39
3
Demodulation
bandwidth
8
Automatic frequency
switch
4
Demodulation mode
9
Signal description
5
Attenuator mode
4.1.4.1 Editing storage table
Step 1.
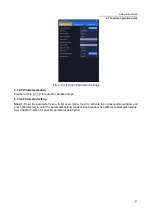
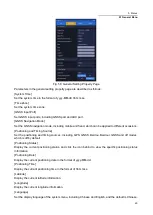
Select [System Menu], click list to enter the list menu, and select [Storage Table], as shown in
Fig. 4.12.
Step 2.
Edit the storage table:
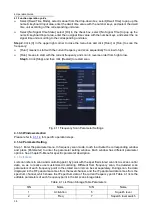
Click anywhere in the row where the serial number is located to select the row, and then perform the
following operations:
Click the corresponding [Activation] check box, and the activation status of this frequency point will
be activated after being checked.
Click the corresponding [Frequency] to pop up the numeric keyboard, enter the center frequency
value, and select the frequency unit according to the corresponding unit to complete the frequency
setting.
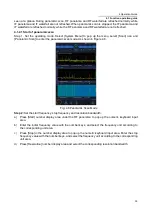
Click [Bandwidth [kHz]] at the bottom of the list to pop up the demodulation bandwidth drop-down
box and select the corresponding demodulation bandwidth.
Click [Demodulation Mode] at the bottom of the list to pop up the demodulation mode drop-down
box and select the corresponding demodulation mode.
Click [Attenuation Mode] at the bottom of the list to pop up the attenuator mode drop-down box and
select the corresponding attenuator mode.
Click [Squelch Switch] at the bottom of the list, click [Off] to turn off the squelch switch, and click [On]
to turn on the squelch switch.
Turn on [Squelch Switch] first, then click the input box of [Squelch Value [dBm]] to pop up the
numeric keypad, input the squelch level value, and select the squelch level unit according to the
corresponding unit to complete the modification of the squelch value.
Click [Automatic Frequency Control Switch] at the bottom of the list, click [Off] to turn off automatic
frequency control, and click [On] to turn on automatic frequency control.
Click the corresponding [Description] to pop up the character keyboard input area, and enter the
corresponding description.
Step 3.
Add new entries:
Select a blank line and click the corresponding [Frequency]. After entering the frequency, this line
will be automatically generated. Other parameters will be automatically set as default parameters,
which can be modified according to Step 2. After successful setting, a new blank line will be
automatically generated at the bottom.


