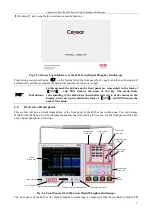
Chapter II About the 4456 Series Digital Phosphor Oscilloscope
4
Chapter II About the 4456 Series Digital Phosphor Oscilloscope
This chapter describes the 4456 series digital phosphor oscilloscope generally. You can get more familiar with the
instrument structure and its basic test functions by reading this chapter. In addition, Chapter III is about use of
oscilloscope vertical system; Chapter IV is about use of oscilloscope horizontal system; Chapter V is about use of
oscilloscope trigger system; Chapter VI is about use of oscilloscope measurement system; Chapter VII is about
mathematic operation function of oscilloscope; Chapter VIII is about use of oscilloscope display system; Chapter
IX is about storage, recall and reference of oscilloscope; Chapter X is about oscilloscope system setup; Chapter XI
is about use of protocol trigger and analysis options; Chapter XII is about use of limit/mask test options;Chapter
XIII is about use of power measurement and analysis options; Chapter XIV is about use of logic analyzer options;
Chapter XV is about use of waveform generator options; Chapter XVI is about use of oscilloscope probe; Chapter
XVII is about function of digital voltmeter; Chapter XVIII is about basic principles of digital phosphor
oscilloscope; Chapter XIX is about application examples of digital phosphor oscilloscope, and Chapter XX is
about fault detection and troubleshooting of digital phosphor oscilloscope.
2.1
Power on
Before powering on the 4456 series digital phosphor oscilloscope, please check the power supply unit according
to the
“
Power supply requirements
”
in Chapter I. Power on the digital oscilloscope after confirming that power
supply is correct.
Instructions:
The safety of digital oscilloscope conforms to the requirements of
GJB3947A-2009: The effective AC rating is 1.5k v, 1 min, 10 mA, with no
flashover or breakdown; input voltage AC is 242 V, and leakage current is
≤
3.5
mA. Therefore, the operation and maintenance of the oscilloscope according to
the specified operation regulations will not cause personal hazard or injury or
cause any damage to the DUTs.
Press down the power button on the rear panel of the 4456 series digital phosphor oscilloscope, and the poweron
indicator lamp on the front panel of the oscilloscope will turn yellow. Press down the power button
【
】
on the
bottom left of the front panel of the 4456 series digital phosphor oscilloscope for about 2 s, and the poweron
indicator lamp on the front panel of the oscilloscope will turn green, and the oscilloscope will enter the poweron
login interface, as shown in 0.
Fig. 2.1 Poweron Interface of the 4456 Series Digital Phosphor Oscilloscope
The 4456 series oscilloscope will take about 40 s to start the system and perform a series of self-check programs,
and then enter the main program initialization interface, displaying
“
Initializing
„
, please wait
”
, as shown in 0.
After the main program starts, it will enter the oscilloscope interface automatically. Press down
【
Bus
】
key to
enable the protocol analyzer function, and press down
【
Meter
】
key to enable functions of the digital voltmeter
and hardware frequency meter. Press down
【
Digital
】
key to enable the logic analyzer function. Press down
Summary of Contents for 4456 Series
Page 10: ...VIII...
Page 55: ...Chapter V Trigger System 45 Fig 5 51 RF Test Signal Example...
Page 69: ...Chapter VII Mathematical Operation 59 Fig 7 10 Advanced Math Example...
Page 71: ...Chapter VIII Display System 61 Fig 8 3 Wfm Palette Menu Fig 8 4 Normal Palette...
Page 72: ...Chapter VIII Display System 62 Fig 8 5 Inverted Palette Fig 8 6 Temperature Palette...
Page 75: ...Chapter VIII Display System 65 Fig 8 12 XY Display Example...
Page 165: ...Chapter XI Protocol Analyzer Option 155 Fig 11 242 1553 Trigger and Analysis Example...


