Chapter XIX Application Examples
235
If you want to observe the transmission of signals on the LIN bus, you can follow these steps below:
1)
Connect the signal of the LIN bus to channel 1 and click the channel control key on the front panel to open
channel 1;
2)
Press the
【
Bus
】
key in the Function Area on the front panel to pop up the bus setup menu on the lower
screen. Click the menu key [Bus] on the menu to pop up the bus type selection menu on the right side of the
screen. Click the menu key [LIN], select the LIN bus type, and switch to the LIN bus setup menu at the
bottom of the screen;
3)
Click the menu key [Bus Switch] at the bottom of the screen to turn on the bus decoding function;
4)
Click the menu key [Define Inputs] to pop up the LIN input setup menu on the right side of the screen. Click
the menu key [LIN Inputs] to pop up the Level3 Menu of LIN input selection on the left side of the menu.
Select the channel 1 by turning the Multipurpose b and then pressing the Multipurpose b to confirm Select, or
by directly clicking the channel 1 in the Level3 Menu on the screen. The selected channel is displayed in the
channel selection menu of the right menu;
5)
Click the menu key [Sample Point] and turn the Multipurpose b to change the position of the sample point.
The sample point can be set to 70%;
6)
Click the menu key [Polarity] to pop up the Level3 Menu of polarity setting on the left side of the menu.
Select the Polarity Normal option by turning the Multipurpose b and then pressing the Multipurpose b to
confirm Select, or by directly clicking the Polarity Normal option on the screen. The selected polarity is
displayed on the right polarity selection menu;
7)
Click the menu key [Thresholds] to pop up the LIN channel threshold setup menu on the right side of the
screen. Click the menu key [LIN (Channel)] and turn the Multipurpose b to set the threshold of LIN input
channel, or click the menu key [Choose Preset] to pop up the Level3 Menu of the preset type selection on the
left side of the menu;
8)
Click the menu key [Configure] to pop up the LIN Configure setup menu on the right side of the screen.
Click the menu key [Bit Rate] and turn the Multipurpose b to set the bit rate of LIN bus to 19200bps, or click
the menu key [Bit Rate Choose Preset] to pop up the bit rate preset type selection menu on the left side of the
menu and turn the Multipurpose b to select 19.2kbps and then press the Multipurpose b to confirm Select or
directly click the preset bit rate 19.2kbps for selection in the Level3 Menu on the screen;
9)
Click the menu key [Configure] to pop up the LIN Configure setup menu on the right side of the screen.
Click the menu key [LIN Standard] to pop up the LIN Standard setup menu on the left side of the menu.
Select the corresponding Both by turning the Multipurpose b and then pressing the Multipurpose b to confirm
Select, or by directly clicking the standard type of Both on the screen;
10) Click the menu key [Configure] to pop up the LIN Configure setup menu on the right side of the screen and
click the menu key [Id With Parity] to set Yes or No;
11) Click the menu key [Bus Display] to pop up the CAN bus display setup menu on the right side of the screen,
click the menu key [Display] to pop up the Level3 Menu of the bus display mode setting on the left side of
the menu, turn the Multipurpose b to select the bus and waveform display mode and then press the
Multipurpose b to confirm Select, or set by clicking the Bus and Waveforms option in the Level3 Menu; click
the menu key [Number Format] to pop up the Level3 Menu of the number format setting on the left side of
the menu, turn the Multipurpose b to select Hex and then press the Multipurpose b to confirm Select, or set
by clicking the Hex option in the Level3 Menu; click the menu key [Bus Offset] and turn the Multipurpose b
to change the position of the bus in the vertical direction of the display area; click the menu key [Waveforms
Offset] and turn the Multipurpose b to change the position of the digital waveform in the vertical direction of
the display area;
12) Press the
【
Trigger
】
key in the Function Area on the front panel to pop up the trigger setup menu on the
lower screen, click the menu key [Type] to pop up the trigger type selection menu on the right side of the
screen: click the menu key [Bus] to select the protocol trigger type and switch to the protocol trigger setup
menu at the bottom of the screen;
13) Click the menu key [Trigger On] at the bottom of the screen to pop up the LIN Trigger type setup menu on
the right side of the screen, and click the menu key [Sync] to set the LIN Trigger type to Sync.
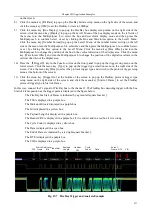
In this way, connect the signal of LIN bus to the channel 1. The LIN bus decoding trigger with the bus Frame
Sync position as the trigger point is displayed in the figure below:
Summary of Contents for 4456 Series
Page 10: ...VIII...
Page 55: ...Chapter V Trigger System 45 Fig 5 51 RF Test Signal Example...
Page 69: ...Chapter VII Mathematical Operation 59 Fig 7 10 Advanced Math Example...
Page 71: ...Chapter VIII Display System 61 Fig 8 3 Wfm Palette Menu Fig 8 4 Normal Palette...
Page 72: ...Chapter VIII Display System 62 Fig 8 5 Inverted Palette Fig 8 6 Temperature Palette...
Page 75: ...Chapter VIII Display System 65 Fig 8 12 XY Display Example...
Page 165: ...Chapter XI Protocol Analyzer Option 155 Fig 11 242 1553 Trigger and Analysis Example...

