25
b
)
After the above steps are completed, perform the discharge correction.
5.5 Cleaning of Objective Lens
If the microscope objective lens is dirty, the normal observation of the fiber core position may be affected,
which may lead to the higher fusion loss or poor connection. Therefore, both objective lenses shall be
cleaned regularly. Otherwise dust will accumulate and eventually cannot be removed. Clean the
objective lens according to the following steps:
a
)
Before cleaning the objective lens, turn off the power.
b
)
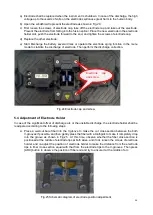
As shown in Fig.26, clean the objective lens with a fine cotton swab moistened with alcohol.
Wipe the lens with a cotton swab from the middle of lens and along the circular trajectory until
the edge of lens is wiped. Then wipe off the remaining alcohol with a clean, dry cotton swab.
c
)
Turn on the power and make sure that the monitor is free of dust or streak.
Fig. 26 Cleaning of objective lens
5.6 Propelling Distance Correction
Place the fiber with well-prepared cross-
section into the fusion splicer, select the “Propelling Distance
Correction” item in the motor menu and press "Enter" button. Press this button again to start the
propulsion test. The process is as follows:
a
)
Fusion splicer automatically pushes the fiber to the center of screen and sets the gap;
b
)
Fusion splicer automatically withdraws the left fiber and propels the right fiber according to the
"o gap" value;
c
)
After the propulsion, fusion splicer automatically calculates and displays the propelling distance
which shall be close to the set value of fusion parameter.
d
)
Based on the calculated propelling distance, fusion splicer automatically determines whether
the propelling distance is appropriate. If not, fusion splicer automatically changes the fusion
overlap parameter, and then repeat the following steps a), b) and c) until the propelling distance
is successfully corrected.
Note: The propelling distance correction is used to optimize the propelling distance. Generally,


