background image

CFI EXTEL  VisioSmart - 04/2017

GB1

CFI EXTEL  VisioSmart - 04/2017

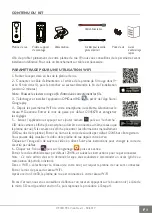
CONTENTS OF THE KIT


To take full advantage of your IP intercom panel, we advise that you set it up before permanently 

installing it. Connecting it on the table is therefore necessary.

SETTINGS FOR WIFI USE
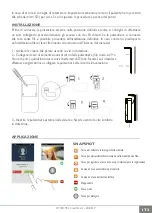
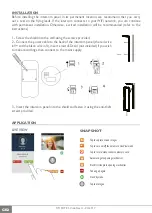
1- Remove the cover screwed into the bottom of the intercom panel. 
2 - Connect the power cable to the back of the intercom panel (the red wire in 

V+ and the black wire in V-), then connect it to the mains. Wait for initialisation to 

fi nish (approximately 2 minutes)
Note: Push the orange levers to correctly introduce the wires.
3 - Download and install the OMGuard HD application 

 from the App Store/

Google play. 
4 - From the WiFi settings on your smartphone or tablet, select the HD-xxxxxx 

network. Enter the default password 12345678 and save the settings 
5 - Launch the application and press add camera 

 then "search". The camera 

ID is displayed (the smartphone must be connected to the same network as the 

intercom panel). If the camera is not displayed, enter the information manually 

(DID at the back of the intercom panel). Enter a name and default security code 

123456 and „Enregistrer“ (Save). 

You can now view the intercom video from your screen.

Click on the image to monitor the live video. Follow the instructions to change the default security 

code.

6 - Click on the 

 icon then on the gear 

 then on next. 

Enter the default administrator code 123456 and follow the instructions to customise it. 
Note: This admin code will be requested when you wish to gain access (strike plate or gate motor) remotely.

In "WiFi", select the network (your box) to which your intercom panel will be connected. Enter the 

WiFi network password. 

After approximately 1 minute 30 seconds, the intercom is connected to your WiFi network.

If there is an error, we recommend that you reset it by pressing the black button (beside the micro 

SD card) for approximately 5 seconds, then repeat the procedure to step 4.

Intercom panel

Mounting 

bracket shield

Power supply

Pack of 

screws

Power cable 


3 cables for buzzer, 

strike plate and gate

Quick 

start-up 

guide 

Summary of Contents for 720303

Page 1: ...ile a colori all indirizzo ltima versi n de las instrucciones descargables en color en ltima vers o do manual para download a cores em The latest version of the instructions in colour is downloadable...

Page 2: ......

Page 3: ...platine de rue Si la cam ra ne s affiche pas entrer les informations manuellement DID au dos de la platine Entrer un nom et le code de s curit par d faut 123456 et Enregistrer Vous pouvez d j visuali...

Page 4: ...rnis 2 Connecter le c ble d alimentation l arri re de la platine le fil rouge dans V et le fil noir dans V ins rer une carte microSD non fournie si vous souhaitez faire des enregistrements puis branch...

Page 5: ...ers la pr sence d un personnel qualifi est n cessaire pour contr ler le fonctionnement des appareils lectroniques Veuillez contacter une personne exp riment e au cas o vous auriez des doutes au sujet...

Page 6: ...della telecamera necessario che lo smartphone tablet sia connesso alla stessa rete a cui connessa la pulsantiera esterna Se la telecamera non compare digitare manualmente le informazioni richieste v D...

Page 7: ...mento alle istruzioni all interno del manuale 1 Avvitare la visiera alla parete usando le viti in dotazione 2 Collegare il cavo di alimentazione sul retro della pulsantiera filo rosso suV e filo nero...

Page 8: ...teria di impianti elettrici Nelle scuole nelle strutture formative nei laboratori ecc la presenza di personale qualificato necessaria per controllare il funzionamento degli apparecchi elettronici In c...

Page 9: ...que la placa externa Si la c mara no aparece introducir la informaci n manualmente DID en la parte trasera de la placa Introducir un nombre y el c digo de seguridad predeterminado 123456 y Enregistre...

Page 10: ...ar el cable de alimentaci n en la parte trasera de la placa el cable rojo a V y el cable negro a V introducir una tarjeta microSD no suministrada si desea grabar y despu s conectar la alimentaci n el...

Page 11: ...s En las escuelas los equipos de formaci n talleres se requiere la presencia de personal cualificado para el control del funcionamiento de los aparatos electr nicos P ngase en contacto con una persona...

Page 12: ...rua Se a c mara n o aparecer introduza as informa es manualmente DID na parte posterior do painel Introduza um nome e o c digo de seguran a predefinido 123456 e prima Enregistrer Guardar Poder deste e...

Page 13: ...enta o na parte posterior da placa o fio vermelho no polo V e o fio preto no polo V introduza um cart o microSD N o inclu do se desejar fazer grava es e em seguida ligue a fonte de alimenta o rede el...

Page 14: ...ipamentos de forma o o cinas a presen a de um pessoal quali cado necess ria para controlar o funcionamento dos aparelhos eletr nicos Contacte uma pessoa experiente se tiver d vidas acerca do modo de f...

Page 15: ...o the same network as the intercom panel If the camera is not displayed enter the information manually DID at the back of the intercom panel Enter a name and default security code 123456 and Enregistr...

Page 16: ...crews provided 2 Connect the power cable to the back of the intercom panel the red wire inV and the black wire inV insert a microSDcard not included if you wish to make recordings then connect to the...

Page 17: ...s In schools training infrastructures workshops the presence of qualified staff is required to check the operation of electronic devices Please contact an experienced person if you have doubts as to t...

Page 18: ...op hetzelfde netwerk zijn aangesloten als de straatunit Als de camera niet wordt weergegeven voert u de informatie handmatig in DID op de achterkant van de unit Voer een naam en de standaard beveiligi...

Page 19: ...erde schroeven 2 Sluit de voedingskabel aan op de achterkant van de unit de rode draad in V en de zwarte draad inV voer een SD microkaart in niet meegeleverd als u opnames wilt maken en sluit de voedi...

Page 20: ...de regels ter preventie van ongevallen na voor elektrische installaties In scholen cursussen workshops enz is er bevoegd personeel nodig om de werking van de elektronische apparatuur te controleren N...

Page 21: ...tz verbunden sein wie die T rsprechanlage Wenn die Kamera nicht angezeigt wird die Informationen manuell eingeben DID auf der R ckseite des Ger ts Einen Namen und den voreingestellten Sicherheitscode...

Page 22: ...otes Kabel in V und schwarzes Kabel in V falls Sie Aufnahmen speichern m chten eine microSD Karte nicht geliefert einsetzen und dann an die Stromversorgung anschlie en 3 Die T rsprechanlage in der Wan...

Page 23: ...ngehalten werden In Schulen Ausbildungsst tten Werkst tten etc muss qualifiziertes Personal anwesend sein um die Funktion der elektronischen Ger te zu berwachen Bitte wenden Sie sich an eine erfahrene...

Page 24: ...otice int grale t l charger sur Istruzioni integrale a trasferire su Instrucciones ntegro a cargar a distancia sobre Manual integral download sobre Integral manual to download on Volledige korte kleur...

Reviews: