show the total number of folder or MP3/MP4 files being detected.
6.
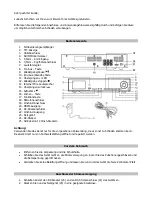
Press the Skip Up
/ Down
(11,14) button to select your file would like to playback.
7.
Press the Play/Pause
(9) button to confirm the selecting.
8.
Press the Skip Up
/ Down
(11,14) button to select the playing channel(HDMI or RCA).
9.
Press the Play/Pause
(9) button to confirm the playing channel then the unit will start to play your
Video/Audio through the TV and the main unit as well.
Remark : -- during operating the unit, every time press Play (9) button is confirm, press Stop
(12) button is quit except further explanation.
Noted :
- Due to system limitation, there was no sound output from the main unit when select the playing channel
at HDMI
- Due to system need few seconds to recognize the file format for HMDI output. Thus, it had few seconds
Audio/Video muting beginning of every track/file while playing HDMI output.
-
The system can detect and read the file under MP3 and MP4 format only though the USB/SD port.
-
If connect the system to MP3 player via the USB socket, due to variances in MP3 encoding format, some
MP3 player may not be able to play via the USB socket. This is not a malfunction of the system.
-
USB port does not support connection with USB extension cable and is not designed for communication
with computer directly.
-
Do not remove the media device(USB/SD) during playback as it will cause damage the USB/SD or unit
will restart.
-
In Playing mode if insert another device the video picture will be pause around 0.5 - 1sec.
-
Only English file name can be recognize by the unit and show on OSD.
Using the headphone output
To obtain playing audio through the headphone jack (5), it is necessary to select the RCA output as playing
channel. If HDMI-output is selected, there will be no audio through headphone jack (5).
Encoding the Video into MP4 file to USB/SD memory
The system is able to encode your analogue video/audio signal to MP4 format and recording at memory
media with USB connecting port (or SM/MMC card slot). Before starting the encoding, please insert the
memory media (USB pen drive or SD/MMC card) to the system & make sure it had adequate free memory
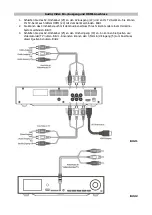
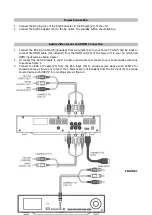
size for recording and connect your playback device refer to the above
Audio/Video in/out and HDMI
Connection section
point 3.
Encoding
1.
Getting ready of your playing device for playback.
2.
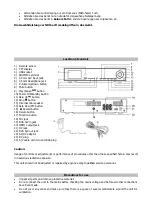
Press the Function button (17) to select the media (USB or SD) for encoding.
3.
Press Record (15) button
4.
Press the Skip Up
/ Down
(11,14) button to select the A/V or RCA in for encoding.
5.
Press Record (15) button again to confirm start to record and start to playback your AV device. During
encoding, the main unit display will show the video but no sound output.
6.
Press Stop (12) button to stop encode.
7.
Playback your encoded file follow the
Playback Video/Audio of MP3/MP4 file via USB/SD card
storage media
section.
Remark
:
-- You also can record your voice to explain the content of the video. Just connect the
Microphone with 6.3mm plug to the Mic jack (18) and speak your explanation during
encode and ensure the microphone was switch off if stop to record your voice.
-- During encoding don’t take out the encode device or take out the power supply as it
may damage the USB or SD card.
-- As some of USB/SD card can not accept long period data transfer, suggest each
encoding mode do not over 2 hours.
-- Encode PAL & SECAM system the video picture top & bottom side will cut out some
picture due to the encode format is 720 x 480 But PAL & SECAM 720 x 576.
-- During encoding process there will be no sound rendered from the headphone output.

