6.0 Operation
33
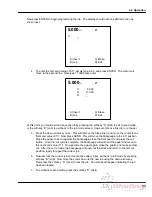
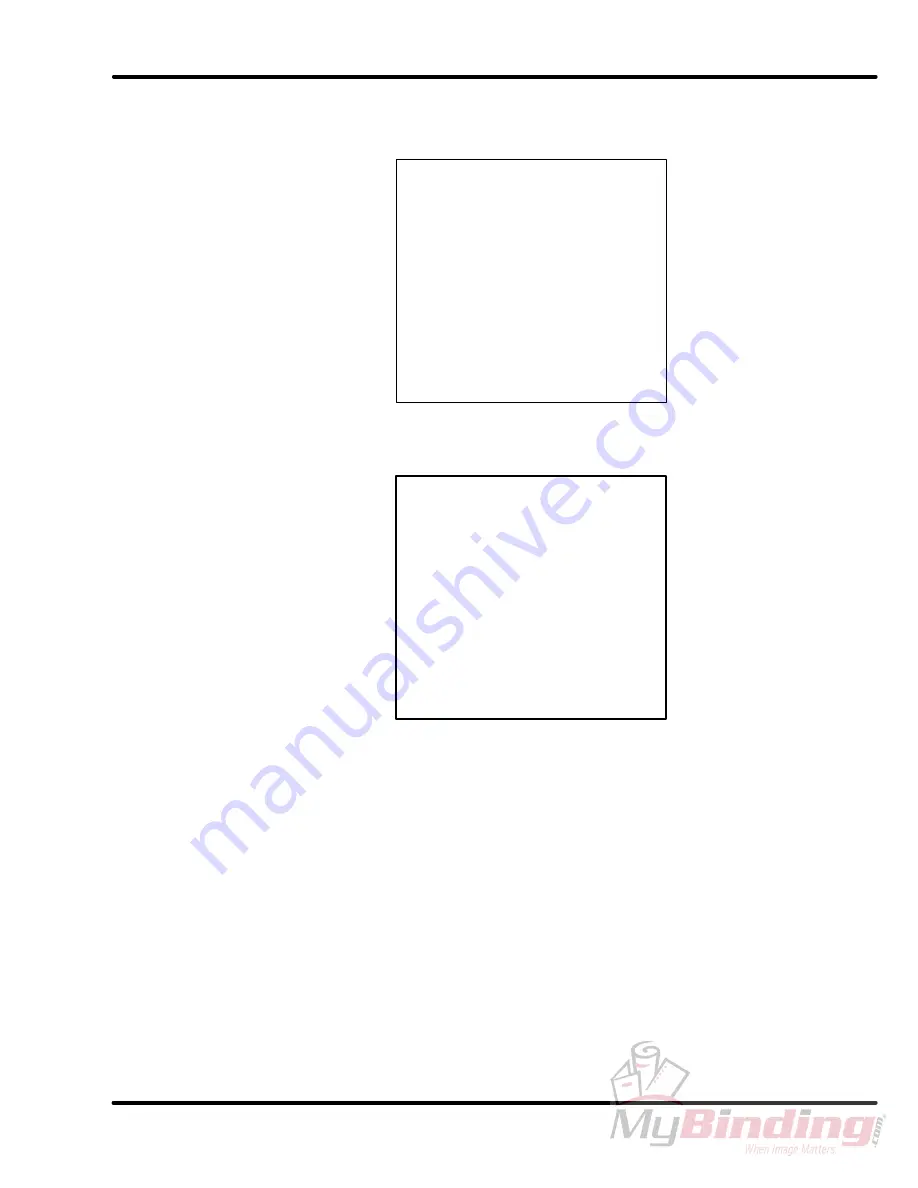
Now press ENTER to begin programming the job. The display should now look similar to the one
shown next:
4. To enter the first send value of 8.5”, simply type in 8.5 and press ENTER. The cursor will
move to the second line. Now type 11 and press enter.
At this point, you could exit and save the job by pressing the soft-key “D” (Exit) to exit to send mode,
or the soft-key “B” (Job) to exit back to the job mode screen. However, lets use this job to cut paper.
5. Press the down arrow key once. This will remove the blank line 3 and move the cursor to the
first send value (8.5”). Now press SEND. This will move the backgauge to the 8.5” position.
Place the paper to be cut against the backgauge, close the front guard, and press the cut
button. Once the cut cycle is complete, the backgauge will push out the paper and move to
the next send value (11”). Now position the paper again, close the guard, and make another
cut. After the cut is made, the backgauge will push out the stock and return to the first cut
position, ready to repeat the current job.
6. Now lets lock the current job so it cannot be edited. First, exit back to job mode by pressing
soft-key “B” (Job). Now move the cursor down to the new job using the down arrow key.
Now press the soft-key “A” (Lock) to lock the job. An asterisk will appear indicating the job
has been locked.
7. To exit back to send mode, press the soft-key “D” (Exit).
5.000
in
#7
1>
_
A) Insert
C) Erase
B) Job
D) Exit
5.000
in
#7
1>
8.500
2>
11.000
3>
_
A) Insert
C) Erase
B) Job
D) Exit
Summary of Contents for Titan 265
Page 60: ...9 0 Parts List Sequence of Operations 59 9 2 Main Assembly Side View 44000 Sht 2 Rev J...
Page 61: ...9 0 Parts List Sequence of Operations 60 9 3 Main Assembly Rear View 44000 Sht 3 Rev E...
Page 62: ...9 0 Parts List Sequence of Operations 61 9 4 Main Assembly Table View 44000 Sht 4 Rev E...
Page 63: ...9 0 Parts List Sequence of Operations 62 9 5 Main Assembly Parts List 44000 Sht 5 Rev S...
Page 64: ...9 0 Parts List Sequence of Operations 63 Main Assembly Parts List continued 44000 Sht 6 Rev N...
Page 65: ...9 0 Parts List Sequence of Operations 64 9 6 Main Assembly Cut Buttons 44000 Sht 7 Rev H...
Page 66: ...9 0 Parts List Sequence of Operations 65 9 7 Main Assembly Front Shield 44000 Sht 7 Rev H...
Page 67: ...9 0 Parts List Sequence of Operations 66 9 8 Electrical Panel Assembly EE 2879 Rev H...
Page 68: ...9 0 Parts List Sequence of Operations 67 Electrical Panel Assembly continued EE 2879 Rev H...
Page 69: ...9 0 Parts List Sequence of Operations 68 Electrical Panel Assembly continued EE 2879 Rev H...
Page 71: ...9 0 Parts List Sequence of Operations 70 9 10 Hydraulic Power Unit Assembly H 507 Rev E...
Page 72: ...9 0 Parts List Sequence of Operations 71 Hydraulic Power Unit Assembly continued H 507 Rev E...
Page 73: ...9 0 Parts List Sequence of Operations 72 9 11 Manifold Assembly H 516 Sheet 1 Rev C...
Page 74: ...9 0 Parts List Sequence of Operations 73 9 12 Hydraulic Schematic H 516 Sheet 2 Rev B...
Page 75: ...9 0 Parts List Sequence of Operations 74 9 13 Manifold Sub Plate Assembly H 517...
Page 76: ...9 0 Parts List Sequence of Operations 75 9 14 Sequence Check Valve Assembly H 551 Rev A...
Page 77: ...9 0 Parts List Sequence of Operations 76 9 15 Basic Machine Schematic E 2853 Rev C...
Page 78: ...9 0 Parts List Sequence of Operations 77 Basic Machine Schematic continued E 2853 Rev C...
Page 80: ...9 0 Parts List Sequence of Operations 79 9 17 Cut Button Assembly EE 2851 1...
Page 81: ...9 0 Parts List Sequence of Operations 80 9 18 Control Console Assembly EE 2773 1 Rev C...
Page 82: ...9 0 Parts List Sequence of Operations 81 9 19 Control P C Assembly EE 2807 1...
Page 83: ...9 0 Parts List Sequence of Operations 82 9 20 Power Panel Label S 1781 54 Rev C...
Page 85: ...9 0 Parts List Sequence of Operations 84 9 22 Knife Latch Assembly 47568 Rev C...
Page 86: ...9 0 Parts List Sequence of Operations 85 9 23 Line Light Assembly EE 2779 Rev B...


