background image

B6 - ENGINE

79019435B

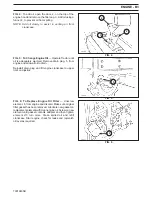
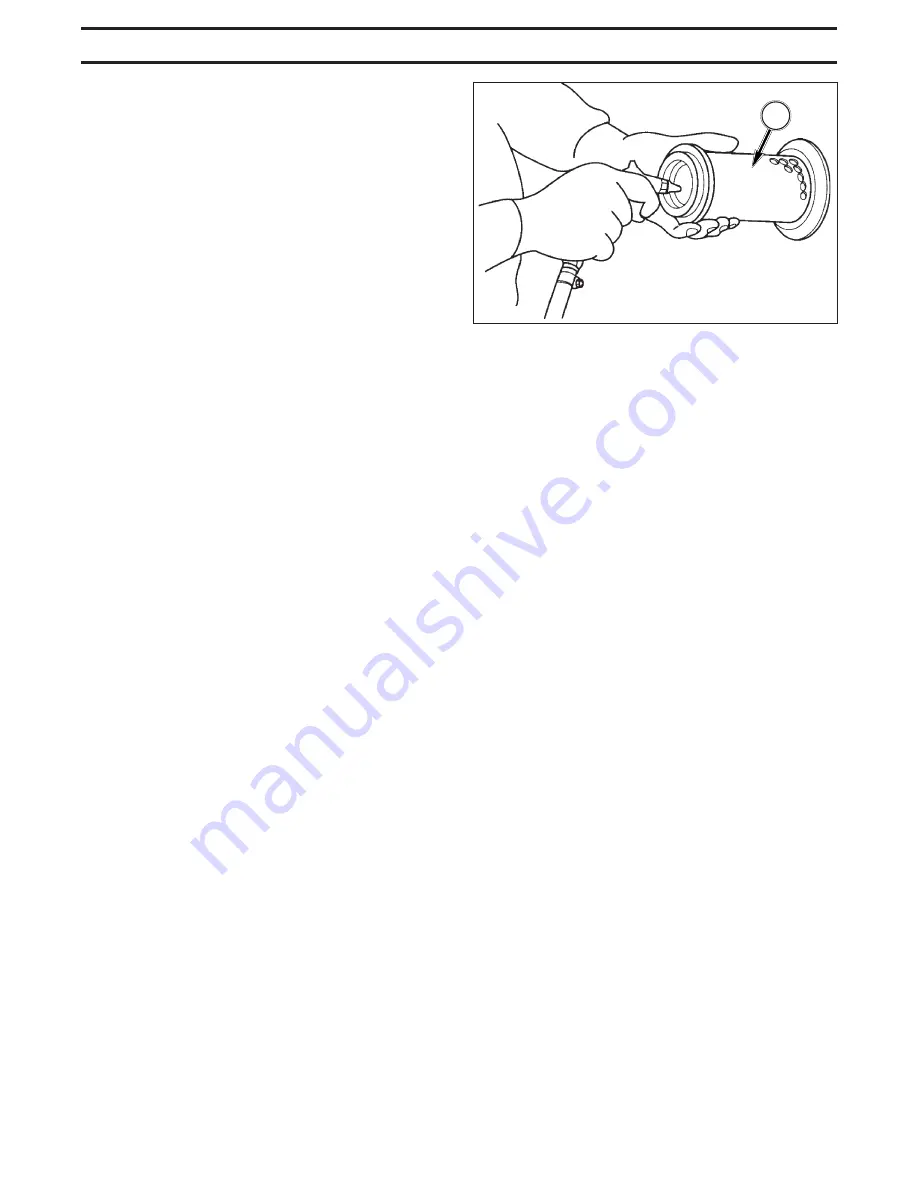
FIG. 14

I-3125

4

FIG. 14: Air Filter element, 4, may be cleaned (if in
serviceable condition) using following procedures:

1.

Using compressed air not to exceed 30 psi (200 kPa)
from inside element, remove loose dirt, grass, chaff,
etc. Be careful not to damage element pleats with air
flow.

2.

If outer element is coated with oil or soot:

a.

Prepare solution of warm water and non-foaming
detergent.

b.

Soak element for thirty minutes.

c.

Agitate element in solution until oil and soot are
loosened.

d.

Rinse element until rinse water is clear.

e.

Allow element to completely dry. Do not dry by
using compressed air or heat.

f.

After cleaning (or washing) element examine for
pin holes, punctures, or tears. If element paper,
canister or seal show any signs of physical
damage, element must be replaced.

NOTE: Replace element which has already been washed

five times.

Summary of Contents for MT225

Page 1: ...TION 01 ENGINE 02a Engine Drop In 02b Engine Drop In 02c MAJOR COMPONENTS 03 CLUTCH SYSTEM 04 TRANSMISSION 05 HYDROSTATICTRANSMISSION 06 REAR AXLE AND BRAKES 07 FRONT AXLE 08 HYDRAULIC SYSTEM 09 ELECT...

Page 2: ...erial Numbers A 2 SPECIFICATIONS A 5 GENERAL PRECAUTIONS FOR DISASSEMBLY AND RE INSTALLATION A 12 Before Operation A 12 Precautions To Be Followed When Installing Standardized Parts A 12 STANDARDTORQU...

Page 3: ...serial numbers As a further identification engine and chassis are provided with identification numbers FIG 1 Standard transmissionTractor identification plate 1 located below operator s seat on right...

Page 4: ...19435B FIG 3 I 3033 FIGS 3 4 5 Identification plate for each model con tains model numbers machine series numbers and weight in addition to Tractor serial numbers FIG 4 I 6090 FIG 5 I 7051 Find manual...

Page 5: ...ne model number FIG 7 Chassis number 1 is stamped in right side of front frame NOTE Reference to left hand and right hand used throughout this book refers to the position when seated in operator s sea...

Page 6: ...95 0 30 3 37 4 77 0 95 0 30 3 37 4 80 0 91 0 31 5 35 8 80 0 91 0 31 5 35 8 Minimum ground clearance under rear axle bottom 25 5 9 6 25 5 9 6 28 0 11 0 28 0 11 0 Minimum turning radius with braking wit...

Page 7: ...5 87 0 34 25 87 0 34 25 Wheel tread Rear 90 0 35 43 90 0 35 43 90 0 35 43 90 0 35 43 Minimum ground clearance under rear axle bottom 24 5 9 64 24 5 9 64 29 0 11 4 29 0 11 4 Minimum turning radius with...

Page 8: ...e dry element Engine cooling Liquid forced circulation Cold starting Glow plugs 3 Transmission 1417 STD 1417 Hydro Primary F3 R1 Infinite Range 2 2 Gear selections F6 R2 F2 R2 Clutch Dry single disc D...

Page 9: ...system System voltage 12 volt negative ground Battery 36hA 5hr 433 cca Charging 40 amp alternator with internal regulator Capacities Engine crankcase with filter 2 9 qts 2 7 liters Transmission and d...

Page 10: ...horsepower net engine rpm 16 5kW 22 5hp 2800 Firing order 1 3 2 Compression ratio 22 5 1 Low idle speed 950 rpm High idle speed 3050 rpm Valve clearance cold intake and exhaust 0 25 mm 010 Air cleane...

Page 11: ...put Clockwise rotation Facing shaft Speeds engine rpm Hydro 2000 2583 STD 2000 2698 Hydraulics Main hydraulic system Pump Gear pump Open center Output maximum 20 2 liters min 5 28 USGPM Pressure relie...

Page 12: ...ssion and differential housing including hydraulics 14 0 liters 14 8 US qts Fuel tank 23 liters 6 1 gal Cooling system 7 1 liters 7 5 US qts Front axle four wheel drive 2 7 liters 2 9 US qts Maximum a...

Page 13: ...ing Standardized Parts Roller or ball bearings When a bearing is installed in a housing by the outer race use an installer which is specially designed to push only the outer race and vice versa The i...

Page 14: ...ng When installing a snap ring install it as shown in the figure with its round edge turned toward the part to be retained This round edge is formed when the snap ring is pressed out Spring roll pin F...

Page 15: ...le in introduction section Grease Fittings After installation each grease fitting should be filled with grease When installing 45 or 90 grease fittings be sure to turn the fitting in a direction that...

Page 16: ...98 950 700 0 7 0 5 1 6 1 2 3 0 2 2 5 0 3 7 12 5 9 2 25 18 43 32 110 81 210 155 360 266 720 531 1250 922 1 3 0 9 3 1 2 3 6 0 4 4 10 7 4 25 18 4 50 37 90 66 200 148 420 310 720 531 1400 1033 2500 1844 1...

Page 17: ...ch 2000Town Center Suite 1480 Southfield MI 48075 Telephone 313 353 2225 Description Three Bond Product North American Equivalent European Equivalent Gasket Spray Gasket Compound Retaining Compound Re...

Page 18: ...iters m l x 0 2029 teaspoons cups x 0 2366 liters x 4 227 cups bushel x 35 239 liters x 0 02838 bushels bushel x 0 03524 m eters m x 28 378 bushels MASS ounces av x 28 35 gram s g x 0 03527 ounces av...

Page 19: ...6 254 508 762 1 016 1 270 1 524 1 778 2 032 2 286 2 54 5 08 7 62 10 16 12 70 15 24 17 78 20 32 22 86 25 4 50 8 76 2 101 6 127 0 152 4 177 8 203 2 228 6 254 0 279 4 304 8 330 2 355 6 381 0 406 4 431 8...

Page 20: ...NGINE CONTENTS ENGINE OIL AND FILTER B 2 SERVICE ACCESS B 2 COOLING SYSTEM B 4 FAN BELT B 4 THERMOSTAT B 5 ENGINE AIR CLEANER B 5 FUEL SYSTEM B 7 Fuel Filter B 7 Fuel Pump B 7 Throttle Lever B 8 Air B...

Page 21: ...installed and secured prior to operating unit FIG 1 To access radiator battery and engine components right and left hood side panels can be easily removed To remove turn locking knobs 1 to unlock Pull...

Page 22: ...uately warmed Remove drain plug 5 from engine and allow all oil to drain Reinstall drain plug and fill engine crankcase to upper limit on dipstick FIG 6 To Replace Engine Oil Filter Unscrew element 6...

Page 23: ...nd radiator to 30 F 34 C Cooling level should be maintained to 1 2 12 mm below the filler neck opening 1 FIG 9 I 3188 FIG 10 I 3121 1 2 FIG 8 Make sure the radiator radiator screen and grill screens a...

Page 24: ...rateenginewithairfilterremoved FIG 12 The engine air cleaner is located above engine To gain access remove right side panel The dust ejector 2 should be squeezed to open and allow dust to drop out dai...

Page 25: ...with oil or soot a Prepare solution of warm water and non foaming detergent b Soak element for thirty minutes c Agitate element in solution until oil and soot are loosened d Rinse element until rinse...

Page 26: ...filter assembly 1 is located at right side of engine and is used to strain impurities from fuel before fuel reaches injection pump Fuel filter incorporates valve 2 to aid in filter servicing Check fi...

Page 27: ...still fails to start pressure injection lines 5 can be loosened where they attach to injectors Turn engine over several times until fuel spurts out then tighten lines and stop engine CAUTION Fuel emit...

Page 28: ...part number when your Service Manual was ordered This is to ensure you are provided with the latest information on a major component in your equipment Please insert the above Component Service Manual...

Page 29: ...ENGINE SERVICE MANUAL Iseki Three Cylinder Diesel Engine Effective 2005 Production...

Page 30: ...d in a long and satisfactory life of the product This equipment is covered by a written warranty which will be provided to you by your AGCO Dealer at time of purchase AGCO reserves the right to make c...

Page 31: ...This as a preview PDF file from best manuals com Download full PDF manual at best manuals com...

Reviews: