background image

Challenger

Optics.com

Wavelength Specific Optical Testing and Measurement Equipment

back to Contents

CO-OPM-CW12                                                                               p 15

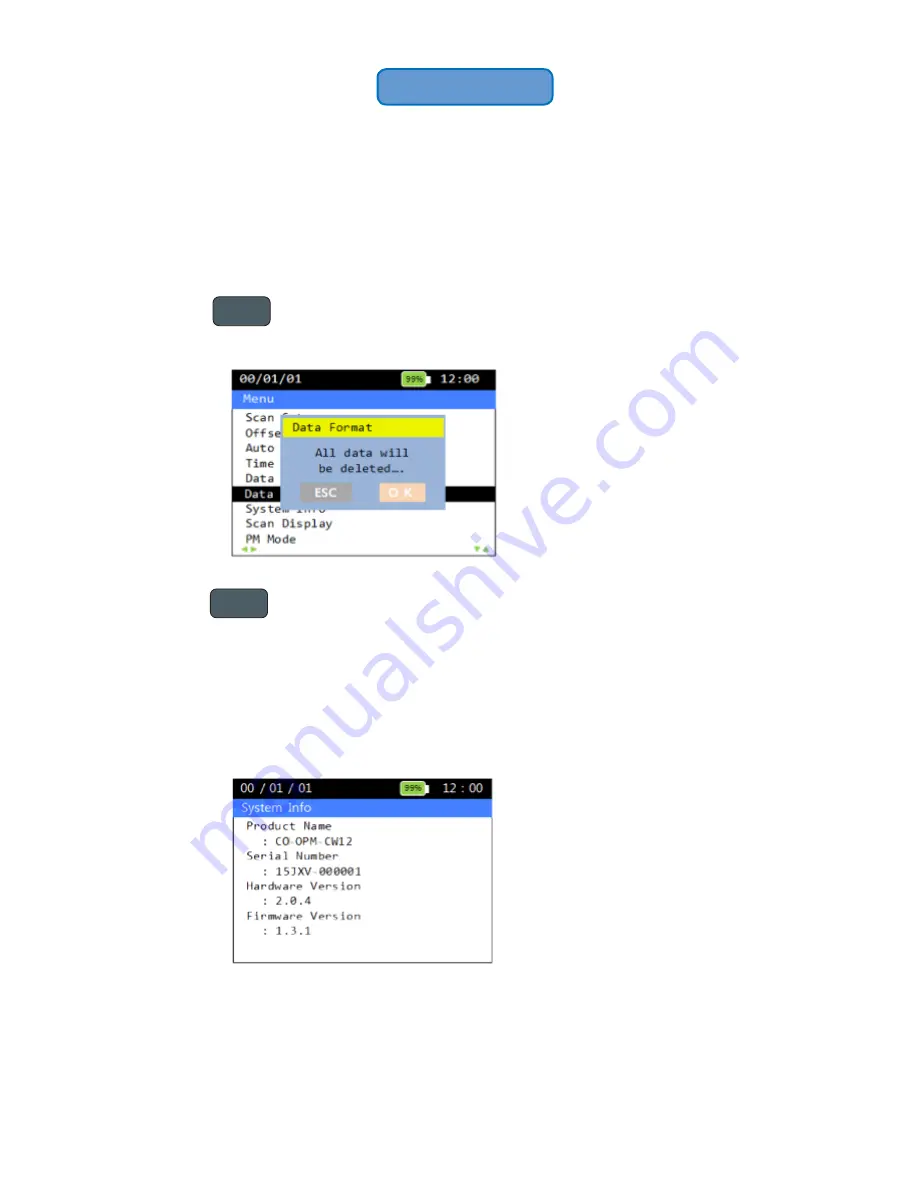
2.3.6  Data Format

You can delete all saved files by formatting the memory.

Press the                 button after ‘Data Format’, message appears on 
the screen to confirm.

Press the                 button, all files are deleted from the memory.

2.3.7  System Info

General information about the equipment. 

OK

OK

Summary of Contents for CO-OPM-CW12

Page 1: ...2 2 2 5 Graph 8 2 3 7 System Info 15 2 2 1 Power ON OFF 5 2 3 2 Offset 12 1 3 Accessories 3 2 2 6 Save 8 2 3 8 Scan Display 16 2 2 2 Mode 6 2 3 3 Auto Power Off 13 2 2 7 Recall 9 2 3 9 PM Mode 17 2 2 3 dB dBm 7 2 3 4 Time Set 13 1 4 Charge Method 3 2 3 10 Scan Mode 18 2 3 12 Display Unit 20 2 2 4 Scan 7 2 3 5 Data Delete 14 1 5 Meter Care 3 2 3 11 Threshold 19 2 3 13 Graph Unit 21 2 3 14 Below Thr...

Page 2: ...p and Test High quality graphics 1 2 Specifications Channels 56 CorWave DWDM Frequency Wavelength 196 4 191 7 THz 1526 43 1563 86 nm Channel Spacing Custom Measurement Speed 4 sec all channels Measurement Range 10 dBm 35 dBm Measurement Accuracy 1 0 35 dBm Power Resolution 0 01 dB Optical Connector SC APC Display Unit dB dBm nm THz Display 3 5 TFT LCD 16 bit Color Battery Power Rechargeable Lithiu...

Page 3: ...echargeable battery A USB power adapter and micro USB cable are provided for charging Typical charge time is six hours Charging conditions LED Color Action of LED Conditions for battery charge Red ON Charging Green ON Fully charged 1 5 Meter Care Do not subject the CO OPM CW12 to strong impact The CO OPM CW12 is not water resistant or waterproof Do not disassemble Always properly clean the fiber i...

Page 4: ... Menu Access system Menu and settings Mode Options Auto and Manual dB dBm Toggle between dB and dBm UOM SCAN All wavelengths are scanned and power levels are displayed Graph Power levels of selected channels displayed as a graph Save Save measurements Recall Recall saved measurements ESC Cancel or move back to previous menu OK Enter Left right up and down arrow key 0 9 Number and letters key Del D...

Page 5: ...Equipment back to Contents CO OPM CW12 p 5 2 2 Key Function 2 2 1 Power ON OFF To turn on and off Press the button more than 2 seconds the logo shown below appears and it moves to Power Meter page Press the button more than 2 seconds to turn the power off Backlight Backlight ...

Page 6: ... select Auto the instrument automatically scans the optical input and displays the wavelength which has been detected with the highest level of power If you select Manual the power of the wavelength selected by the user is displayed in real time You can select the different wavelengths using Selection of Manual and Auto can be done by this button PM Mode or Click button Menu Mode ...

Page 7: ...Testing and Measurement Equipment back to Contents CO OPM CW12 p 7 2 2 3 dB dBm The button toggles between dB and dBm UOM 2 2 4 Scan Press the button to measure all selected wavelengths and display in table format You can select the page using dB dBm ...

Page 8: ... Press the button after scanning to display power measurements in graph format 2 2 6 Save Press the button the measurement will be saved using the current date and time as the file name Or a 17 character filename can be entered using the keypad Press the button to save If you want to cancel saving press button Graph Save OK ESC ...

Page 9: ...pecific Optical Testing and Measurement Equipment back to Contents CO OPM CW12 p 9 2 2 7 Recall Press the button to view files saved on device Use to highlight desired file Press the button to select the file to be displayed Recall OK ...

Page 10: ...k to Contents CO OPM CW12 p 10 2 3 MENU The button allows you to configure the operating environment of CO OPM CW12 The menu consists of Scan Set Offset Auto Power Off Time Set Data Delete Data Format System Info Scan Display PM Mode SCAN Mode Threshold Display unit Below Threshold Menu ...

Page 11: ...471 1491 1591 1611nm CorWave2 1471 1491 1591 1611nm and ITU Channels 21 22 24 26 28 33 36 39 44 48 52 54 57 60 61 62 All Scan will measure all 56 channels Selected allows user selected wavelength measurement Press the Selected you will see the screen below Press to toggle ON OFF the highlighted wavelength The Selected option allows user to select specific channels to be measured Highlight the chan...

Page 12: ...fset can be added to the signal power When you choose the Offset you can choose either All Channel and Each Channel Press the button after selecting All Channel you can set up the offset with values between 25 99 to 25 99 dB for all channels and sign can be changed to button Press the button after selecting Each Channel you can set up each channel s offset value OK OK ...

Page 13: ...s not input any key in the determined time Press the button after selecting Auto Power OFF you can set the Auto power off time in minutes You can set the time between 5 to 600 Min by pressing the number key and button OK OK 2 3 4 Time Set Press the button after selecting Time Set you can set today s date and current time You can set the time by pressing the number key and button OK OK ...

Page 14: ...s CO OPM CW12 p 14 OK OK OK 2 3 5 Data Delete Press the button after selecting Delete Data you can delete measurement files Press the key after choosing the file you want to delete the message appears on the scree to confirm to delete or not Press the button and file will be deleted from the memory ...

Page 15: ...ontents CO OPM CW12 p 15 2 3 6 Data Format You can delete all saved files by formatting the memory Press the button after Data Format message appears on the screen to confirm Press the button all files are deleted from the memory 2 3 7 System Info General information about the equipment OK OK ...

Page 16: ...s CO OPM CW12 p 16 2 3 8 Scan Display Scan Display consists of All and Measured This can be selected using All will display power levels of All wavelengths measured by the meter REGARDLESS of power level If you choose the Measured only wavelengths with a power level higher than 40 dBm are displayed ...

Page 17: ...de The PM Mode consists of the Auto and Manual This can be selected using the buttons If you choose the Auto The meter will automatically detect and display the channel with the highest power If Manual is selected the meter will display power level of the last channel measured User can display adjacent channels using the buttons ...

Page 18: ...W12 p 18 2 3 10 Scan Mode The SCAN Mode consists of the Repeat and Single This can be selected using If you select Repeat the instrument repeatedly scans the optical input measurements are displayed in real time If you select Single The moment you click on the SCAN button the light source is scanned only once ...

Page 19: ... CW12 p 19 2 3 11 Threshold Threshold allows you to change the baseline or lowest power level of the meter Enter the desired value Use the key as needed 30 00 dBm is the default setting Press the button after inputting the new threshold to SAVE the value Baseline changes can be found at the graph screen OK ...

Page 20: ...nd Measurement Equipment back to Contents CO OPM CW12 p 20 2 3 12 Display Unit You can change the unit on the display The Display unit consists of the Wavelength nm and Frequency THz This can be selected using If you choose the Frequency shows the below screen ...

Page 21: ...either visible or invisible by choosing Display or Hide If Hide is chosen any power level BELOW the THRESHOLD will NOT be displayed on the graph 2 3 13 Graph Unit Options for GRAPH UNIT are Standard and ITU Grid If STANDARD is chosen Graph units will be displayed in Wavelength nm If ITU Grid is chosen Graph units will be displayed in DWDM ITU Channels 17 64 ...

Page 22: ... 38 193800 1546 92 38 39 193900 1546 12 39 39 40 194000 1545 32 40 41 194100 1544 53 41 42 194200 1543 73 42 42 43 194300 1542 94 43 44 194400 1542 14 44 44 44 45 194500 1541 35 45 46 194600 1540 56 46 47 194700 1539 77 47 47 48 194800 1538 98 48 48 49 194900 1538 19 49 50 195000 1537 40 50 51 195100 1536 61 51 51 52 195200 1535 82 52 52 52 53 195300 1535 04 53 54 195400 1534 25 54 54 54 55 195500...

Reviews: