2
en
de
NOTE:
Older model 24 V door locks are incompatible.
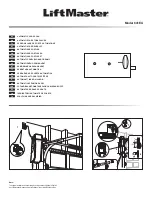
1. Disconnect all electric and battery power before performing any service.
2. The lock must be mounted within 10 m of door opener. If possible, mount on
same side as door opener.
3. Ensure rail surface is clean and attach the lock template to the track so that
the bolt hole is approximately 7.6 cm from the center of a door roller.
4. Drill holes as marked on the template.
5. Fasten automatic door lock to the outside of the door track with hardware
provided.
6. Run bell wire up wall to door opener. Use insulated staples (optional) to
secure wire in several places. Insert wire through the bottom of the door
opener.
7. Plug the connector into either plug in the door opener. A secondary door
lock (841EU) can be installed on the opposite side of the door following the
instructions above.
HINWEIS:
Ältere 24V-Torschlossmodelle sind nicht kompatibel.
1. Trennen Sie die GESAMTE Strom- und Batterieversorgung ab, BEFOR Sie
IRGENDWELCHE Service- oder Wartungsmaßnahmen vornehmen.
2. Das Schloss ist in einem Abstand von maximal 10 m vom Torantrieb
anzubringen. Montieren Sie es, wenn möglich, auf der gleichen Seite wie
den Torantrieb.
3.
Stellen Sie sicher, dass die Schienenoberfläche sauber ist und bringen Sie
die Schlossschablone so daran an, dass das Bolzenloch etwa 7,6 cm vom
Mittelpunkt einer Torrolle entfernt ist.
4. Bohren Sie die auf der Schablone eingezeichneten Löcher.
5. Befestigen Sie das automatische Torschloss mit den mitgelieferten Befesti-
gungsmaterialien außen an der Schiene.
6. Führen Sie die Klingelleitung die Wand hoch zum Torantrieb. Befestigen Sie
die Leitung an mehreren Stellen mit isolierten Klammern (optional). Führen
Sie die Leitung unten in den Torantrieb ein.
7. Verbinden Sie das Anschlussteil mit einem beliebigen Anschluss des
Torantriebs. Ein zweites Torschloss (841EU) kann entsprechend den obigen
Anweisungen an der anderen Torseite angebracht werden.
• With the door fully closed, the automatic door lock bolt should be protruding
through the track.
• Operate the door in the open direction. The automatic door lock should
retract before the door begins to move.
• Operate the door in the down direction. When the door reaches the fully
closed position, the automatic door lock should move into lock position to
secure the door.
NOTE:
If the automatic door lock does not function, the lock can be manually
released by sliding the manual release handle to the open position.
•
Bei vollständig geschlossenem Tor sollte der Bolzen des automatischen
Torschlosses durch die Schiene hinausragen.
• Öffnen Sie das Tor. Das automatische Torschloss sollte sich zurückziehen,
ehe das Tor sich zu bewegen beginnt.
•
Bewegen Sie das Tor nach unten. Sobald das Tor vollständig geschlossen
ist, sollte sich das automatische Torschloss schließen und das Tor sichern.
HINWEIS:
Wenn das automatische Torschloss nicht funktioniert, kann das
Schloss manuell gelöst werden, indem der Lösehebel auf geöffnet gestellt wird.
WARNING
To reduce the risk of FIRE or INJURY to persons:
WARNUNG
Zur Verringerung des BRAND- und VERLETZUNGSRISIKOS:
INSTALL THE AUTOMATIC DOOR LOCK
TEST AUTOMATIC DOOR LOCK
TESTEN DES AUTOMATISCHEN TORSCHLOSSES
INSTALLATION DES AUTOMATISCHEN TORSCHLOSSES
TECHNICAL DATA
TECHNISCHE DATEN
CAUTION
The automatic door lock (model 841EU) is used to prevent
the door from being manually opened once the door is fully
closed.
ACHTUNG
Das automatische Torschloss (Modell 841EU) verhindert das
manuelle Öffnen des Tores, wenn dieses vollständig geschlos-
sen ist.
Dimensions:
92,4 mm tall, 182,7 mm long, 83,2 mm across
(including handles)
Abmessungen:
92,4 mm hoch, 182,7 mm lang, 83,2 mm breit
(inklusive Griff)
• Disconnect ALL electric and battery power BEFORE performing ANY
service or maintenance.
• Use ONLY LiftMaster 841 Series locks for replacement.
• Be sure to DISASSEMBLE and REMOVE any manual door locks that
might be currently installed.
• The door MUST be in the fully closed position BEFORE installing the
garage door lock.
• Trennen Sie die GESAMTE Strom- und Batterieversorgung ab, BEFOR
Sie IRGENDWELCHE Service- oder Wartungsmaßnahmen vornehmen.
• Verwenden Sie AUSSCHLIESSLICH Schlösser der Serie LiftMaster 841
als Ersatz.
• Achten Sie darauf, sämtliche manuellen Türschlösser auszubauen und
zu entfernen, die möglicherweise momentan eingesetzt sind.
• Die Tür MUSS vollständig geschlossen sein, BEVOR das Garagen-
schloss installiert wird.

