background image

Chamberlain ONE YEAR LIMITED WARRANTY

The Chamberlain Group, Inc. warrants to the first retail purchaser of this product, for the structure in which this product is
originally installed, that it is free from defect in materials and/or workmanship for a period of ONE year from the date of
purchase. The proper operation of this product is dependent on your compliance with the instructions regarding installation,
operation, maintenance and testing. Failure to comply strictly with those instructions will void this limited warranty in its
entirety.

If, during the limited warranty period, this product appears to contain a defect covered by this limited warranty, call 
1-800-528-9131, toll free, before dismantling this product. Then send this product, pre-paid and insured, to our service
center for warranty repair. You will be advised of shipping instructions when you call. Please include a brief description of
the problem and a dated proof-of-purchase receipt with any product returned for warranty repair. Products returned to Seller
for warranty repair, which upon receipt by Seller are confirmed to be defective and covered by this limited warranty, will be
repaired or replaced (at Seller’s sole option) at no cost to you and returned pre-paid. Defective parts will be repaired or
replaced with new or factory-rebuilt parts at Seller’s sole option.

ALL IMPLIED WARRANTIES FOR THE PRODUCT, INCLUDING BUT NOT LIMITED TO ANY IMPLIED WARRANTIES OF
MERCHANTABILITY AND FITNESS FOR A PARTICULAR PURPOSE, ARE LIMITED IN DURATION TO THE ONE YEAR
LIMITED WARRANTY PERIOD SET FORTH ABOVE, AND NO IMPLIED WARRANTIES WILL EXIST OR APPLY AFTER
SUCH PERIOD. Some States do not allow limitations on how long an implied warranty lasts, so the above
limitation may not apply to you. THIS LIMITED WARRANTY DOES NOT COVER NON-DEFECT DAMAGE, DAMAGE
CAUSED BY IMPROPER INSTALLATION, OPERATION OR CARE (INCLUDING, BUT NOT LIMITED TO ABUSE,
MISUSE, FAILURE TO PROVIDE REASONABLE AND NECESSARY MAINTENANCE, UNAUTHORIZED REPAIRS OR
ANY ALTERATIONS TO THIS PRODUCT), LABOR CHARGES FOR REINSTALLING A REPAIRED OR REPLACED UNIT,
OR REPLACEMENT OF BATTERIES.

THIS LIMITED WARRANTY DOES NOT COVER ANY PROBLEMS WITH, OR RELATING TO, THE GATE OR GATE
HARDWARE, INCLUDING BUT NOT LIMITED TO THE GATE SPRINGS, GATE ROLLERS, GATE ALIGNMENT OR
HINGES. THIS LIMITED WARRANTY ALSO DOES NOT COVER ANY PROBLEMS CAUSED BY INTERFERENCE. ANY
SERVICE CALL THAT DETERMINES THE PROBLEM HAS BEEN CAUSED BY ANY OF THESE ITEMS COULD
RESULT IN A FEE TO YOU.

UNDER NO CIRCUMSTANCES SHALL SELLER BE LIABLE FOR CONSEQUENTIAL, INCIDENTAL OR SPECIAL
DAMAGES ARISING IN CONNECTION WITH USE, OR INABILITY TO USE, THIS PRODUCT. IN NO EVENT SHALL
SELLER’S LIABILITY FOR BREACH OF WARRANTY, BREACH OF CONTRACT, NEGLIGENCE OR STRICT LIABILITY
EXCEED THE COST OF THE PRODUCT COVERED HEREBY. NO PERSON IS AUTHORIZED TO ASSUME FOR US
ANY OTHER LIABILITY IN CONNECTION WITH THE SALE OF THIS PRODUCT.

Some states do not allow the exclusion or limitation of consequential, incidental or special damages, so the above limitation
or exclusion may not apply to you. This limited warranty gives you specific legal rights, and you may also have other rights
which vary from state to state.

WARRANTY POLICY

HOW TO ORDER REPAIR PARTS

OUR LARGE SERVICE ORGANIZATION SPANS AMERICA

FOR INSTALLATION AND SERVICE INFORMATION,

CALL OUR TOLL FREE NUMBER:

1-866-826-4943

www.chamberlain.com

When ordering repair parts, please supply the following information:

PART NUMBER    DESCRIPTION    MODEL NUMBER

ADDRESS ORDER TO:

THE CHAMBERLAIN GROUP, INC.

Technical Support Group

6050 S. Country Club Road

Tucson, AZ 85706

Warranty

32

Summary of Contents for GA200D

Page 1: ...ensure safe operation The model number label is located inside the control box of your operator Serial Installation Date RESIDENTIAL GATE OPERATOR Model GA200D For Residential Use Only INSTALLATION D...

Page 2: ...ION WARNING WARNING WARNING WARNING WARNING WARNING CAUTION CAUTION WARNING WARNING TABLE OF CONTENTS 2 6 INTRODUCTION 2 Safety Symbol and Signal Word Review 3 Operator Specifications 3 Carton Invento...

Page 3: ...me without prior warning Do not let children operate the gate or play in the gate area Thi s entrance is for vehicles only Pedestrians must use separate entrance Carton Inventory This operator comes w...

Page 4: ...x 3 3 16 U bolt Qty 2 To secure the bracket to the gate use the following hardware 1 4 20 x 3 hex head bolt with associated flat washers lock washers and hex nuts Qty 2 For gates with flat mounting su...

Page 5: ...mote pedestrian usage The pedestrian access shall be located such that persons will not come in contact with the moving vehicular gate during the entire travel of the gate 8 Pedestrians should never c...

Page 6: ...ng gate Install warning signs on the front and back of the gate in PLAIN VIEW Permanently secure each warning sign in a suitable manner using fastening holes ATTENTION AVERTISSEMENT WARNING WARNING CA...

Page 7: ...g trimmers Gate Bracket Post Bracket Hinge M o v i n g G a t e C a n C a u s e I n j u r y o r D e a t h K E E P C L E A R G a t e m a y m o v e a t a n y t i m e w i t h o u t p r i o r w a r n i n g...

Page 8: ...Preparation and Overview 8 Check Your Gate Remove ANY ALL wheels from the bottom of gate Gate MUST NOT hit or drag across ground Gate MUST be level Gate and gate post MUST be plumb...

Page 9: ...recommended for plastic or vinyl gates Refer to Gate Manufacturer for recommendation and options R R R R R R R R Gate post bracket mounting locations Gate bracket mount locations R R LEFT HAND HINGE M...

Page 10: ...e or play in the gate area This entrance is for vehicles only Pedestr ians must use separate entrance Indoor Outlet 1 2 Remove the cover screws 4 then set cover aside Select mounting holes within the...

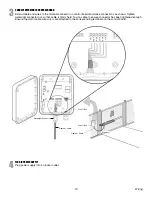
Page 11: ...e wire to confirm it is secure Figure 3 Connect and firmly secure the wires from the power supply to the control board terminals marked 24Vac Figure 3 1 2 V C O M 2 4 V Power Supply Wiring to Control...

Page 12: ...how common gate hinges There are many styles of hinges available Gate Post Gate Post Gate Post J Bolt Hinge Point J Bolt Hinge Point Butt Hinge Point Barrel Hinge Point J BOLT HINGE BARREL HINGE BUTT...

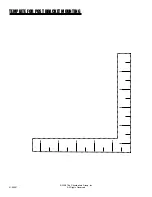
Page 13: ...LEFT SIDE BRACKET MOUNTING Place the template provided on the back page under the gate hinge point Use a screwdriver or dowel rod to temporarily mark the location in front of the gate post Place the m...

Page 14: ...secure with 3 8 serrated flange nut DO NOT TIGHTEN AT THIS TIME 3 5 16 Ribbed Neck Bolt 5 16 Serrated Flange Nut Installation 14 Once the extension bracket is in the desired location insert 5 16 ribb...

Page 15: ...the post and the gate bracket to the gate with the clamps Ensure the operator is level by placing the level on the bottom of the operator Ensure there is at least 1 4 space between the operator and t...

Page 16: ...ional SECURE GATE BRACKET TO GATE Mount gate bracket with appropriate hardware not provided If your gate is constructed of round tubular framing u bolts can be used lieu of through bolt hardware NOTE...

Page 17: ...sign in a suitable manner using fastening holes ATTENTION AVERTISSEMENT WARNING WARNING CAUTION 10 REINSTALL OPERATOR TO GATE Reinstall operator to the post and gate brackets securing with the hairpin...

Page 18: ...h out prio r war ning Do not let child ren ope rate the gate or Do not let child ren ope rate the gate or play in the gate area play in the gate area This entr ance is for vehi cles only This entr anc...

Page 19: ...use Inj ury or De ath Inj ury or De ath KEE P CLE AR KEE P CLE AR Gate may mov e at any Gate may mov e at any time with out prio r warn ing time with out prio r warn ing Do not let child ren oper ate...

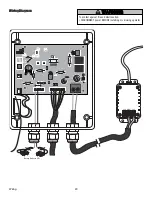
Page 20: ...ITCH 24VAC IR _ _ GRN BRN WHT RED BLU K2 K1 D20 127A0154P6 2007 36 GATE FORCE MAX MIN Wiring Diagram To protect against fire and electrocution DISCONNECT power BEFORE installing or servicing operator...

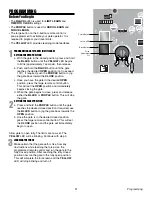
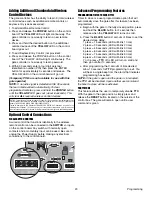
Page 21: ...the gate d When the gate begins to close press and release either the BLACK or PURPLE button This will stop the gate SETTING THE CLOSE POSITION a Press and hold the PURPLE button until the gate reache...

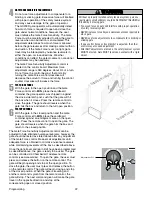
Page 22: ...board container against an entrapment area on the open side Press the remote control to open the gate The gate should reverse when the gate hits the box and return to the closed position Adjustment Po...

Page 23: ...imer to close is a user programmable option that will automatically close the gate after this feature has been programmed a Begin with the gate in the fully closed position press and hold the BLACK bu...

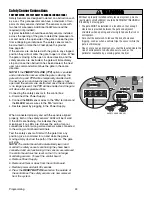
Page 24: ...above the ground See page 25 If the sensors are obstructed with the gate in any stopped position they will not allow the gate to open or close While the gate is moving in the open or close direction a...

Page 25: ...gate to move or stop the gate when moving Inside Property ENTRAPMENT ZONE Safety Sensors Entrapment Entrapment Danger Danger Entrapment Zone Entrapment Danger Inside Property Outside Property CLOSE Sa...

Page 26: ...will automatically reverse direction and stop on the open or close limit setting 1 READ AND FOLLOW ALL INSTRUCTIONS 2 NEVER let children operate or play with gate controls Keep the remote control away...

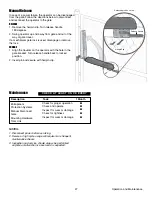
Page 27: ...Turn release handle back to locked position 2 Insert pin and secure with hairpin clip Check for proper operation Check and operate Inspect for wear or damage Check for tightness Inspect for wear or d...

Page 28: ...appropriate power check for 24Vac at the terminals on the power supply marked COM and 24Vac with a volt meter Also check for 24Vac at the end of the two wires leading from the transformer to the contr...

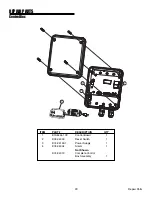
Page 29: ...T DESCRIPTION QTY 1 K1A6454 1CC Control Board 1 2 K76 34003 Reset Switch 1 3 K74 34153 1 Power Supply 1 4 K76 34004 Alarm 1 Not Shown K74 34019 Complete Control Box Assembly 1 REPAIR PARTS Control Box...

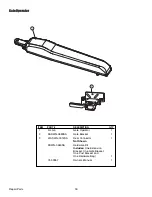
Page 30: ...ator 1 2 KASWG 0580SA Gate Bracket 1 3 41ASWG 0014SA Rear Connector 1 Not Shown KSWG 0580SA Hardware Kit Includes One Extension Bracket One Gate Bracket One Post Bracket and One Hardware Bag 1 01 3395...

Page 31: ...ystem Safety Sensors The safety reversing sensors model 916GA are intended for installation with the operators covered in this manual 916GA Low Voltage 16AWG Wire 100 Low voltage wire is required to c...

Page 32: ...anty lasts so the above limitation may not apply to you THIS LIMITED WARRANTY DOES NOT COVER NON DEFECT DAMAGE DAMAGE CAUSED BY IMPROPER INSTALLATION OPERATION OR CARE INCLUDING BUT NOT LIMITED TO ABU...

Page 33: ...NOTES 33 Notes...

Page 34: ...NOTES Notes 34...

Page 35: ...NOTES 35 Notes...

Page 36: ...2008 The Chamberlain Group Inc 01 33957 All Rights Reserved 5 4 3 2 1 5 4 3 2 1 TEMPLATE FOR POST BRACKET MOUNTING...

Reviews: