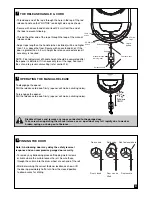
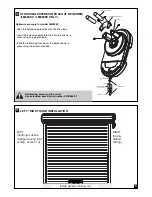
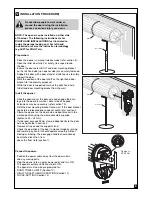
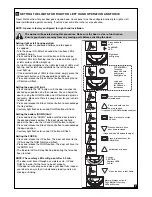
background image

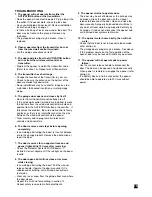
DIA

G

N

O

S

T

IC

U

P

D

O

W

N

S

Y

M

PT

O

M

PO

SSIBL

E

CA

USE

P

O

S

SIBL

E

R

ESO

L

U

T

O

N

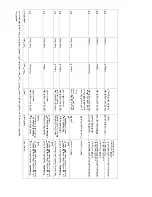
CODE

A

R

ROW

A

RROW

3-

3

3

F

L

A

SHES

3

F

L

A

SHES

T

h

e

g

arage

d

oor

opener

fa

ils

to

B

attery

LED

flas

h

ing

g

reen,

Rec

harge

Battery

,

c

o

ntac

t

operate

and

the

battery

LED

is

c

harging

c

irc

u

it

s

tops

and

s

tarts

s

e

rv

ic

e

c

entre.

c

o

ns

tantly

fl

as

hing

green

to

drain

c

aus

ing

batter

y

c

harging

s

tatus

4-1

4

FLA

S

HES

1

FLA

S

H

Door

is

c

los

ing,

s

tops

a

nd

O

b

s

truc

tion,

binding

o

r

s

tic

k

ing

R

em

ov

e

o

bs

truc

tion,

s

erv

ic

e

door.

rev

e

rs

es

door

4-2

4

FLA

S

HES

2

FLA

S

HES

T

h

e

d

oor

s

to

p

s

w

hile

o

p

enin

g

O

b

s

truc

tion,

binding

or

s

tic

k

ing

Rem

o

v

e

obs

truc

tion

,

serv

ic

e

d

oor.

fo

r

n

o

apparent

reas

on

door

4-3

4

FLA

S

HES

3

FLA

S

HES

T

h

e

door

rev

e

rs

es

fo

r

n

o

O

b

s

truc

tion,

binding

o

r

s

tic

k

ing

Res

e

t

lim

its

&

fo

rc

e

,

serv

ic

e

door.

apparent

reas

on

or

af

ter

touc

h

ing

door

the

floor

4

-4

4

F

L

AS

H

E

S

4

F

L

AS

H

E

S

The

door

revers

es

fo

r

n

o

a

pp

arent

O

b

s

truc

tion,

binding

o

r

s

tic

k

ing

Res

e

t

lim

its

&

fo

rc

e

,

s

e

rv

ic

e

door.

reas

on

or

af

ter

touc

hing

the

floor

door

4

-5

4

F

L

AS

H

E

S

5

F

L

AS

H

E

S

Th

e

o

p

ener

runs

a

pp

roxi

m

a

tel

y

Com

m

unic

ation

e

rror

to

trav

el

150-200

m

m

a

nd

s

tops

and/or

re

v

e

rse

s

mo

d

u

le

Res

e

t

lim

its

&

fo

rc

e

c

ontac

t

s

e

rv

ic

e

c

entre

4-6

4

FLA

S

HES

6

FLA

S

HES

T

h

e

door

rev

e

rs

es

fo

r

n

o

a

pp

arent

Saf

e

ty

s

ens

ors

w

ere

tem

p

oraril

y

Rem

o

v

e

obs

truc

tion

,

or

reali

g

n

reas

on

w

h

ile

trav

e

lling

d

ow

n

obs

truc

ted

o

r

m

is

aligned

se

n

s

o

rs

M

y

gar

a

ge

door

opener

light(s)

w

ill

not

tur

n

o

ff

w

h

en

the

door

is

o

pen:

T

h

e

g

arage

door

opener

is

equipped

w

ith

a

feature

that

turns

the

light

on

w

hen

th

e

sa

fe

ty

re

v

e

rs

ing

s

ens

ors

hav

e

b

een

o

bs

truc

ted.

If

staying

on

continually

-

Contact

C

ustomer

S

ervice

Centre.

*

R

eprogram

the

rem

ote

c

ontrol.

*

If

the

rem

o

te

c

ontrol

w

ill

s

till

not

ac

tivate

the

door

c

hec

k

the

diagnos

tic

c

odes

to

ens

u

re

the

garage

door

opener

is

w

o

rk

ing

p

roperly

.

M

y

neighbour

's

remote

c

ontr

ol

opens

m

y

g

ar

age

d

oor

:

*

E

ns

ure

the

antenna

w

ire

is

hanging

dow

n

from

the

garage

door

opener.

Eras

e

the

m

e

m

o

ry

fr

om

y

our

garage

door

opener

and

reprogram

the

rem

o

te

co

n

trol(s

).

T

hes

e

a

re

additional

troubles

hooting

is

s

ues

that

w

ill

not

s

how

up

in

the

d

iagnos

tic

c

odes

:

M

y

re

mote

contr

o

l

w

ill

not

activ

ate

the

door

:

2

-4

2

F

L

AS

H

E

S

4

F

L

AS

H

E

S

T

h

e

g

arage

d

oor

op

ener

will

not

operate

b

y

remote

c

ontrols

PCB

radio

receiver

failure

Reset

o

pener

by

turning

mains

O

FF

for

2

0

s

econds,

recode

transmitters

2-5

2

FLA

S

HES

5

FLA

S

HES

T

h

e

g

arage

door

opener

will

not

operate

PCB

possible

internal

failure

R

eset

opener

by

turning

m

ains

OFF

for

2

0

s

econds,

retest

opener.

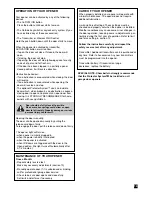
18

Summary of Contents for LM650EVGB

Page 1: ...rwellingen Germany www liftmaster eu Engineered and designed by The Chamberlain Group Inc USA Rolling Garage Door Opener LM650EVGB LM650EVGBSA LM850EVGBSA LM950EVGBSA Installation and Operating Instructions Keep these instructions for future reference ...

Page 2: ...oved prior to fitting the LM950EV DO NOT use extension poles with the LM950EV The LM950EV can be used on windlocked doors based on the following conditions door is professionally installed correctly sprung and maintained to manufacturer s instruction door size up to 18m product is only operated in normal conditions not during adverse wind conditions ...

Page 3: ...th reduced physical sensory or mental capablities or lack of experience and knowl edge unless they have been given supervision or instruction concerning use of the appliance by a person responsible for their safety Automatic Drive Keep away from the area of the door as it may operate unexpectedly This opener should not be installed in a damp or wet space exposed to weather Start by Reading These I...

Page 4: ...ng balanced The Protector System IR Beams must be installed if the force at the edge of the closing door exceeds 400 N 40 kg For LM950EV the maximum allowable door height is 5 5m light commercial door with a maximum curtain area of 25m door height in metres multiplied by the width in metres The door must be of continuous corrugated sheet con struction spring balanced of a mass not exceeding 250kg ...

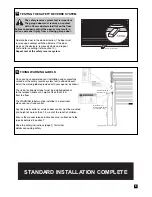
Page 5: ...fied door technician before installing the opener 4 INSTALLING THE STOP COLLAR Install the stop collar on the opposite end to where the opener is to be installed Fit the stop collar hard against the boss of the door drum Ensure the U bolt holding the door shaft to the door bracket is tightly secured 5 INSTALLING THE WEIGHT BAR optional Place the weight in the centre of the door as shown Use a penc...

Page 6: ...the rope heat seal the cut end to prevent unravelling refer section 16 7 OPERATING THE MANUAL RELEASE To disengage the opener Pull the release cord down firmly opener will make a clicking noise To re engage the opener Pull the release cord down firmly opener will make a clicking noise Disable all locks and remove any ropes connected to the garage door Take care when operating the manual release as...

Page 7: ...N POLES IF REQUIRED LM650EV LM850EV ONLY Optional accessory for model LM850EV Align the extension pole holes with the drive legs Insert the extension poles into the drive leg and fix in place using screws provided Slide the reinforcing brace over the poles and fix in place using the screws provided 10 Reinforcing brace must be used Use extension pole kit part number 001B6449 1 LEFT RIGHT HAND INST...

Page 8: ...to the door drum wheel either side of a spoke Extensions may be necessary refer section 10 Refit the door mounting bracket to the wall If the door bracket needs to be relocated due to opener width refer section 3 Clamp the opener on the door axle and door bracket in the marked position using the clamp assembly supplied tighten to 25 28 Nm If side room exceeds 95mm clamp independently to the door a...

Page 9: ...s illuminated simply press the Yellow learn button until the opposite bank lights up Press and release the Black limit set button to accept hand UP button will flash Setting the open UP limit Press and hold the UP button until the door reaches the desired open position and then release You can adjust the door by using the DOWN button and UP button to adjust as necessary Make sure there is enough r...

Page 10: ...erious personal injury from a closing garage door FIXING WARNING LABELS Once you have completed your installation and successfully carried out the safety reverse system test outlined above install the warning labels provided with your opener as shown The risk of entrapment label must be installed adjacent to the release handle at a height of less than1 8 m from the floor The WARNING label must be ...

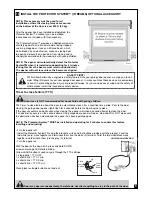
Page 11: ...o close the door If an obstruction occurs on the second attempt the garage door opener will open stop and WILL NOT close until the obstruction has been cleared and the opener has been operated again NOTE The Protector SystemTM MUST be installed and operating for 5 minutes to enable this feature Installing and adjusting Turn the opener off Install the Protector SystemTM using the brackets wires and...

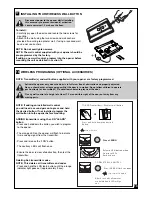
Page 12: ...TE Transmitter s and wall button supplied with your opener are factory programmed NOTE If adding an installed wall control you will need a second person to press and hold the desired button If not installed program the wall button into the opener before mounting ADDING transmitters using the LRN LEARN button Press and hold down the button you wish to program to the opener The orange LED on the ope...

Page 13: ...ad 4 Press and hold the ENTER button Check to see if the opener light blinks Release the ENTER button after the l ight bulb blinks To change an existing keyless entry PIN 1 Enter the existing programmed PIN that you want to change 2 Press and hold the button until the light bulb blinks twice 3 Enter the new 4 digit PIN of your choice then press the ENTER button The light bulb will blink once 4 To ...

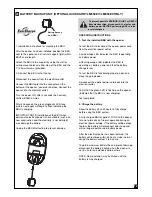
Page 14: ...tery Unplug the BBU after testing to prevent damage OPERATING INSTRUCTIONS 1 Test the installed BBU with the opener To test the BBU disconnect the opener power cord from the electrical power outlet A solid orange LED indicates the BBU is operating on battery power A flashing orange LED indicates the BBU is operating on battery power and that the battery charge is low To test the BBU is functioning...

Page 15: ... the battery is low Once the power is restored the BBU will recharge is indicated by a flashing green LED RED LED An error has been detected and the BBU will automatically shut off The BBU will attempt to restart by reconnecting to the battery If the error is still present it will shut itself off again This process will repeat every 5 minutes or until the error has been resolved This is used to pr...

Page 16: ...d in when the power is briefly interrupted when the opener is activated when IR Beams are triggered with the door in the Open position the light turns off automatically after 2 1 2 minutes CARE OF YOUR OPENER When properly installed your opener will operate with minimal maintenance The opener does not require additional lubrication Limit and Force Settings These settings must be checked and proper...

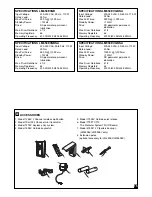
Page 17: ...equency 433 30 433 92 434 54 MHz SPECIFICATIONS LM850EVGBSA Input Voltage 220 240 VAC 50 60 Hz 170 W Rated Load 32 Nm Max Pull Force 550 N 300 mm Standby Power 1 Watt Drive DC gearmotor permanent lubrication Max Drum Rotations 4 1 2 Memory Registers 64 Operating Frequency 433 30 433 92 434 54 MHz SPECIFICATIONS LM650EVGB Input Voltage 230 240 VAC 50 Hz 110 W Rated Load 25 Nm Max Pull Force 500 N 3...

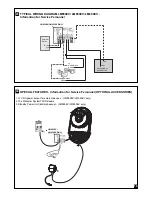
Page 18: ...ces LM950EV LM850EV only 2 The Protector SystemTM IR Beams 3 Standby Power Unit battery backup LM950EV LM850EV only 24 16 LM850EV LM950EV ONLY TYPICAL WIRING DIAGRAM LM950EV LM850EV LM650EV Information for Service Personnel 23 rx white black white white black white 12 vdc gnd External Device Keyswitch or push button com no 12V DC LM950EV LM850EV ONLY ...

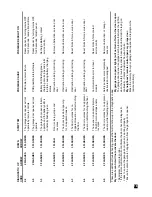
Page 19: ...stem is not close the door and the Protector System installed and aligned correctly lights flash both LEDs are ON with no obstruction between the beams 1 5 1 FLASH 5 FLASHES The garage door opener clicks Internal fault Contact service centre but no movement The opener runs approximately Communication error to Contact service centre 150 200 mm and stops and or reverses travel module Your garage doo...

Page 20: ...vice centre 4 6 4 FLASHES 6 FLASHES The door reverses for no apparent Safety sensors were temporarily Remove obstruction or realign reason while travelling down obstructed or misaligned sensors My garage door opener light s will not turn off when the door is open The garage door opener is equipped with a feature that turns the light on when the safety reversing sensors have been obstructed If stay...

Page 21: ...ers 6 The door reverses and stops before opening completely Is something obstructing the door Is it out of balance or are the springs broken Remove the obstruction or repair the door 7 The door reverses for no apparent reason and opener lights blink 10 times after reversing Check the Protector SystemTM IR Beams if installed Correct alignment if the red light on the beam is solid 8 The door opens b...

Page 22: ...ﺮ ﺇﻟﻰ ﺃﺳﻔﻞ ﺑﺸﺪﺓ ﺳﻴﺼﺪﺭ ﺟﻬﺎﺯ ﻓﺘﺢ ﺍﻟﺒﺎﺏ ﺻﻮﺕ ﻃﻘﻄﻘﺔ ﻹﻋﺎﺩﺓ ﺗﺸﻐﻴﻞ ﺟﻬﺎﺯ ﻓﺘﺢ ﺍﻟﺒﺎﺏ ﺍﺟﺬﺏ ﺣﺒﻞ ﺍﻟﺘﺤﺮﻳﺮ ﺇﻟﻰ ﺃﺳﻔﻞ ﺑﺸﺪﺓ ﺳﻴﺼﺪﺭ ﺟﻬﺎﺯ ﻓﺘﺢ ﺍﻟﺒﺎﺏ ﺻﻮﺕ ﻃﻘﻄﻘﺔ ﻗﻢ ﺑﺘﻌﻄﻴﻞ ﺁﺎﻓﺔ ﺍﻷﻗﻔﺎﻝ ﻭﺇﺯﺍﻟﺔ ﺃﻱ ﺣﺒﺎﻝ ﻣﺘﺼﻠﺔ ﺑﺒﺎﺏ ﺍﻟﺠﺮﺍﺝ ﻳﺮﺟﻰ ﺗﻮﺧﻲ ﺍﻟﺤﺬﺭ ﻋﻨﺪ ﺗﺸﻐﻴﻞ ﻧﻈﺎﻡ ﺍﻟﻔﺘﺢ ﺍﻟﻴﺪﻭﻱ ﺣﻴﺚ ﺃﻥ ﺍﻟﺒﺎﺏ ﺍﻟﻤﻔﺘﻮﺡ ﻗﺪ ﻳﺴﻘﻂ ﺑﺴﺮﻋﺔ ﺑﺴﺒﺐ ﺿﻌﻒ ﺃﻭ ﺁﺴﺮ ﻓﻲ ﺍﻟﺰﻧﺒﺮﺁﺎﺕ ﺃﻭ ﻳﻜﻮﻥ ﺍﻟﺒﺎﺏ ﻏﻴﺮ ﻣﺘﻮﺍﺯﻥ ﺇﻋﺪﺍﺩ ﺍﻟﺤﺪﻭﺩ ﻭﺍﻟﻘﻮﺓ ﻟﺘﺸﻐﻴﻞ ﺍﻟﺠﻬﺔ ﺍﻟﻴﻤﻨﻰ ﺃﻭ ﺍﻟﻴﺴﺮﻯ ﺗ ُ ﻌ ﻴ ﱢ ﻦ ﺣﺪﻭﺩ ﺃﺷﻮﺍﻁ ﺍﻟﺒ...

Page 23: ...ﻣﺾ ﺯﺭ ﺃﺳﻔﻞ ﺍﺿﻐﻂ ﻭ ﺣ ﺮ ﱢ ﺭ ﺯﺭ ﺃﺳﻔﻞ ﺳﻴﺘﺤﺮﻙ ﺍﻟﺒﺎﺏ ﻧ ﺰ ﻭ ﻟ ً ﺎ ﺗﺠﺎﻩ ﺍﻷﺭﺿﻴﺔ ﺇﻟﻰ ﺍﻟﺤﺪ ﺍﻟﺴﻔﻠﻲ ﺳﻴﺘﻮﻗﻒ ﻣﺆﺷﺮ ﺍﻟﻀﻮء LED ﻋﻦ ﺍﻟﻮﻣﻴﺾ ﻣ ﻮ ﺿ ﺤ ً ﺎ ﺃﻧﻪ ﺗ ﻌ ﻠ ﱠ ﻢ ﺣﺪ ﺍﻟﻘﻮﺓ ﻣﻼﺣﻈﺔ ﺳﺘﺨﺘﻔﻲ ﺃﺿﻮﺍء LED ﺍﻟﺨﺎﺻﺔ ﺑﻔﺘﺢ ﺍﻟﺒﺎﺏ ﺑﻌﺪ ﻣﺮﻭﺭ 2 5 ﺩﻗﻴﻘﺔ ﻳﺠﺐ ﺃﻥ ﻳﺘﺤﺮﻙ ﺍﻟﺒﺎﺏ ﺧﻼﻝ ﺩﻭﺭﺓ ﺁﺎﻣﻠﺔ ﺇﻟﻰ ﺃﻋﻠﻰ ﻭﺇﻟﻰ ﺃﺳﻔﻞ ﺣﺘﻰ ﻳﺘﻢ ﺿﺒﻂ ﺍﻟﻘﻮﺓ ﺑﺸﻜﻞ ﺻﺤﻴﺢ ﺇﺫﺍ ﺁﺎﻥ ﺟﻬﺎﺯ ﻓﺘﺢ ﺍﻟﺒﺎﺏ ﻻ ﻳﺴﺘﻄﻴﻊ ﻓﺘﺢ ﺃﻭ ﺇﻏﻼﻕ ﺑﺎﺑﻚ ﺑﺸﻜﻞ ﺁﺎﻣﻞ ﺍﻓﺤﺺ ﺑﺎﺑﻚ ﻟﻠﺘﺄﺁﺪ ﺃﻧﻪ ﻣﺘﻮﺍﺯﻥ ﺑﺸﻜﻞ ﺻﺤﻴﺢ ﻭﺃﻧﻪ ﻏﻴﺮ...

Page 24: ... ﺑﺮﺗﻘﺎﻟﻴﺔ ﺍﻟﺒﺎﺏ ﻓﺘﺢ ﺟﻬﺎﺯ ﺃﺿﻮﺍء ﺳﺘﻮﻣﺾ ﺯﺭ ﻭ ﺣ ﺮ ﱢ ﺭ ﺍﺿﻐﻂ ﺗ ﻌ ﻠ ﱠ ﻢ LRN ﺍﻟﺒﺎﺏ ﻓﺘﺢ ﻟﻤﺒﺎﺕ ﺳﺘﻮﻣﺾ LED ﻭﺍﺣﺪﺓ ﻣﺮﺓ ﺍﻹﺭﺳﺎﻝ ﺟﻬﺎﺯ ﺍﺧﺘﺒﺮ ﺛﻢ ﺍﻟﻌﻘﺒﺎﺕ ﻣﻦ ﺧ ﺎ ﻝ ٍ ﺍﻟﺒﺎﺏ ﻣﺴﺎﺭ ﺃﻥ ﺗﺄﺁﺪ ﻣﺴﺢ ﺁﻞ ﺍﻹﺭﺳﺎﻝ ﺟﻬﺎﺯ ﺭﻣﻮﺯ ﻣﻼﺣﻈﺔ ﻭﺍﻟﺮﻣﻮﺯ ﺍﻹﺭﺳﺎﻝ ﺃﺟﻬﺰﺓ ﺁﺎﻓﺔ ﺣﺬﻑ ﺇﻟﻰ ﺳﻴﺆﺩﻱ ﻩﺬﺍ ﺃﻥ ﻣﻼﺣﻈﺔ ﻳﺮﺟﻰ ﺯﺭ ﻋﻠﻰ ﺍﻟﻀﻐﻂ ﻓﻲ ﺍﻻﺳﺘﻤﺮﺍﺭ ﻣﻊ ﺍﺿﻐﻂ ﺗﻌﻠﻢ ﺿﻮء ﻳﺨﺘﻔﻲ ﺣﺘﻰ ﺍﻟﺒﺮﺗﻘﺎﻟﻲ ﺍﻟﻠﻮﻥ ﺫﻭ ﺍﻟﻤﺆﺷﺮ ﺫﻟﻚ ﻳﺴﺘﻐﺮﻕ 9 ﺗ ﻘ ﺮ ﻳ ﺒ ً ﺎ ﺛﻮﺍﻥ ﺗﺸﻐﻴﻞ ﺟﻬﺎﺯ ﻓﺘﺢ ﺍﻟﺒﺎﺏ ﺍﻟﺘﺎﻟﻴﺔ ﺍﻟﻄﺮﻕ ﻣﻦ ...

Page 25: ...ً ﺎ ﺍﻟﺒﺎﺏ ﻓﺘﺢ ﺟﻬﺎﺯ ﻳﻜﻮﻥ ﻋﻨﺪﻣﺎ ﻣﺘﻘﻄﻊ ﺍﻟﺒﺎﺏ ﻓﺘﺢ ﺟﻬﺎﺯ ﻳﻜﻮﻥ ﻋﻨﺪﻣﺎ ﺍﻟﺘﺸﻐﻴﻞ ﻗﻴﺪ ﺍﻟﺒﺎﺏ ﻓﺘﺢ ﺟﻬﺎﺯ ﻳﻜﻮﻥ ﻋﻨﺪﻣﺎ ﺃﺷﻌﺔ ﺗﻜﻮﻥ ﻋﻨﺪﻣﺎ IR ﺍﻟﺤﻤﺮﺍء ﺗﺤﺖ ﺍﻟﻔﺘﺢ ﻣﻮﺿﻊ ﻓﻲ ﺍﻟﺒﺎﺏ ﻣﻊ ﺗﻀﻲء ﺩﻗﻴﻘﺔ ﻧﺼﻒ ﺑﻌﺪ ﺗ ﻠ ﻘ ﺎ ﺋ ﻴ ً ﺎ ﺍﻟﻀﻮء ﻳﻨﻄﻔﺊ ﺩﻗﻴﻘﺘﻴﻦ ﺍﻟﻌﻨﺎﻳﺔ ﺑﺠﻬﺎﺯ ﻓﺘﺢ ﺍﻟﺒﺎﺏ ﺍﻟﺼﻴﺎﻧﺔ ﻣﻦ ﺣﺪ ﺃﺩﻧﻰ ﺍﻟﺒﺎﺏ ﻓﺘﺢ ﺟﻬﺎﺯ ﻟﻚ ﻳﻮﻓﺮ ﺳﻮﻑ ﺗﺜﺒﻴﺘﻪ ﻳﺘﻢ ﻋﻨﺪﻣﺎ ﺇﺿﺎﻓﻲ ﺗﺸﺤﻴﻢ ﺇﻟﻰ ﺍﻟﺒﺎﺏ ﻓﺘﺢ ﺟﻬﺎﺯ ﻳﺤﺘﺎﺝ ﻻ ﺍﻟﺒﺎﺏ ﺃﺷﻮﺍﻁ ﺣﺪﻭﺩ ﺇﻋﺪﺍﺩﺍﺕ ﻭﺍﻟﻘﻮﺓ ﺍﻹﻋﺪﺍﺩﺍﺕ ﻩﺬﻩ ﻓﺤﺺ ﻳﺠﺐ ﺍﻟﺒﺎﺏ ﻓﺘﺢ ﺟﻬ...

Page 26: ...ﺎﺏ ﻓﻲ ﺍﻟﺘﺤﻜﻢ ﺟﻬﺎﺯ ﺗﻮﺻﻴﻼﺕ ﺃﻥ ﺗﺄﺁﺪ 1 4 ﻭﺍﺣﺪﺓ ﻭﻣﻀﺔ 4 ﻭﻣﻀﺎﺕ ﻳ ُ ﻐ ﻠ ﻖ ﻻ ﺍﻟﺠﺮﺍﺝ ﺑﺎﺏ ﻓﺘﺢ ﺟﻬﺎﺯ ﺗﻮﻣﺾ ﻭﺍﻷﺿﻮﺍء ﺍﻟﺒﺎﺏ ﻧﻈﺎﻡ ﻣﺤﺎﺫﺍﺓ ﺿﺒﻂ ﻳﺘﻢ ﻟﻢ ﺍﻟﺤﻤﺎﻳﺔ Protector System TM ﺍﻋﺘﺮﺿﻪ ﺃﻭ ﻋﺎﺋﻖ ﺍﻟﺤﻤﺎﻳﺔ ﻧﻈﺎﻡ ﺗﺮﺁﻴﺐ ﺗﻢ ﺃﻧﻪ ﺗﺄﺁﺪ Protector System TM ﻭﺃﻥ ﺻﺤﻴﺢ ﺑﺸﻜﻞ ﻣﺤﺎﺫﺍﺗﻪ ﻭﺿﺒﻂ ﻟﻤﺒﺎﺕ ﺁﻠﺘﺎ LED ﺑﻴﻦ ﻋﻘﺒﺎﺕ ﺃﻱ ﺗﻮﺟﺪ ﻭﻻ ﻣﻀﻴﺌﺔ ﺍﻷﺷﻌﺔ 1 5 ﻭﺍﺣﺪﺓ ﻭﻣﻀﺔ 5 ﻭﻣﻀﺎﺕ ﺍﻟﺠﺮﺍﺝ ﺑﺎﺏ ﻓﺘﺢ ﺟﻬﺎﺯ ﻳ ُ ﺼ ﺪ ﺭ ﺻﻮﺕ ﺁﻠﻴﻚ ﺗﻮﺟﺪ ﻻ ﻭﻟﻜﻦ ﺣﺮﺁﺔ ﺍﻟﺠﺮﺍﺝ ﺑﺎﺏ ﻓﺘﺢ ﺟﻬﺎﺯ ﻳﻌ...

Page 27: ... ﻳﺮﺗﺪ ﺍﻷﺭﺿﻴﺔ ﻣﻼﻣﺴﺔ ﺑﻌﺪ ﻳﻌﺘﺮﺿﻪ ﺃﻭ ﻋﺎﻟﻖ ﻳﻜﻮﻥ ﻗﺪ ﺍﻟﺒﺎﺏ ﻣ ﺤ ﺸ ﻮ ﺭ ً ﺍ ﻳﻜﻮﻥ ﻗﺪ ﺃﻭ ﻋﺎﺋﻖ ﺑﺈﺟﺮﺍء ﻭﻗﻢ ﺍﻟﻌﺎﺋﻖ ﺃﺯﻝ ﻟﻠﺒﺎﺏ ﺻﻴﺎﻧﺔ 4 4 4 ﻭﻣﻀﺎﺕ 4 ﻭﻣﻀﺎﺕ ﺃﻭ ﻇﺎﻩﺮ ﺳﺒﺐ ﺑﺪﻭﻥ ﺍﻟﺒﺎﺏ ﻳﺮﺗﺪ ﺍﻷﺭﺿﻴﺔ ﻣﻼﻣﺴﺔ ﺑﻌﺪ ﻳﻌﺘﺮﺿﻪ ﺃﻭ ﻋﺎﻟﻖ ﻳﻜﻮﻥ ﻗﺪ ﺍﻟﺒﺎﺏ ﻣ ﺤ ﺸ ﻮ ﺭ ً ﺍ ﻳﻜﻮﻥ ﻗﺪ ﺃﻭ ﻋﺎﺋﻖ ﺻﻴﺎﻧﺔ ﺑﺈﺟﺮﺍء ﻭﻗﻢ ﻭﺍﻟﻘﻮﺓ ﺍﻟﺤﺪﻭﺩ ﺗﻌﻴﻴﻦ ﺃﻋﺪ ﻟﻠﺒﺎﺏ 4 5 4 ﻭﻣﻀﺎﺕ 5 ﻭﻣﻀﺎﺕ ﺍﻟﺠﺮﺍﺝ ﺑﺎﺏ ﻓﺘﺢ ﺟﻬﺎﺯ ﻳﻌﻤﻞ ﻟﻤﺴﺎﻓﺔ 150 200 ﺗ ﻘ ﺮ ﻳ ﺒ ً ﺎ ﻣﻢ ﻭ ﻭﻳﺘﻮﻗﻒ ﺍﺗﺠﺎﻩﻪ ﻳﻌﻜﺲ ﺃﻭ ﺍﻟﺤﺮﺁﺔ ﺑﻮﺣﺪﺓ...

Page 28: ...ﺎﻓﺔ ﺑﺮﻣﺠﺔ ﻭﺃﻋﺪ ﺍﻟﺬﺍﺁﺮﺓ ﺃﻓﺮﻍ ﺍﻹﺭﺳﺎﻝ ﻭﺃﺟﻬﺰﺓ 6 ﺁﺎﻣﻞ ﺑﺸﻜﻞ ﻳﻔﺘﺢ ﺃﻥ ﻗﺒﻞ ﻭﻳﺘﻮﻗﻒ ﺍﻟﺒﺎﺏ ﻳﺮﺗﺪ ﺃﻭ ﻣﺘﻮﺍﺯﻥ ﻏﻴﺮ ﺍﻟﺒﺎﺏ ﻩﻞ ﺍﻟﺒﺎﺏ ﻃﺮﻳﻖ ﻳﻌﺘﺮﺽ ﺷﻲء ﻩﻨﺎﻙ ﻩﻞ ﻩﻨﺎﻙ ﺍﻟﺒﺎﺏ ﺃﺻﻠﺢ ﺃﻭ ﺍﻟﻌﺎﺋﻖ ﺃﺯﻝ ﻣﻜﺴﻮﺭﺓ ﺯﻧﺒﺮﺁﺎﺕ 7 ﺍﻟﺒﺎﺏ ﻓﺘﺢ ﺟﻬﺎﺯ ﺃﺿﻮﺍء ﻭﺗﻮﻣﺾ ﻇﺎﻩﺮ ﺳﺒﺐ ﺑﺪﻭﻥ ﺍﻟﺒﺎﺏ ﻳﺮﺗﺪ 10 ﺍﻻﺭﺗﺪﺍﺩ ﺑﻌﺪ ﻣﺮﺍﺕ ﺍﻟﺤﻤﺎﻳﺔ ﻧﻈﺎﻡ ﻣﻦ ﺗﺤﻘﻖ Protector SystemTM ﺍﻟﺴﻼﻣﺔ ﻣﺴﺘﺸﻌﺮﺍﺕ ﺍ ﻟ ﻀ ﻮ ﺋ ﻴ ّ ﺔ ﺗﺮﺁﻴﺒﻪ ﺗﻢ ﻗﺪ ﺁﺎﻥ ﺇﺫﺍ ﺍﻷﺣﻤﺮ ﺍﻟﻀﻮء ﺁﺎﻥ ﺇﺫﺍ ﺍﻟﻤﺤﺎﺫﺍﺓ ﺻ ﺤ ﱢ ﺢ ﻓﻲ ﻳﻮﻣﺾ ﻻ ﺍﻟﺤﺰﻣ...

Reviews: