background image

ASSEMBLY SECTION

– 

5

6

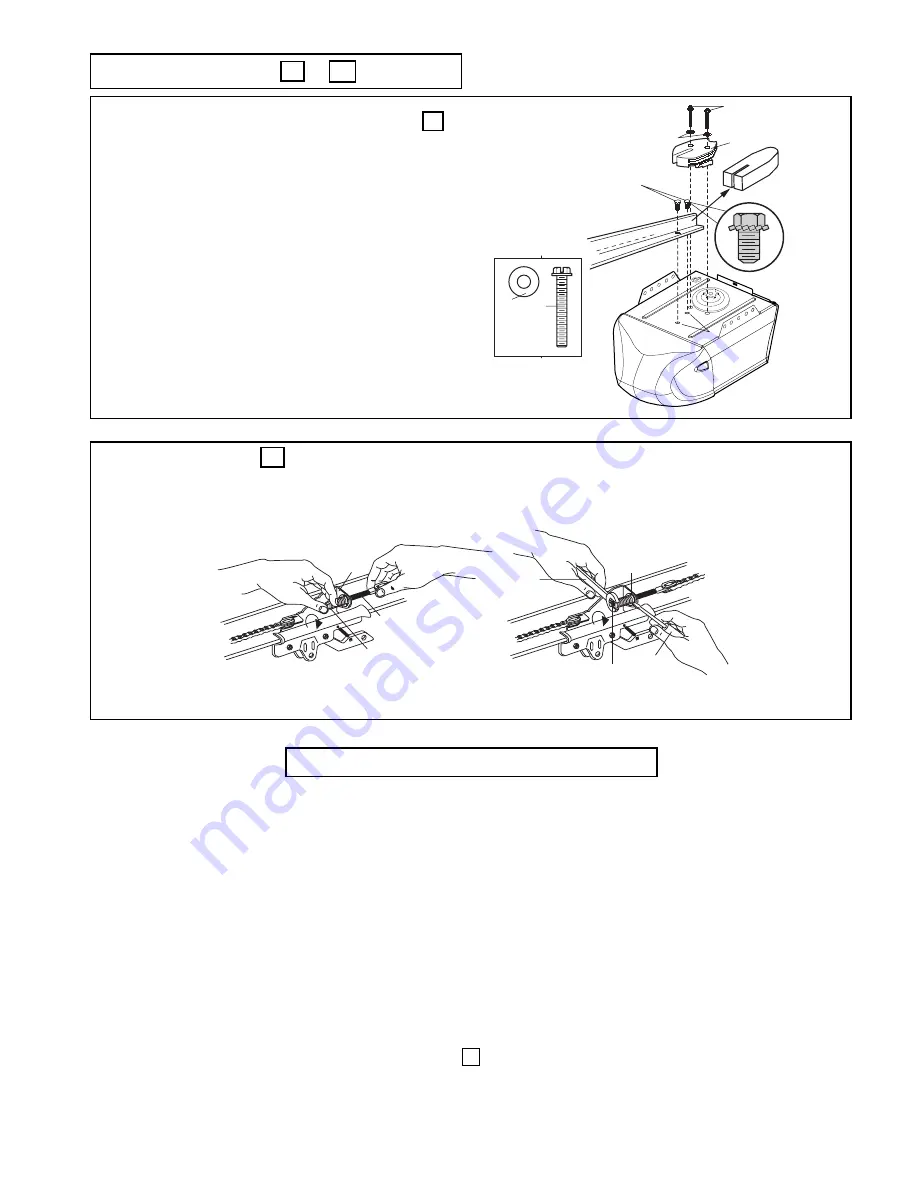
FASTEN T-RAIL & ATTACH CHAIN SPREADER – 

Place packing material under the opener to protect the opener cover. For convenience,
place a support under the chain pulley bracket end of rail.

Remove Styrofoam from rail end and the (2) washered screws 

(4) 

from the top of the

opener. Align holes in back end of the T-rail with holes in opener

(7)

.

Fasten the rail to the opener with the same washered screws and tighten securely.

Caution: Use only those screws! 

Use of any other screws will cause serious damage to the door opener.

Attach the chain spreader

(2)

with hex screws 

(1) 

and flat washers 

(3)

.

5

4

2

1

3

7

1

3

TIGHTEN THE CHAIN - 

Insert the threaded shaft (2) through the hole in the trolley (1). By hand, thread the spring trolley nut (3) on the threaded shaft until finger tight
against trolley. Insert a screwdriver tip (4) into one of the slots of the nut ring (7), and hold firmly. Using an open end wrench (5) at the square end
(6), slightly rotate the assembly clockwise until the nut ring (7) is released against the trolley, providing tension for the best operation of the opener.

1

2

3

7

5

6

4

ASSEMBLY OF YOUR OPENER IS NOW COMPLETE.

6

5

Summary of Contents for Merlin MT5580

Page 1: ......

Page 2: ...or property damage Caution If your garage has no service entrance door Model CM1702 Outside Quick Release must be installed This accessory allows manu al operation of the garage door from outside in...

Page 3: ...YPES 1 A One Piece Door with Horizontal Track Only B One Piece Door with Horizontal and Vertical Track Special door arm F The Chamberlain Arm required See your dealer C Sectional Door with Curved Trac...

Page 4: ...you have an access door in addition to the garage door If not Model CM1702 Outside Quick Release Accessory is required 5 Disable locks 6 Remove any ropes connected to garage door 7 Complete the follo...

Page 5: ...ng Torsion Spring Access Door OR Slack in chain tension is normal when garage door is closed Wall mounted Door Control Motor Unit FINISHED CEILING Support bracket fastening hardware is required See pa...

Page 6: ...e of any other screws will cause serious damage to the door opener Attach the chain spreader 2 with hex screws 1 and flat washers 3 5 4 2 1 3 7 1 3 TIGHTEN THE CHAIN Insert the threaded shaft 2 throug...

Page 7: ...not provided to securely fasten the 2x4 to structural supports as shown here and on page 9 3 Open your door to the highest point of travel as shown Draw an intersecting horizontal line on the header...

Page 8: ...signated for ceiling mount only 4 Drill 4 5mm 3 16 pilot holes and fasten the bracket with wood screws 3 For concrete ceiling mount use concrete anchors 7 provided 8 UP CEILING MOUNT ONLY UP CE ILING...

Page 9: ...structural support before installing the opener For concrete ceiling mount Figure C use concrete anchors 5 provided On each side of opener measure the distance from the opener to the structural suppor...

Page 10: ...at least 1 5m Serious personal injury from a moving garage door may result from misuse of opener Do not allow children to operate the wired door con trols or remote control transmitters Fasten the cau...

Page 11: ...nt door arm Exercise care in removing and assembling arm conversion kit Keep fingers away from the sliding parts NOTE Horizontal and vertical reinforcement is needed for lightweight garage doors Secti...

Page 12: ...open position parallel to floor and lift door arm 9 to trolley The arm should touch trolley just in back of door arm connector hole 10 as shown in solid line drawing Increase up limit if necessary On...

Page 13: ...hree buttons are held 6 4 Release buttons when the opener light blinks It has learned the code If the light bulb is not installed two clicks will be heard 7 To Erase all Remote Control Codes To deacti...

Page 14: ...turn equals 5cm 2 of travel If Door Reverses when Closing and there is no Interference to Travel Cycle Test door for binding Pull manual release handle Manually open and close door If door is binding...

Page 15: ...ver 400N 40kg After opener has been installed and adjusted The Protector System accessory can be installed Instructions are included with this accessory The Protector System provides an additional mea...

Page 16: ...to move The Outside Keylock or Keyless Entry System if you have installed either of these accessories The Remote Control Transmitter Hold the push button down until the door starts to move Opening th...

Page 17: ...ngaged all door locks Review installation instruction warnings on page 1 Is there a build up of ice or snow under door The door may be frozen to ground Remove any obstruction The garage door spring ma...

Page 18: ...is complete 11 Opener light does not turn on Replace light bulb 40 Watts maximum Replace burned out bulbs with rough service light bulbs 12 Opener light does not turn off There may be a defective eart...

Page 19: ...3 217A238 178B34 178B35B NOTICE 41A2828 12B374 41A4353 1 UP CE ILI NG MO UN T ON LY 4A1008 RAIL GREASE NO 83A4 83A4 12B380 178B69 1A5414 1706E 1 7m 1707E 2 3m 1708E 2 5m 1710E 3m 41D3484 1 1 7m 41D348...

Page 20: ...ent of the parts of this product which are found to be defective and does not cover the costs or risks of transportation of the defective parts or product This warranty does not cover non defect damag...

Reviews: