background image

8

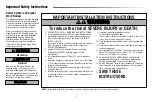
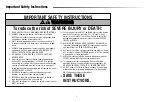
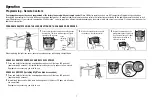
To prevent possible SERIOUS INJURY or DEATH from a falling garage door:
•   If possible, use emergency release handle to disengage trolley ONLY when garage 

door is CLOSED. Weak or broken springs or unbalanced door could result in an open 
door falling rapidly and/or unexpectedly.

•   NEVER use emergency release handle unless garage doorway is clear of persons and 

obstructions.

•    NEVER use handle to pull door open or closed. If rope knot becomes untied, you 

could fall.

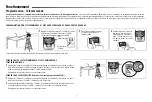
DISCONNECT THE TROLLEY 

The door should be fully closed if possible. 

Pull down on the emergency release handle.

RECONNECT THE TROLLEY

The lockout feature prevents the trolley from reconnecting 
automatically. 

1  

Pull the emergency release handle down and back (toward 
the opener). The door can then be raised and lowered 
manually as often as necessary. 

2  

To disengage the lockout feature, pull the handle straight 
down. 

The trolley will reconnect on the next UP or DOWN operation, 
either manually or by using the door control or remote control.

To Open the Door Manually

Operation

Battery Backup (If applicable) 

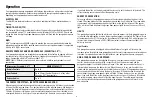
The battery backup system allows access in and out of your garage, even when the power is out.  When the garage door opener is operating on battery power, the garage door opener will run 
slower, the light will not function, the Battery Status LED will glow solid orange, and a beep will sound approximately every 2 seconds.

The battery charges when the garage door opener is plugged into a 110Vac electrical outlet that has power and requires 24 hours to fully charge. A fully charged battery supplies 12Vdc to 
the garage door opener for one to two days of normal operation during an electrical power outage. After the electrical power has been restored, the battery will recharge within 24 hours. The 
battery will last approximately 1 to 2 years with normal usage. Instructions for replacement are provided with the battery. To obtain maximum battery life and prevent damage, disconnect the 
battery when the garage door opener is unplugged for an extended period of time.

NOTE: 

When the garage door opener is in battery backup mode the garage door opener lights, Timer-to-Close, and Remote Close features are unavailable.

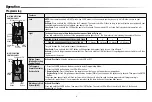
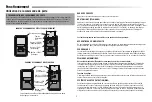
BATTERY STATUS LED

GREEN LED:

All systems are normal.

•   A solid green LED light indicates the 

battery is fully charged.

•   A fl ashing green LED indicates the 

battery is being charged.

 ORANGE  LED:

The garage door opener has lost power and 
is in battery backup mode.

•   A solid orange LED with beep, sounding 

approximately every 2 seconds, 
indicates the garage door opener is 
operating on battery power.

•   A fl ashing orange LED with beep, 

sounding every 30 seconds, indicates 
the battery is low.

NOTE: 

The Battery Status LED is most 

visible with the garage door opener light off.  
Battery does not have to be fully charged to 
operate the garage door opener.

Battery Status LED

RED LED:

The garage door opener’s 12V battery needs 
to be replaced.

•   A solid red LED with beep, sounding 

every 30 seconds, indicates the garage 
door opener needs servicing. Please 
call for replacement battery to allow 
your system to operate during a power 
outage.

Summary of Contents for PREMIUM series

Page 1: ...LOSE unless the Protector System is connected and properly aligned Periodic checks of the garage door opener are required to ensure safe operation This garage door opener is ONLY compatible with MyQ and Security 2 0 accessories DO NOT enable the Timer to Close feature if you are installing the garage door opener on a one piece door The Timer to Close is to be used ONLY with sectional doors Attach ...

Page 2: ...able ALL locks and remove ALL ropes connected to garage door BEFORE installing opener to avoid entanglement 5 Install garage door opener 7 feet 2 13 m or more above floor 6 Mount the emergency release within reach but at least 6 feet 1 83 m above the floor and avoiding contact with vehicles to avoid accidental release 7 NEVER connect garage door opener to power source until instructed to do so 8 NEV...

Page 3: ...ersons and obstructions 8 NEVER use handle to pull garage door open or closed If rope knot becomes untied you could fall 9 After ANY adjustments are made the safety reversal system MUST be tested 10 Safety reversal system MUST be tested every month Garage door MUST reverse on contact with 1 1 2 high 3 8 cm object or a 2x4 laid flat on the floor Failure to adjust the garage door opener properly incre...

Page 4: ... door control or keyless entry until the door is fully closed The safety reversing sensors do not affect the opening cycle ENERGY CONSERVATION For energy efficiency the garage door opener will enter sleep mode when the door is fully closed The sleep mode shuts the garage door opener down until activated The sleep mode is sequenced with the garage door opener light bulb as the light bulb turns off t...

Page 5: ...r opener lights when motion is sensed The lights will come on for the set period of time then shut off If using the garage door opener light as a work light disable the motion sensor otherwise the light will turn off automatically if you are beyond the range of the sensor Light Feature The lights will turn on when someone enters through the open garage door and the safety reversing sensor infrared...

Page 6: ...tivate Deactivate Slide the motion sensor switch ON or OFF To Program a Remote Control or Keyless Entry 1 Press the LEARN button on the door control to enter Programming Mode 2 Press the LEARN button again the LED will flash once 3 Remote Control Press the button on the remote control that you wish to operate your garage door Keyless Entry Enter a 4 digit personal identification number PIN of your c...

Page 7: ...on on the garage door opener To program additional remote controls refer to the instructions provided with the additional remote controls or visit www liftmaster com If your vehicle is equipped with a Homelink you may require an external adapter depending on the make model and year of your vehicle Visit www homelink com for additional information ERASE ALL REMOTE CONTROLS AND KEYLESS ENTRIES 1 Pre...

Page 8: ... into a 110Vac electrical outlet that has power and requires 24 hours to fully charge A fully charged battery supplies 12Vdc to the garage door opener for one to two days of normal operation during an electrical power outage After the electrical power has been restored the battery will recharge within 24 hours The battery will last approximately 1 to 2 years with normal usage Instructions for repl...

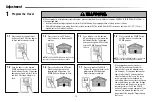
Page 9: ...ner is designed with electronic controls to make setup and adjustments easy The adjustments allow you to program where the door will stop in the open UP and close DOWN position The electronic controls sense the amount of force required to open and close the door NOTE If anything interferes with the door s upward travel it will stop If anything interferes with the door s downward travel it will rev...

Page 10: ...UP Button When the door travels to the programmed UP position the DOWN Button will begin to flash 1 7 Press and release the DOWN Button The door will travel to the programmed DOWN position Programming is complete 1 4 Press and hold the DOWN Button until the door is in the desired DOWN position NOTE The UP and DOWN Buttons can be used to move the door up and down as needed If the garage door opener ...

Page 11: ... be tested every month After ANY adjustments are made the safety reversal system MUST be tested Door MUST reverse on contact with 1 1 2 high 3 8 cm object or 2x4 laid flat on the floor 2 Test the Protector System 3 1 Open the door Place the garage door opener carton in the path of the door The garage door opener will not close from a remote control if the LED in either safety reversing sensor is off...

Page 12: ...la conformité peut avoir pour résultat d annuler l autorité de l utilisateur de faire fonctionner l équipement Cet appareil est conforme aux dispositions de la partie 15 du règlement de la FCC et de la norme IC RSS 210 Son utilisation est assujettie aux deux conditions suivantes 1 ce dispositif ne peut causer des interférences nuisibles et 2 ce dispositif doit accepter toute interférence reçue y c...

Page 13: ...rses Manually open and close the door Check for binding or obstructions such as a broken spring or door lock correct as needed Check wiring connections at travel module and at the logic board Replace travel module if necessary No movement only a single click Manually open and close the door Check for binding or obstructions such as a broken spring or door lock correct as needed Replace logic board...

Page 14: ...ng or door lock correct as needed If the door is binding or sticking contact a trained door systems technician If door is not binding or sticking attempt to reprogram travel refer to page 10 4 5 Opener runs approximately 6 8 stops and reverses Communication error to travel module Check travel module connections replace travel module if necessary 4 6 The garage door opener will not close and the li...

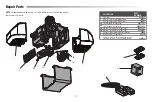
Page 15: ... Board Model 8360 45DCT Receiver Logic Board Model 8355 45ACT 3A Travel Module Model 8360 41A7114 7 3B Travel Module Model 8355 041D7742 7 4A Motor w Travel Module Model 8360 41D1739 1 4B Motor w Travel Module Model 8355 041A7442 5 3V2032 Lithium Battery Remote Control 10A20 6 Backup Battery if applicable 485LM 7 Safety Sensor Kit with receiving and sending sensors with 3 feet 9 m 2 conductor wire...

Page 16: ... You are responsible for any costs incurred in removing and or reinstalling the product or any component ALL IMPLIED WARRANTIES FOR THE PRODUCT INCLUDING BUT NOT LIMITED TO ANY IMPLIED WARRANTIES OF MERCHANTABILITY AND FITNESS FOR A PARTICULAR PURPOSE ARE LIMITED IN DURATION TO THE APPLICABLE LIMITED WARRANTY PERIOD SET FORTH ABOVE FOR THE RELATED COMPONENT S AND NO IMPLIED WARRANTIES WILL EXIST O...

Page 17: ... n est pas branché et réglé correctement Des vérifications périodiques de l ouvre porte de garage sont requises pour garantir un fonctionnement sécuritaire du dispositif Cet ouvre porte de garage est compatible UNIQUEMENT avec les accessoires MyQ et Security 2 0 N activez PAS la fonction de minuterie de fermeture si vous installez l ouvre porte de garage sur une porte rigide La minuterie de fermet...

Page 18: ...de montage DOIVENT être confiées à un technicien formé en systèmes de porte AVANT de poser l ouvre porte 4 Désactiver TOUTES les serrures et retirer TOUTES les cordes raccordées à la porte de garage AVANT de poser l ouvre porte afin d éviter un emmêlement 5 Poser l ouvre porte de garage à au moins 2 13 m 7 pi au dessus du sol 6 Laisser le déverrouillage de secours à portée de main mais à au moins 1 ...

Page 19: ...re de la porte 8 N utilisez JAMAIS la poignée pour ouvrir ou fermer la porte de garage Il y a risque de chute si le noeud de la corde se défait 9 Après avoir effectué quelque réglage que ce soit on DOIT faire l essai du système d inversion de sécurité 10 Le système d inversion de sécurité DOIT être testé chaque mois La porte de garage DOIT remonter au contact d un objet d une hauteur de 3 8 cm 1 1...

Page 20: ...ouillage jusqu à ce que la porte soit totalement fermée Le capteur d inversion n a aucun effet sur le cycle d ouverture CONSERVATION DE L ÉNERGIE Pour une efficacité énergétique l ouvre porte de garage se met en mode de veille lorsque la porte est complètement fermée Le mode de veille ferme l ouvre porte de garage jusqu à ce qu il soit activé Le mode veille est séquencé à l ampoule d éclairage de l...

Page 21: ...té L éclairage s allume pendant la période de temps fixée puis s éteint Si vous utilisez l éclairage de l ouvre porte de garage comme une lampe de travail désactivez l détecteur de mouvement sinon l éclairage s éteindra automatiquement quand vous êtes hors de portée du capteur Fonction d eclairage L éclairage s allume quand quelqu un entre par la porte de garage ouverte et que le faisceau infraroug...

Page 22: ... de détecteur de mouvement à la position de marche ou d arrêt Pour programmer à télécommande ou Ouvre porte sans fil et sans clé 1 Appuyez sur le bouton de mise en mémoire LEARN sur la commande de porte pour passer en mode de programmation 2 Appuyez une fois de plus sur le bouton LEARN la DEL clignotera une fois 3 Télécommande Appuyez sur le bouton de la télécommande que vous souhaitez utiliser pou...

Page 23: ...vec les télécommandes supplémentaires ou consulter le site www liftmaster com Si votre véhicule est équipé du système Homelink un adaptateur externe peut être nécessaire selon la marque et l année modèle de votre véhicule Aller sur www homelink com pour de l information supplémentaire EFFACER TOUTES LES TÉLÉCOMMANDES ET LES COMMANDES DE TÉLÉDÉVERROUILLAGE 1 Appuyer sur le bouton LEARN de l ouvre p...

Page 24: ...recharge complète de la pile prend 24 heures Une pile complètement chargée fournit une tension de 12 V c c à l ouvre porte de garage pendant une ou deux journées de fonctionnement normal lors d une panne de courant Une fois que l alimentation électrique a été rétablie la pile se rechargera dans les 24 heures La pile durera durera environ un à deux ans pour un usage normal Les instructions de rempl...

Page 25: ...MENT Votre ouvre porte de garage est conçu avec des commandes électroniques pour rendre la configuration et les réglages faciles Les réglages vous permettent de programmer là où la porte s arrêtera en position d ouverture UP et de fermeture DOWN Les commandes électroniques détectent la puissance du courant nécessaire à l ouverture et à la fermeture de la porte REMARQUE Si quoi que ce soit gêne l ou...

Page 26: ...et le bas au besoin 1 6 Appuyer et relâcher le bouton UP Lorsque la porte se déplace à la position UP programmée le bouton DOWN commencera à clignoter 1 7 Appuyer et relâcher le bouton DOWN La porte se déplacera jusqu à la position de fermeture programmée La programmation est terminée 1 4 Appuyer sur le bouton DOWN et le maintenir enfoncé jusqu à ce que la porte soit à la position de fermeture dés...

Page 27: ...é quelque réglage que ce soit on DOIT faire l essai du système d inversion de sécurité La porte de garage DOIT remonter au contact d un objet d une hauteur de 1 1 2 po 3 8 cm ou un 2 x 4 posé à plat sur le sol AVERTISSEMENT 2 Essai du Protector System 3 1 Ouvrir la porte Mettre la boîte en carton de l ouvre porte sur le chemin de la porte Si l essai échoue encore appeler un technicien formé en sys...

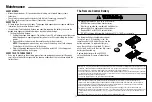
Page 28: ... 2 ce dispositif doit accepter toute interférence reçue y compris une interférence pouvant causer un fonctionnement non souhaité Cet appareil numérique de la classe B est conforme à la norme NMB 003 du Canada Entretien CHAQUE MOIS Faire fonctionner la porte à la main Si elle est déséquilibrée ou si elle force appeler un technicien formé en systèmes de porte S assurer que la porte s ouvre et se fer...

Page 29: ...de 15 à 20 cm 6 à 8 po puism s arrête ou inverse sa course Ouvrir et fermer manuellement la porte Vérifier si un objet est collé ou obstrue la porte comme un ressort ou une serrure brisé e corriger au besoin Vérifier les connexions de câble au module de course et à la plaque logique Remplacer le module au besoin Aucun mouvement même pas un déclic Ouvrir et fermer manuellement la porte Vérifier si un ...

Page 30: ...erelle internet LiftMaster consulter la page 4 Fonctionnement sur l alimentation de pile ou la pile de 12 V c c en coruant continu doit être remplacée s il y a lieu voir pages 8 et 12 Ma télécommande n actionne pas la porte de garage Vérifier si la fonction de verrouillage n est pas activée sur la commande de porte Reprogrammer la télécommande Si la télécommande n actionne toujours pas la porte vér...

Page 31: ...cement Modéle 8360 41D1739 1 4B Moteur avec Module de déplacement Modéle 8355 041A7442 4 Pile au lithium 3V2032 télécommande 10A20 5 Pile de secours S il y a lieu 485LM 6 Capteur d inversion de sécurité avec cellules réceptrice et émettrice avec fil de 0 9 m 3 pi à 2 conducteurs 41A5034 REMARQUE Pour les pièces supplémentaires non affichées visitez www liftmaster com pour télécharger ou imprimer du ...

Page 32: ... du produit ou de tout composant incombent à l acheteur TOUTE GARANTIE IMPLICITE POUR CE PRODUIT Y COMPRIS MAIS DE FAÇON NON LIMITATIVE TOUTE GARANTIE IMPLICITE DE QUALITÉ MARCHANDE ET D ADEQUANTION À UN USAGE PARTICULIER SE LIMITE À LA DURÉE DE LA PÉRIODE DE GARANTIE LIMITÉE APPLICABLE STIPULÉEE CI DESSUS POUR LES COMPOSANTS CONCERNES AUCUNE GARANTIE IMPLICITE N EXISTERA OU NE S APPLIQUERA APRES ...

Reviews: