background image

26

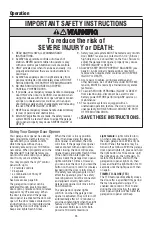
IMPORTANT SAFETY INSTRUCTIONS

To reduce the risk of 

SEVERE INJURY or DEATH:

1.   READ AND FOLLOW ALL WARNINGS AND 

INSTRUCTIONS.

2.   ALWAYS keep remote controls out of reach of 

children. NEVER permit children to operate or play 
with door control push buttons or remote controls. 

3.   ONLY activate door when it can be seen clearly, it is 

properly adjusted and there are no obstructions to 
door travel.

4.   ALWAYS keep garage door in sight and away from 

people and objects until completely closed. NO ONE 
SHOULD CROSS THE PATH OF THE MOVING DOOR.

5.   NO ONE SHOULD GO UNDER A STOPPED, 

PARTIALLY OPENED DOOR.

6.   If possible, use emergency release handle to disengage 

door ONLY when door is CLOSED. Use caution when 
using this release with the door open. Weak or broken 
springs or unbalanced door could result in an open 
door falling rapidly and/or unexpectedly and increasing 
the risk of SEVERE INJURY or DEATH.

7.   NEVER use emergency release handle unless doorway 

is clear of persons and obstructions.

8.   After ANY adjustments are made, the safety reversal 

system MUST be tested. Failure to adjust the garage 
door opener properly may cause SEVERE INJURY or 
DEATH.

9.   Safety reversal system MUST be tested every month. 

Door MUST reverse on contact with 1-1/2" (3.8 cm) 
high object (or a 2x4 laid fl at) on the fl oor. Failure to 
adjust the garage door opener properly may cause 
SEVERE INJURY or DEATH.

10.  ALWAYS KEEP DOOR PROPERLY BALANCED (see 

page 4). An improperly balanced door may NOT 
reverse when required and could result in SEVERE 
INJURY or DEATH.

11.  ALL repairs to cables, spring assemblies and 

other hardware, ALL of which are under EXTREME 
tension, MUST be made by a trained door systems 
technician.

12.  To avoid SERIOUS PERSONAL INJURY or DEATH 

from electrocution, disconnect ALL electric and 
battery power BEFORE performing ANY service or 
maintenance.

13.  This operator system is equipped with an 

unattended operation feature. The door could move 
unexpectedly. NO ONE SHOULD CROSS THE PATH 
OF THE MOVING DOOR.

14. 

 SAVE THESE INSTRUCTIONS.

Operation

Your garage door opener has already 
been programmed at the factory to 
operate with your remote control, 
which changes with each use, 
randomly accessing over 100 billion 
new codes. When programmed to the 
Chamberlain

®

 Internet Gateway you 

can monitor and control your garage 
door from your smartphone. 
You may program the myQ

®

 control 

panel with up to:
•  12 remote controls 
• 2 keypads
•   a combination of 16 myQ

®


accessories

See Accessories page 38.
The garage door opener can be 
activated through a wall-mounted 
door control, remote control, wireless 
keypad or myQ

®

 accessory. When 

the door is closed and the garage 
door opener is activated the door will 
open. If the door makes contact with 
an obstruction or is interrupted while 
opening the door will stop, opener 
beeps and lights fl ash 5 times.

Using Your Garage Door Opener

When the door is in any position 
other than closed and the garage 
door opener is activated, the door 
will close. If the garage door opener 
makes contact with an obstruction 
while closing, the door will reverse, 
opener beeps and lights fl ash 5 times. 
If the obstruction interrupts the 
sensor beam the garage door opener 
lights will blink 10 times. However, 
you can close the door if you hold the 
button on the door control or wireless 
keypad until the door is fully closed. 
The safety reversing sensors do not 
affect the opening cycle. The safety 
reversing sensor must be connected 
and aligned correctly before the 
garage door opener will move in the 
down direction.
The garage door opener lights 
will turn on when the garage door 
opener is activated. They will turn off 
automatically after 4-1/2 minutes or 
provide constant light when the Light 
feature on the myQ

®

 Control Panel 

is activated. Bulb size is A19. Bulb 
power is 100 watts maximum.

Light feature:

 Lights will also turn 

on when someone walks through 
the open garage door. With a myQ

®


Control Panel, this feature may be 
turned off as follows: With the garage 
door opener lights off, press and hold 
the light button for 10 seconds, until 
the light goes on, then off again. To 
restore this feature, start with the 
garage door opener lights on, then 
press and hold the light button for 10 
seconds until the light goes off, then 
on again.

TIMER-TO-CLOSE (TTC)

The TTC feature automatically closes 
the door after a specifi ed time period 
that can be adjusted using a TTC 
enabled door control. Prior to and 
during the door closing, the garage 
door opener lights will fl ash and the 
garage door opener will beep.

Summary of Contents for RJO20

Page 1: ... is ONLY compatible with myQ accessories The model number label is located behind the hinged door of your opener This product is NOT intended for use on low headroom tracks with outside pickup drum or garage doors utilizing extension springs For advanced or customized adjustments door springs and or track configurations contact a trained door systems technician For Residential Use Install On Secti...

Page 2: ...red 14 Install the Door Control myQ Control Panel 15 Install Remote Light 16 Install the Protector System 17 Connect Power 20 Align the Safety Reversing Sensors21 ADJUSTMENT 22 Program the Travel Limits 22 Enter Force Adjustment Mode 23 Test the Safety Reversal System 24 Test the Protector System 24 Test the Power Door Lock 25 Test the Emergency Release 25 Test Cable Tension Monitor 25 OPERATION 2...

Page 3: ... a door lighter so you can easily open and close the door by hand High Lift Sectional Door A type of garage door constructed with multiple panels that slide along a track inside the garage The track runs vertically up the wall beyond the top of the door opening several inches before encountering the curve in the track The extended distance above the top of the garage door determines the amount of ...

Page 4: ...on bar must extend at least 1 1 2 inches 3 81 cm past the bearing plate and be free of damage Distance between ceiling and center of torsion bar is 3 inches 7 6 cm or more Distance between garage wall the torsion bar is mounted on and center of torsion bar is 2 1 2 inches 6 4 cm or more A minimum of 8 5 inches 21 6 cm between the side garage wall or obstruction and the end of the torsion bar Drums...

Page 5: ...BEFORE installing and operating garage door opener to avoid entanglement Preparation continued ____ 1 Uninstall previous garage door opener ____ 2 Disable locks ____ 3 Remove any ropes connected to the garage door ____ 4 Check the seal on the bottom of the door Any gap between the floor and the bottom of the door must not exceed 1 4 inch 6 mm Otherwise the safety reversal system may not work proper...

Page 6: ...ing Sensor 1 Lock Template Carton Inventory Save the carton and packing material until the installation and adjustment is complete The images throughout this manual are for reference only and your product may look different Door Control myQ Control Panel Model 041A7928 3 NOT SHOWN Safety labels and literature Preparation continued Screw 10 32 2 REMOTE LIGHT HARDWARE INCLUDED HARDWARE ACCESSORIES S...

Page 7: ...EED FOR THE INSTALLATION Survey your garage area to see if you will need any of the following items Wood blocks and or shimming material Used to mount the cable tension monitor Fastening hardware Alternate floor mounting of the safety reversing sensor will require hardware not provided Extension brackets Model 041A5281 1 or wood blocks and shimming material Used to position the garage door opener d...

Page 8: ... clothing while installing or servicing the garage door opener They could be caught in door or operator mechanisms 9 Install wall mounted door control within sight of the door out of reach of small children at a minimum height of 5 feet 1 5 m above floors landings steps or any other adjacent walking surface away from ALL moving parts of the door 10 Install the Entrapment Warning Placard next to the...

Page 9: ...and until they contact the torsion bar Then use a socket wrench to finish tightening the set screws by turning them 1 4 1 2 turn 5 Loosely attach slotted side of mounting bracket to the same side of the garage door opener as the collar using screws provided NOTE Do not tighten mounting bracket screws until instructed Attach the Collar to the Garage Door Opener 1 To prevent possible SERIOUS INJURY o...

Page 10: ...en the garage door opener is properly aligned mark the mounting bracket holes If necessary tighten collar screws on the torsion bar to hold garage door opener in place while marking holes NOTE The garage door opener does not have to be flush to the wall To prevent possible SERIOUS INJURY or DEATH Concrete anchors MUST be used if mounting bracket into masonry NEVER try to loosen move or adjust garag...

Page 11: ... 4 1 full turn after making contact with the bar For a solid shaft torsion bar tighten screws 1 4 no more than 1 2 turn after making contact with the shaft If installing on a keyed torsion bar DO NOT tighten the screws into the keyway 9 Secure the mounting bracket to the wall and to the garage door opener Use the 14 10x2 screws to secure the mounting bracket to the wall Installation continued Scre...

Page 12: ...the power door lock Mount the door lock on the same side as the opener The third roller from the floor is ideal for most installations The power door lock MUST be mounted within 10 feet 3 05 m of garage door opener with approximately a 3 inch 7 6 cm distance between the center of a door roller and the hole for the power door lock bolt Garage Door Opener Emergency Release Cable Overhand Knot Overhan...

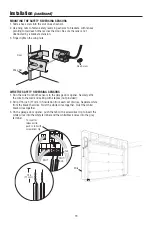
Page 13: ...tension monitor MUST be connected and properly installed BEFORE the garage door opener will move in the down direction The cable tension monitor must be installed on the same side as the garage door opener Factory default is configured for left side installation 1 Determine if the cable tension monitor will be installed on the left or right side of the door 2 For left side installation skip to Step...

Page 14: ... cable tension monitor to the wall using the hardware provided Check that the roller is on top of the cable 3 Run wire to garage door opener Securely affix wire to wall and ceiling Secure any additional wire away from the moving parts of the door 4 Connect wire to the green quick connect terminals on the garage door opener NOTE Cable must have tension through entire door travel Check there is no sl...

Page 15: ...iling with the staples not applicable for gang box or pre wired installations 10 Strip 7 16 11 mm of insulation from the end of the wire near the garage door opener Connect wire to the quick connect terminals on the garage door opener white to white and white red to red 11 Fasten the warning placard to the wall next to the door control NOTE DO NOT connect the power and operate the garage door open...

Page 16: ...to outlet NOTE Light will not operate until the garage door opener is activated Multiple openers in the same garage may cause interference between lights Program all lights to one opener to avoid interference Install Remote Light 9 To prevent possible OVERHEATING of the end panel or light socket DO NOT use short neck or specialty light bulbs DO NOT use halogen bulbs Use ONLY incandescent DO NOT us...

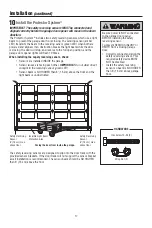
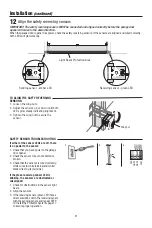
Page 17: ... direct sunlight to the receiving sensor green LED Sensor beam is NO HIGHER than 6 15 cm above the floor and the light beam is unobstructed The safety reversing sensors are designed to clip onto the door track with the provided sensor brackets If the door track will not support the sensor bracket a wall installation is recommended The sensor beam should be NO HIGHER than 6 15 cm above the floor Be s...

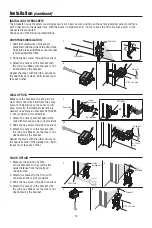
Page 18: ...other sensor on the opposite side of the garage door Both lenses must face each other INSTALLING THE BRACKETS The brackets house the safety reversing sensors in a fixed secure position so the safety reversing sensors will face each other across the garage door with the beam no higher than 6 15 cm above the floor Be sure power to the opener is disconnected Choose one of the following installations In...

Page 19: ... the garage door opener push the tab with a screwdriver tip to insert the white wires into the white terminal and the white black wires into the grey terminal WHT BLK Tab Wire WHT MOUNTING THE SAFETY REVERSING SENSORS 1 Slide a hex screw into the slot on each sensor 2 Use wing nuts to fasten safety reversing sensors to brackets with lenses pointing toward each other across the door Be sure the len...

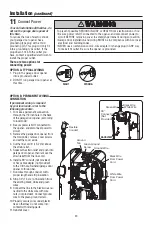
Page 20: ...9 Connect the line to the black wire and neutral to the white wire with wire nuts not provided Connect ground wire to the green ground screw 10 Properly secure wires under plastic ties so that they do not come into contact with moving parts 11 Reinstall cover To avoid installation difficulties do not run the garage door opener at this time To reduce the risk of electric shock your garage door opene...

Page 21: ...on Area Receiving sensor green LED Sending sensor amber LED SAFETY SENSOR TROUBLESHOOTING If either of the sensor LEDs are off there is no power to the sensor 1 Check that you have power to the garage door opener 2 Check the sensor wire is not shorted or broken 3 Check that the sensors is wired correctly white wires to white terminal and white black wires to grey terminal Wing nut RED WHITE WHITE ...

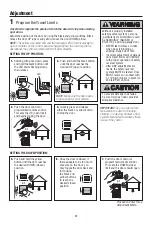
Page 22: ...t on floor To prevent damage to vehicles be sure fully open door provides adequate clearance 1 LED or or or Adjustment 1 Starting with door down press and hold the black button until the LED starts flashing slowly then release 3 Push the door control or programmed remote control This sets the UP open limit and begins closing the door 5 Push and hold the yellow button until the door reaches the desir...

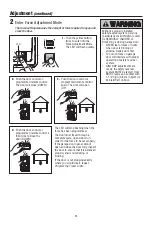
Page 23: ...floor 2 Adjustment continued or or or LED 1 Push the yellow button twice to enter into the Force Adjustment Mode The LED will flash quickly 2 Push the door control or programmed remote control The door will close DOWN 4 Push the door control or programmed remote control a third time to close the door DOWN 3 Push the door control or programmed remote control again The door will open UP The LED will s...

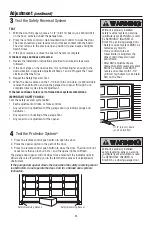
Page 24: ...ustment of the garage door including springs and hardware Any repair to or buckling of the garage floor Any repair to or adjustment of the opener Without a properly installed safety reversal system persons particularly small children could be SERIOUSLY INJURED or KILLED by a closing garage door Safety reversal system MUST be tested every month If one control force or travel limits is adjusted the o...

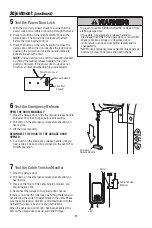
Page 25: ...il you hear a click The door will reconnect on the next UP or DOWN operation 7 Test the Cable Tension Monitor 1 Close the garage door 2 Pull down on the emergency release handle until you hear a click 3 Press on the front of the cable tension monitor you should hear a click 4 Reconnect the garage to the garage door opener If there is no click the roller may be hitting the jamb and not allowing the...

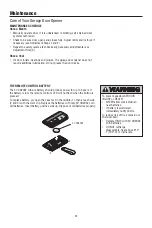
Page 26: ...s with each use randomly accessing over 100 billion new codes When programmed to the Chamberlain Internet Gateway you can monitor and control your garage door from your smartphone You may program the myQ control panel with up to 12 remote controls 2 keypads a combination of 16 myQ accessories See Accessories page 38 The garage door opener can be activated through a wall mounted door control remote...

Page 27: ...WILL NOT close until the obstructions are clear or the safety reversing sensors are correctly installed When the obstruction has been cleared or the safety reversing sensors have been aligned the door will close when the garage door opener is activated Activate Press and hold the ON button until one of the TTC LEDs light up Then press the ON button again to cycle through the time interval options ...

Page 28: ...OTICE This device complies with part 15 of the FCC rules and Innovation Science and Economic Development Canada license exempt RSSs Operation is subject to the following two conditions 1 this device may not cause harmful interference and 2 this device must accept any interfer ence received including interference that may cause undesired operation Any changes or modifications not expressly approved ...

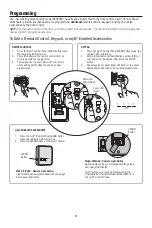
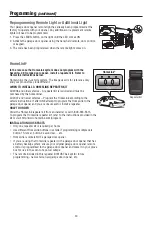
Page 29: ...ammed 1 Press the myQ Control Panel LEARN button twice the red learn LED will turn on 2 Enter a 4 digit personal identification number PIN of your choice on the keypad Then press the ENTER button 3 The garage door opener lights will flash or two clicks will be heard when the code has been programmed KEYPAD LEARN Button LEARN Button Model PILCEV Remote Light Control Light module can be synchronized...

Page 30: ...homeowner All 2007 and newer vehicles Program the HomeLink according to the vehicle instructions If after ONE attempt to program the HomeLink to the garage door opener and you are unsuccessful install a repeater HOW TO ORDER Order the HomeLink repeater kit from an installer or call 1 800 355 3515 To program the HomeLink repeater kit refer to the instructions provided in the kit or visit http www h...

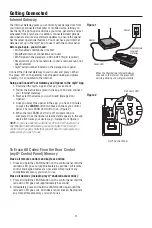
Page 31: ...he app you have 3 minutes to press the LEARN button two times on the myQ control panel The red LEARN LED will turn on Figure 2 5 When the red LEARN LED turns off programming is complete Once the opener is learned and appears in the app device list name your device e g Garage Door Opener NOTE If you are unable to add the myQ Control Panel to your Chamberlain Internet Gateway erase all codes from th...

Page 32: ...event possible SERIOUS INJURY or DEATH NEVER allow small children near batteries If battery is swallowed immediately notify doctor To reduce risk of fire explosion or chemical burn Replace ONLY with 3V CR2032 coin batteries DO NOT recharge disassemble heat above 212 F 100 C or incinerate THE REMOTE CONTROL BATTERY The 3V CR2032 Lithium battery should produce power for up to 3 years If the battery i...

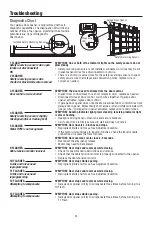
Page 33: ...ogram limits and forces See Adjustment section If the motor unit continues to travel 2 3 inches check the travel module connection or replace the travel module SYMPTOM No movement motor runs 2 3 seconds Reconnect the emergency release Motor may need to be replaced SYMPTOM Door stops and reverses while closing Check for possible door obstructions and remove Check that the cable tension monitor is p...

Page 34: ...or doesn t open completely Check power door lock The door opens but won t close Check that cable tension monitor is correctly installed If a second cable tension monitor has been removed follow the instructions to relearn a single cable tension monitor The safety reversing sensors must be connected and aligned correctly before the door opener will move in the down direction If you are able to clos...

Page 35: ...e door opener won t operate due to power failure Manually open the power door lock Use the emergency release handle to disconnect the door The door can be opened and closed manually When power is restored pull manual release a second time Door loses limits Collar not tightened securely Tighten collar see Assembly Steps 1 and 2 on pages 9 and 10 and reprogram limits see Adjustment Step 1 on page 22...

Page 36: ...rgest moving object in the home An improperly adjusted garage door and opener can exert deadly force when the door closes which could lead to entrapment of children or adults and subsequent injury or death Proper installation operation maintenance and testing of the garage door and automatic opener are necessary to provide a safe trouble free system Careless operation or allowing children to play ...

Page 37: ...g the manual disconnect and open the door Place a 2x4 board flat in the path of the door 1 and try to close it 2 The door should stop when it comes in contact with the 2x4 and then reverse direction Block the photoelectric sensor by waving an object in front of the sensor and attempt to close the door The door should not close unless the wall mounted push button is manually held during operation If...

Page 38: ...to enable access to the garage using a 4 digit PIN Works with ALL Chamberlain openers from 1993 present myQ compatible G940EV Remote Light Control Monitor and control this plug in lamp switch with the myQ Smartphone App PILCEV Remote Light Switch Automatically control your lights using your garage door opener a Security 2 0 remote control or a myQ Internet Gateway Simply replaces your current wire...

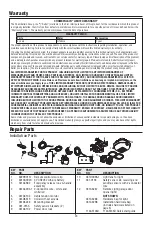
Page 39: ...ered by this limited warranty will be repaired or replaced at Seller s sole option at no cost to you and returned pre paid Defective parts will be repaired or replaced with new or factory rebuilt parts at Seller s sole option You are responsible for any costs incurred in removing and or reinstalling the product or any component ALL IMPLIED WARRANTIES FOR THE PRODUCT INCLUDING BUT NOT LIMITED TO AN...

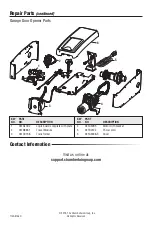
Page 40: ...plate 2 041B8861 Travel Module 3 041C0168 Transformer KEY PART NO NO DESCRIPTION 4 041A6095 Motor with bracket 5 041B0122 Power cord 6 041A6348 3 Cover Visit us online at support chamberlaingroup com Contact Information Repair Parts continued 2019 The Chamberlain Group Inc 114A5146D All Rights Reserved ...

Reviews: