Antenna Spoke Base Series
Page 5
Assembling the CHA SPIDER ASB
TM
Assembly of the CHA SPIDER ASB
TM
is quick and easy using our Easy-Up design
–
just perform the following steps.
1.
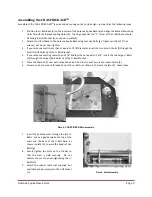
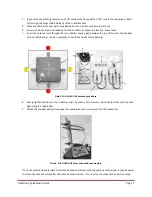
Position the U-Bolt Base (d) on the bottom of the Antenna Spoke Base (a) and align the Bracket Mounting
Holes (k) with the Base Mounting Holes (b). The edge
opposite the ”L” corner
of the U-Bolt Base should
be facing the UHF Socket (c), as shown in plate (3).
2.
Attach the U-Bolt Base to the Antenna Spoke Base using four Hex Bolts (g). T
ighten with a 5/32” hex
wrench, but do not over-tighten.
3.
If your antenna mast is less than or equal to 1 3/8” diameter, insert
the two Small U-bolts (f) through the
Small U-Bolt Holes (j) of the U-Bolt Bracket.
4.
If your antenna mast is greater than 1 3/8” and less than or equal to 1 3/4”, insert the two Large U
-Bolts
(e) through the Large U-Bolt Holes (i) of the U-Bolt Bracket.
5.
Place one Washer (h) over each threaded end of the U-Bolts, as shown in the inset of plate (3).
6.
Screw one Nut over each threaded end of the U-Bolts, as shown in the inset of plate (3). Leave loose.
Plate 3
. CHA SPIDER ASB
TM
Assembly.
7.
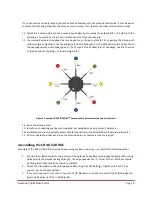
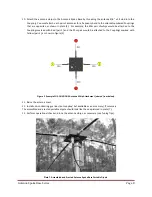
Insert the antenna mast through the two U-
Bolts. Leave a gap between the top of the
mast and the base of the U-Bolt Base, as
shown in plate (4), to avoid the heads of Hex
Bolts (g).
8.
Evenly tighten the Nuts on the U-Bolts so
that the mast is held securely. Do not
deform the mast by over-tightening the U-
Bolt Nuts.
9.
Attach the coaxial cable
(not supplied, but
available as an accessory)
to the UHF Socket
(c).
Plate 4. Mast Assembly.

