Antenna Spoke Base Series
Page 6
If you can safely and easily reach the Antenna Spoke Assembly with the antenna mast raised, it may be easier
to attach the antenna whips after the antenna mast is raised. If so, reverse the order of the next two steps.
10.
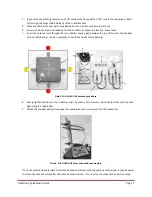
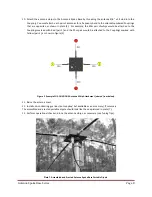
Attach the anten
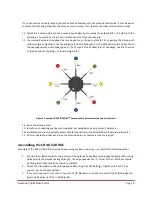
na whips to the Antenna Spoke Base by threading the antenna 3/8” x 24 stud into the
Coupling. You must attach each pair of antennas for a frequency band to
11.
the colored/numbered Couplings that are opposites, as shown in plate (2). For example, the 40m pair of
whips would be attached to the Couplings marked with Blue (pair 1). The 20m pair would be attached to
the Couplings marked with Green (pair 2), the 17m pair to the Yellow (pair 3) Couplings, and the 10m pair
to the Red (pair 4) Couplings, as shown in figure (1).
Figure 1. Example CHA SPIDER ASB
TM
Antenna Whip Attachment
(viewed from below).
12.
Raise the antenna mast.
13.
Install non-conducting guy lines
(not supplied, but available as an accessory)
, if necessary.
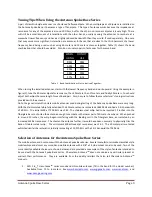
The assembled and erected portable dipole should look similar to the CHA QUAD ONE pictured in plate (7).
14.
Perform operational check and tune the antenna whips, as necessary (see Tuning Tips).
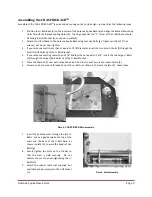
Assembling the CHA QUAD ONE
Assembly of the CHA QUAD ONE is quick and easy using our Easy-Up design
–
just perform the following steps.
1.
Position the U-Bolt Base (d) on the bottom of the Antenna Spoke Base (a) and align the Bracket Mounting
Holes (k) with the Base Mounting Holes (b). The edge
opposite the ”L” corn
er of the U-Bolt Base should
be facing the UHF Socket (c), as shown in plate (6).
2.
Attach the U-
Bolt Base to the Antenna Spoke Base using four Hex Bolts (g). Tighten with a 5/32” hex
wrench, but do not over-tighten.
3.
If your antenna mast is less than or
equal to 1 3/8” diameter, insert the two Small U
-bolts (f) through the
Small U-Bolt Holes (j) of the U-Bolt Bracket.

