CHA F-LOOP 3.0
Page 10
7.
Connect the other end of the Flexible
Radiator Loop to the right Radiator Loop
Connection.
8.
Secure the top middle of the Flexible
Radiator Loop to the top middle of the
Coupling Loop with one of the attached
Sticky Straps.
9.
Shape the Flexible Radiator Loop into a
circular shape. The Coupling Loop and
Flexible Radiator Loop should be in the same
plane.
10.
Place the CHA F-LOOP 3.0 BASIC on a flat
surface, such as a tabletop, or attach the
Aluminum Base Plate (n) to a heavy-duty
camera tripod or other compatible antenna
mount
(see the Accessories section for a list
of compatible 3/8
”
antenna mounts
available from Chameleon Antenna
TM
).
11.
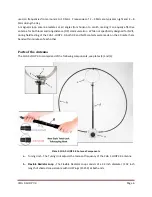
Connect the Coaxial Cable (m) to the Loop
Connection (l).
12.
Secure the Coaxial Cable Feedline along the
Telescoping Mast to ensure easy tuning and
consistent low SWR.
13.
Perform an operational test
(see section on
Loop Operation).
Double Flexible Loop Assembly (CHA F-LOOP 3.0 BASIC)
The Double Single Flexible Loop configuration uses the standard Flexible Radiator Loop, Flexible Radiator
Loop Extension (d) and small Coupling Loop included with the CHA F-LOOP 3.0 BASIC, CHA FLOOP 3.0
PLUS, and CHA F-FLOOP 3.0 TOTAL.
The CHA F-LOOP 3.0 Double Flexible Loop configuration allows you to use the CHA F-LOOP 3.0 on the 80
meter ham band by extending the lower frequency of the CHA F-LOOP 3.0 down to 2.8 MHz. See Plate
(5) and perform the following steps.
Plate 5. Double Flexible Loop Antenna.
(CHA F-LOOP 2.0 shown)
1.
Perform assembly of the Standard Single
Flexible Loop configuration.
2.
Disconnect one end of the Flexible Radiator
Loop (b)
“Loop 1”
from one of the Flexible
Radiator Loop Connections (f).
3.
Connect the free end of the Flexible Radiator
Loop
“Loop 1”
to the Loop Extension Barrel
Connector (r).
4.
Connect one end of the Flexible Radiator
Loop Extension (d)
“Loop 2”
to the open
Flexible Radiator Loop Connection from step
2.
5.
Form the Flexible Radiator Loop Extension
“Loop 2”
into a loop, like the Flexible
Radiator Loop
“Loop 1”
.
6.
Attach the top of the Flexible Radiator Loop
Extension
“Loop 2”
to the top of the
Coupling Loop (c) using the attached sticky
strap.


