CHA RXL
Page 9
Loop Assembly.
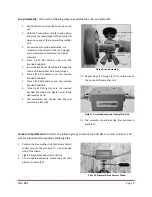
Perform the following steps to assemble the Loop, see plate (10).
1.
Position the Loop (a) upside down (open end
up).
2.
Hold the Preamplifier Unit (b) upside down
and mate the Loop Flanges (d) flat side to flat
side on one end of the Loop and Preamplifier
Unit.
3.
For permanent outside installation, we
recommend treatment of the Loop Flanges
and hardware with Permatex® Anti-Seize
Lubricant.
4.
Place a #10 Flat Washer over one #10
Knurled Knob Bolt.
5.
Insert the #10 Knurled Knob Bolt through the
Loop and Preamplifier Unit Loop Flanges.
6.
Place a #10 Flat Washer over the inserted
Knurled Knob Bolt.
7.
Place a #10 Split Washer over the inserted
Knurled Knob Bolt.
8.
Thread a #10 Wing Nut onto the inserted
Knurled Knob Bolt and tighten until firmly
tightened by hand.
9.
The assembled end should look like that
pictured in plate (10).
Plate 10. Loop Assembly.
10.
Repeat steps (2) through (9) for the other side of
the Loop and Preamplifier Unit.
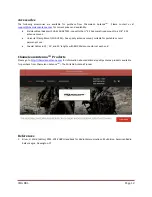
Plate 11. Assembled Loop and Preamplifier Unit.
11.
The assembly should look like that pictured in
plate (11).
Camera Tripod Mount.
Perform the following steps to mount the CHA RXL on a camera tripod. The
camera tripod must be capable of holding 6 lbs.
1.
Position the Preamplifier Unit (b) Camera Mount
socket (e) over the
standard ¼” x 20 threaded
stud of the tripod.
2.
Tighten tripod threaded stud until snug.
3.
The completed assembly should look like that
pictured in plate (12).
Plate 12. Preamplifier on Camera Tripod
.

