background image

CHA TD 

Page 13 


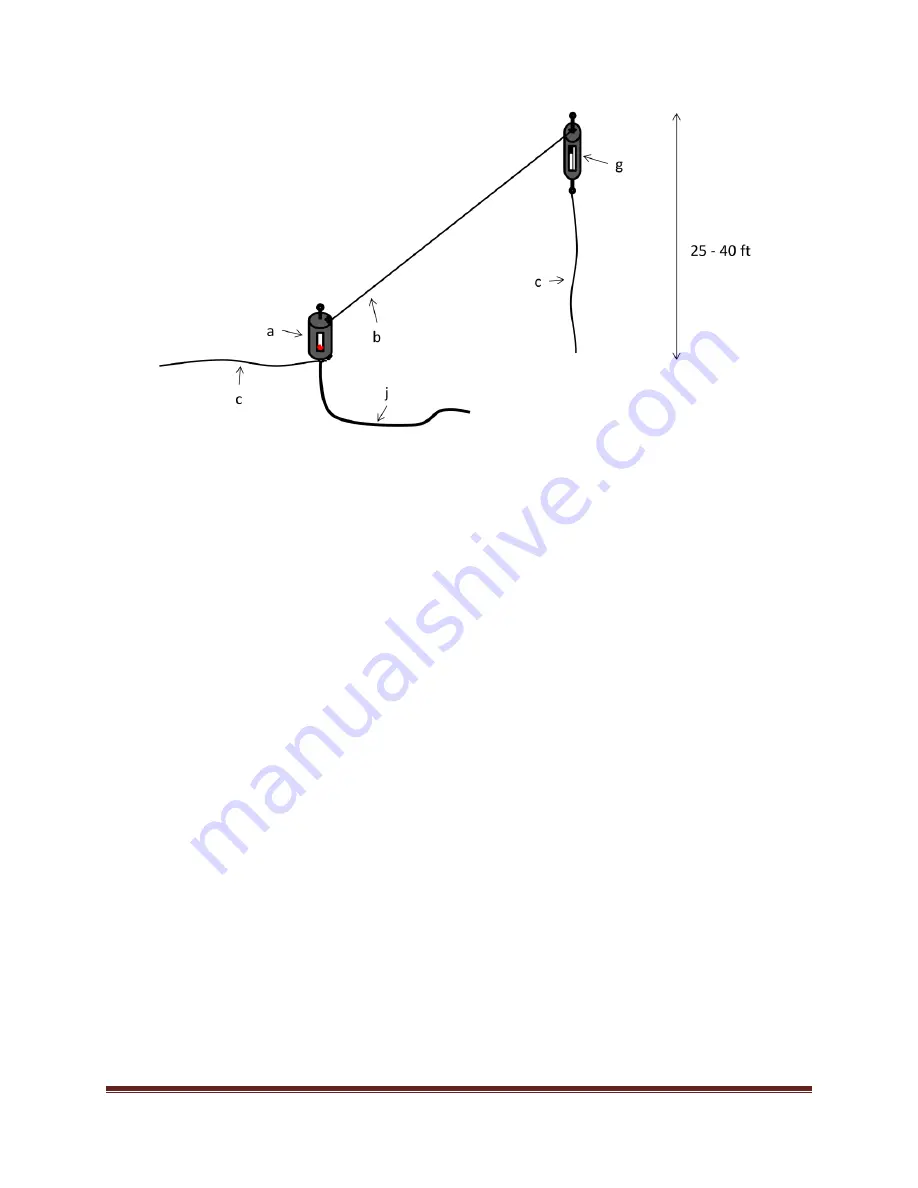
Figure 5. Sloping Wire Configuration. 

Connect  the  Matching  Transformer.    Refer  to  figure 
(2) for steps (5) 

 (10).  

5.


Connect  the  Carabiner  from  the  Counterpoise 
Wire to the Transformer Eyebolt (n). 

6.


Connect  the  Wire  Connector  (r)  from  the 
Counterpoise  Wire  to  the  Bottom  Transformer 
Connection  (m).    Tighten  the  wing  nut  finger 
tight. 

7.


Connect  the  Carabiner  from  one  end  of  the 
Antenna Wire to the Carabiner from step (5). 

8.


Connect  the  Wire  Connector  from  the  Antenna 
Wire  to  the  Top  Transformer  Connection  (l).  
Tighten the wing nut finger tight. 

9.


Using  a  Bowline  of  similar  knot,  tie  one  end  of 
short  length  (around  four  feet)  of  Paracord  to 
the Carabiner connected in step (5). 

10.


Connect  the  UHF  Plug  (o)  from  one  end  of  the 
Coaxial  Cable  to  the  UHF  Socket  (k)  on  the 
Matching Transformer. 

Connect the Terminating Resistor.  Refer to figure (3) 
for steps (11) 

 (14). 

11.


Connect  the  Carabiner  from  the  unconnected 
end of the Antenna Wire to the Resistor Eyebolt 
(q) of the Termination Resistor (g). 

12.


Connect  the  Wire  Connector  from  the  Antenna 
Wire  to  the  Resistor  Connection  (p)  of  the 
Termination  Resistor.    Tighten  the  wing  nut 
finger tight. 

13.


Connect  the  Carabiner  from  the  Counterpoise 
Wire  to  the  other  end  of  the  Termination 
Resistor. 

14.


Connect  the  Wire  Connector  from  the 
Counterpoise Wire to the Resistor Connection of 
the  Termination  Resistor.  Tighten  the  wing  nut 
finger tight. 

15.


Using  a  Bowline  or  similar  knot,  tie  one  end  of 
the Paracord to the Carabiner from step (11).  

Raise the Antenna. 

16.


Using  a  throw  weight  or  some  other  method 
loop the Paracord over the support. 

17.


Raise  the  end  of  Sloping  Wire  antenna  to  the 
desired  height  and  secure  the  Paracord  to  the 
support  using  a  Round  Turn  and  two  Half 
Hitches or similar knot.   

Extend the Antenna Wire and Counterpoise Wire. 

18.


Fully extend the Antenna Wire. 

19.


Drive  a  Stake  around  two  feet  beyond  the  end 
of the Antenna Wire. 

20.


Using  two  Half  Hitches,  tie  the  short  length  of 
Paracord from the Matching Transformer to the 
Stake,  such  that  the  Antenna  Wire  is  not  quite 
taut. 

21.


Extend  the  Counterpoise  Wire  that  is  attached 
to  the  Matching  Transformer  along  the  ground 
in any convenient direction. 

22.


Perform operational test. 

Summary of Contents for CHA TD

Page 1: ...Tactical Dipole CHA TD Operator s Manual California USA WWW CHAMELEONANTENNA COM VERSATILE DEPENDABLE STEALTH BUILT TO LAST ...

Page 2: ...ng Procedure 18 Troubleshooting 18 Specifications 19 Accessories 22 Chameleon AntennaTM Products 22 References 24 Be aware of overhead power lines when you are deploying the CHA TD You could be electrocuted if the antenna gets near or contacts overhead power lines All information on this product and the product itself is the property of and is proprietary to Chameleon Antenna TM Specifications are...

Page 3: ...xplanation of the theory of HF radio wave propagation is beyond the scope of this operator s manual but an understanding of the basic principles will help the operator decide what frequency and which of the CHA TD s configurations will support their communication requirements HF radio waves propagate from the transmitting antenna to the receiving antenna using two methods ground waves and sky wave...

Page 4: ...ons is an automated method of finding a frequency in the OWF and establishing and maintaining a communications link Even under optimal conditions there is a gap between where ground waves end around 40 to 90 miles and the sky wave returns to Earth on the first hop around 300 miles NVIS propagation can be used to fill this gap The frequency selected must be below the critical frequency so NVIS is c...

Page 5: ...tore the Antenna Wires b Counterpoise Wires c and Paracord h see plates 2 and 3 They enable rapid deployment and recovery of the CHA TD Plate 2 Antenna Wire g Termination Resistor CHA R 300 The Termination Resistors see plate 4 are non inductive 300 Ohm resistors They enable the CHA TD to be broad banded without use of a tuner or coupler ...

Page 6: ... are used to anchor various ends of the CHA TD to the ground depending upon the antenna configuration j Coaxial Cable The Coaxial Cable assembly see plate 5 is a 50 foot length of RG 58 coaxial cable with built in RF current isolation terminated at each end with a UHF Plug PL 259 o The cable length may be extended using a Double UHF Socket SO 239 Barrel and another Coaxial Cable assembly which is ...

Page 7: ...ransformer Connection The Bottom Transformer Connection is located on the bottom of the Matching Transformer a see plate 1 n Transformer Eyebolt The Transformer Eyebolt is located on the top of the Matching Transformer a see plate 1 Plate 5 Coaxial Cable ...

Page 8: ... in this manual each with unique performance characteristics Table 2 shows the antenna configurations described in this manual The table can assist the operator to quickly select the most appropriate antenna configuration to meet their operational requirements Configuration Ground Short Medium Long Directionality Deployment Sloping V Unidirectional Deliberate Horizontal Dipole Bidirectional Delibe...

Page 9: ...ngle of 90 will provide good overall performance but angles from 180 to 60 can be used to fit the antenna to the site or to improve performance Larger opening angles increase performance on lower frequencies and smaller angles on higher frequencies At 180 the antenna becomes an Inverted V antenna The antenna may also be mounted horizontally using three 10 foot tall supports Figure 1 Sloping V Ante...

Page 10: ...t the unconnected end of both Antenna Wires 13 Extend one Antenna Wire to its full length 14 Drive a Stake in the ground around two feet beyond the end of the Antenna Wire 15 Using two Half Hitches or similar knot tie the short length of Paracord from the Antenna Wire to the Stake such that the Antenna Wire is not quite taut 16 Extend the other Antenna Wire to its full length along the approximate...

Page 11: ...al broadside to the antenna If the center of the antenna is supported and the ends are sloped down to the ground the antenna becomes an Inverted V see Sloping V configuration If the Termination Resistors are not installed the antenna becomes an Un terminated Broadband Horizontal Dipole If the Termination Resistors are not installed and a Counterpoise Wire is substituted for one of the Antenna Wire...

Page 12: ...iners to the Resistor Eyebolts of the Termination Resistors 19 Connect the Wire Connectors to the Resistor Connections of the Termination Resistors Tighten the wing nuts finger tight Raise the antenna 20 Raise the antenna to the desired height and secure the free ends of the Paracord to the supports with a Round Turn and two Half Hitches or similar knot 21 Perform operational test Sloping Wire The...

Page 13: ...nect the Wire Connector from the Antenna Wire to the Resistor Connection p of the Termination Resistor Tighten the wing nut finger tight 13 Connect the Carabiner from the Counterpoise Wire to the other end of the Termination Resistor 14 Connect the Wire Connector from the Counterpoise Wire to the Resistor Connection of the Termination Resistor Tighten the wing nut finger tight 15 Using a Bowline o...

Page 14: ...e top of a vehicle may be used as a field expedient support with reduced performance 2 Remove the Matching Transformer a Paracord h one Antenna Wire b Coaxial Cable j two Stakes i both Counterpoise Wires c and one Termination Resistor g from the Backpack s 3 If not already attached connect a Carabiner to each end of the Antenna Wire and to the Wire Connector end of both Counterpoise Wires Connect ...

Page 15: ...izontal NVIS The CHA TD Horizontal NVIS configuration see figure 7 is a special configuration designed to provide good NVIS propagation on lower frequencies It is predominately omnidirectional and also provides medium range sky wave propagation on frequencies above 10 MHz It is suitable for hasty deployment and requires two supports that will enable the antenna to be raised to a height of 10 12 fe...

Page 16: ...ombic configuration see figure 8 is a low noise broadband medium range HF and line of sight VHF Low Band 30 0 54 0 MHz antenna This configuration is unidirectional in the direction of the Matching Transformer below 12 MHz and the Termination Resistor above 25 MHz This configuration will produce line of sight and sky wave propagation with best performance above 25 MHz It requires one support at lea...

Page 17: ...tight 13 Attach a short length 4 feet of Paracord to the Carabiner from step 11 Raise the Antenna 14 Using a throw weight or some other method loop the Paracord over the support 15 Using a Fisherman s or similar knot tie the Paracord to the center of one of the Antenna Wires 16 Raise the apex at the center of the Antenna Wire to a height of 18 feet and secure the Paracord to the support using a Ro...

Page 18: ...his suggested packing procedure will make deployment easier and help to ensure you don t lose any CHA TD components during recovery To pack the CHA TD in the Backpack s perform the following steps 1 Place the Matching Transformer a into the lower front pouch 2 Place the Paracord h into the lower front pouch and zip up the pouch 3 If not already connected attach a Carabiner e to the Isolation Loops...

Page 19: ...former a Specifications Frequency 1 8 MHz through 30 0 MHz continuous including all Amateur Radio Service bands 160m to 10m 30 0 MHz through 54 0 MHz continuous including the 6m Amateur Radio Service band also available when the CHA TD is installed in the Half Rhombic configuration Power 100 W continuous duty cycle CW AM FM RTTY 300 W intermittent duty cycle SSB and SSB based digital modes RF Conn...

Page 20: ...CHA TD Page 20 Figure 10 Horizontal Dipole Far Field Plot 3 7 MHz left 14 MHz right Figure 11 Sloping Wire Far Field Plot 7 MHz left 14 MHz right ...

Page 21: ...CHA TD Page 21 Figure 12 Inverted L Field Plot 7 MHz left 14 MHz right Figure 13 Half Rhombic Field Plot 7 MHz left 50 MHz right ...

Page 22: ...ontinuously The unassembled antenna comes into a high quality MOLE tactical bag for easy carry and storage CHA P LOOP The CHA P LOOP is designed to be rugged portable and versatile It is ideal when you require highly portable communication capability such as when hiking camping staying in a hotel preparing for emergencies or disasters and other activities and places that preclude erecting a full s...

Page 23: ...YBRID MINI is also smaller and about 50 lighter than the regular HYBRID The CHA HYBRID MINI Base and a CHA MIL Whip perfectly complements the capability of the CHA TD CHA HYBRID MICRO Antenna The CHA HYBRID MICRO is a lightweight highly portable broadband HF antenna system designed to offer maximum portability and performance The antenna weights about 1 lb The antenna will operate at all frequenci...

Page 24: ...ons 91 st Edition American Radio Relay League Newington CT 2 1987 Tactical Single Channel Radio Communications Techniques FM 24 18 Department of the Army Washington DC 3 Turkes Gurkan 1990 Tactical HF Field Expedient Antenna Performance Volume I Thesis U S Naval Post Graduate School Monterey CA ...

Reviews: