background image

REV 100133-20141031  

14

100133


ENGLISH

ASSEMBLy

When the outdoor tempurature is below 32 ˚F, 
Dexron III transmission fluid can be used . Do not 
mix hydraulic oil and transmission fluid . Drain all oil 
or fulid before adding the other one .

NOTE

To check oil level, use the oil sight glass on the 
side of the beam . The oil sight glass has a marker 
for the acceptable level of oil . If oil is below the 
marker, add oil as needed .

NOTE

Add Hydraulic Oil

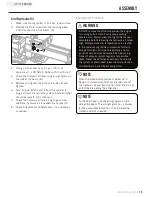
1 .  Make sure the log splitter is on a flat, level surface .
2 .  Remove the R3/4 screw from the reducing elbow 

25x20 on the side of the beam . (A)

DO NOT remove the R3/4 screw when the engine 
is running or hot . Hot oil can escape causing 
severe burns . Always allow the log splitter to cool 
completely before removing the hydraulic oil screw . 
High fluid pressure and temperatures are created 
in the hydraulic log splitters . Hydraulic fluid will 
escape through a pin-size hole opening and can 
puncture skin and cause severe blood poisoning . 
Inspect hydraulic system regularly for possible 
leaks . Never check for leaks with your hand while 
the system is pressurized . Seek medical attention 
immediately if injured by escaping fluid .

WARNING

Add Hydraulic Oil Cont’d.

A

B

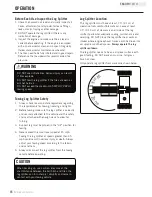
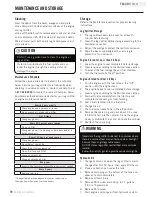
3 .  Using a funnel, add up to 2 .1 gal . (7 .9 L) of 

hydraulic oil - 10W AW32, ASLE H-150, or ISO 32 .

4 .  Check the hydraulic oil level using oil sight glass on 

the side of the beam . (B)

5 .  Replace and tighten the R3/4 screw . Do not over 

tighten .

6 .  Start Engine . Extend and retract the cylinder to 

purge air from the hydraulic system . Cylinder motion 
should be smooth and continuous .

7 .  Check the hydraulic oil tank oil sight glass . Add 

additional hydraulic oil if needed . Do not overfill .

8 .  Check oil level daily and before each use, and add oil 

as needed . 

Summary of Contents for 100133

Page 1: ... Ton LOG SPLITTER 12039 Smith Ave Santa Fe Springs CA 90670 USA 1 877 338 0999 www championpowerequipment com SAVE THESE INSTRUCTIONS Important Safety Instructions are included in this manual MADE IN CHINA REV 100133 20141031 100133 MODEL NUMBER ...

Page 2: ...Do not return this product to the store WE ARE HERE TO HELP Visit our website www championpowerequipment com for more info Product Info Updates Frequently Asked Questions Tech Bulletins Product Registration or Call our Customer Care Team Toll Free at 1 877 338 0999 We are always working to improve our products Therefore the enclosed product may differ slightly from the image on the cover ...

Page 3: ...Starting the Engine 16 Stopping the Engine 16 Log Splitter Operation 17 Operation at High Altitude 17 Maintenance and Storage 18 Engine Maintenance 18 Oil 18 Spark Plugs 18 Air Filter 18 Log Splitter Maintenance 18 Maintenance Schedule 19 Cleaning 19 Storage 19 Log Splitter Storage 19 Engine stored for Less than 30 Days 19 Engines Stored for Over 30 Days 19 Hydraulic Oil 19 Specifications 20 Log S...

Page 4: ... date and place of purchase for future reference Have this information available when ordering parts and when making technical or warranty inquiries Accessories Champion Power Equipment manufactures and sells accessories designed to help you get the most from your purchase To find out more please visit our website at www championpowerequipment com This Booklet Every effort has been made to ensure ...

Page 5: ...between different kinds of information The safety symbol is used with a key word to alert you to potential hazards in operating and owning power equipment Follow all safety messages to avoid or reduce the risk of serious injury or death DANGER indicates an imminently hazardous situation which if not avoided will result in death or serious injury DANGER WARNING indicates a potentially hazardous sit...

Page 6: ...g your log splitter Failure to follow instructions could result in serious injury or death WARNING WARNING Sparks can result in fire or electrical shock DANGER When servicing the engine Disconnect the spark plug wire and place it where it cannot contact the plug DO NOT check for spark with the plug removed Use only approved spark plug testers Running engines produce heat Severe burns can occur on ...

Page 7: ...is empty Disconnect the spark plug wire When storing the log splitter Store away from sparks open flames pilot lights heat and other sources of ignition Skin Injection Hazard High pressure hydraulic oil can inject under your skin DANGER Make sure all fittings are tightly secure before applying pressure Relieve system of pressure before servicing Towing Hazard ALWAYS check all local and state regul...

Page 8: ... a doctor at once Serious infection or reaction can develop if proper medical treatment is not administered immediately 8 Keep the operator zone and adjacent area clear for safe secure footing 9 This log splitter is equipped with an internal combustion engine if you are using it near unimproved forest brush or grass covered land the engine exhaust should be equipped with a spark arrestor Make sure...

Page 9: ...e each use It is possible for connections to vibrate loose over time 3 Never leave the machine unattended with the power source operating 4 Never operate the machine when under the influence of alcohol drugs or medication 5 The machine owner should instruct all operators in safe log splitter operation 6 Always operate the log splitter with all safety equipment in place and all controls properly ad...

Page 10: ...he movement of the thrust plate 10 2 in 5 1 cm Ball Coupler For towing the log splitter behind your vehicle 11 Safety Chains For use while towing 12 Support Leg Supports log splitter while operating Raise leg for towing 13 Engine 196cc OHV 4 stroke air cooled Log Splitter Controls and Features Read this owner s manual before operating your log splitter Familiarize yourself with the location and fu...

Page 11: ...n the wheel to distribute grease 5 Loosen the castle nut and re tighten by hand 6 Install the cotter pin through the castle nut and axle to prevent the nut from backing off Flair separate ends of cotter pin 7 Place axle cap over castle nut and axle 8 Repeat steps 1 7 for the other wheel 2 Attach the splitting beam to the axle by inserting two M12x75 bolts into the back of the axle and through the ...

Page 12: ...0 bolts M8 washers M8 lock washers and M8 nuts Tighten to 18 ft lb A 2 Attach the support leg to the same bracket on the bottom of the splitting beam Secure with one M12x80 bolt and M12 lock nut B 3 Secure the support leg in the vertical horizontal position by inserting the L pin through the bracket and support leg and securing with hair pin clip C Do not tow with support leg in the down position ...

Page 13: ... 3 Place the hydraulic cylinder into the mounting slots on the beam and slide all the way into the slots C 4 Secure the cylinder by re installing both cylinder retainer plates with the M10x25 bolts M10 washers and M10 lock washers on each side 5 Tighten Do not over tighten 6 Attach thrust plate to cylinder rod with M12x75 bolt and M12 lock nut D 7 Tighten Do not over tighten 7 Install the Hydrauli...

Page 14: ... M10 lock washers and ø10 washers B 7 Screw the M10x25 bolt directly into the threaded holes of the multi wedge from underneath the unit going upwards B 8 Tighten Do not over tighten 9 Repeat steps 5 7 for the right side log catcher 10 Once the log catchers have been secured to the multi wedge secure the log catchers together on the bottom side with the two 2 M10x25 bolts ø10 washers and M10 nuts ...

Page 15: ...he first 5 hours of run time to be the break in period for the unit During the break in period stay at or below 50 of the running watt rating and vary the load occasionally to allow stator windings to heat and cool Adjusting the load will also cause engine speed to vary and help seat piston rings After the 5 hour break in period change the oil NOTE Once oil has been added a visual check should sho...

Page 16: ...lends can absorb more water than gasoline alone These blends can eventually separate leaving water or a watery goo in the tank fuel valve and carburetor With gravity fed fuel supplies this compromised fuel can be drawn into the carburetor and cause damage to the engine and or potential hazards There are only a few suppliers of fuel stabilizer that are formulated to work with ethanol blend fuels An...

Page 17: ...oil screw High fluid pressure and temperatures are created in the hydraulic log splitters Hydraulic fluid will escape through a pin size hole opening and can puncture skin and cause severe blood poisoning Inspect hydraulic system regularly for possible leaks Never check for leaks with your hand while the system is pressurized Seek medical attention immediately if injured by escaping fluid WARNING ...

Page 18: ...ng the log splitter at speeds greater than 45 mph could result in serious injury or death Always adjust your towing speed according to the terrain and conditions 5 Always disconnect the log splitter from the towing vehicle before operating DO NOT over inflate tires Serious injury can result if tires explode DO NOT tow the log splitter if the tires are worn or will not hold air DO NOT exceed the ma...

Page 19: ...the Choke position 6 Pull the starter cord slowly until resistance is felt and then pull rapidly SEE NOTE BELOW 7 As engine warms up move the choke lever Item D to Run If the engine starts but does not run make certain that the log splitter is on a flat level surface The engine is equipped with a low oil sensor that will prevent the engine from running when the oil level falls below a critical thr...

Page 20: ... feet of elevation above sea level This is a natural trend and cannot be changed by adjusting the engine At high altitudes increased exhaust emissions can also result due to the increased enrichment of the air fuel ratio Other high altitude issues can include hard starting increased fuel consumption and spark plug fouling To alleviate high altitude issues other than the natural power loss Champion...

Page 21: ...ignition 3 Make certain the spark plug gap is 0 7 0 8 mm 0 028 0 031 in Log Splitter Maintenance Make certain that the log splitter is kept clean and stored properly Only operate the unit on a flat level surface in a clean dry operating environment DO NOT expose the unit to extreme conditions excessive dust dirt moisture or corrosive vapours Inspect all air vents and cooling slots to ensure that t...

Page 22: ...the debris from the beam wedge and end plate Use a damp cloth to clean exterior surfaces of the engine and log splitter Use a soft bristle brush to remove excess dirt and oil Use an air compressor 25 PSI to clear dirt and small debris Wipe all metal parts with an oily rag to help prevent rust and corrosion Storage Refer to the Maintenance section for proper cleaning instructions Log Splitter Stora...

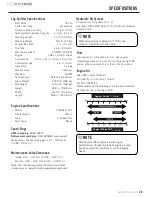
Page 23: ... AW32 ASLE H 150 ISO32 or universal hydraulic fluid When temperature is below 32º F 0ºC use universal tractor transmission fluid NOTE Maintenance Valve Clearance Intake 0 13 0 17 mm 0 005 0 007 in Exhaust 0 18 0 22 mm 0 007 0 009 in Note Tech bulletin regarding the valve adjustment procedure is on www championpowerequipment com Spark Plugs OEM spark plug NHSP F6RTC Replacement spark plug NGK BPR6E...

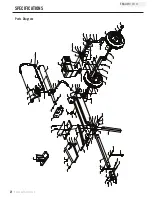
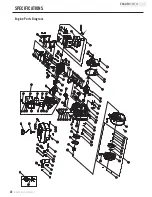
Page 24: ...1 52 56 66 65 64 57 62 63 58 60 46 61 29 47 48 72 73 74 73 75 76 12 42 23 24 25 18 19 20 17 22 16 15 14 21 31 32 33 15 34 35 36 38 37 37 39 37 15 37 39 29 29 40 15 41 15 41 29 43 15 44 45 46 15 29 15 49 49 53 52 51 59 27 23 27 23 25 24 23 26 28 25 33 32 31 15 15 30 67 69 70 71 68 55 52 51 53 53 A TO A TO B B 29 29 21 77 ...

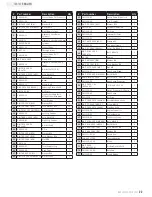
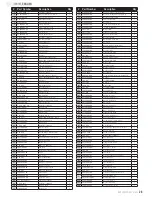
Page 25: ...ort Leg 1 36 PMJ22D 06 Base Tube 1 37 GB T 848 2002 Ø12 Washer Ø12 4 38 GB T 5782 2000 M12X90 Bolt M12 90 1 Part number Description Qty 39 PMJ22G 41 Safety Chain With Hook 2 40 PMJ22G 40 2 in Coupler 1 41 GB T 95 2000 Ø12 Washer Ø12 2 42 PMJ15 05 Cylinder Fixed Plate 2 43 PMJ22G 19 Oil Plug 1 44 PMJ22Q 20 Internal Oil Filter 1 45 PMJ22Q 22 Filter Connector 1 46 JB T 8870 1999 d32 Clamp d32 2 47 PM...

Page 26: ... 43 44 45 46 47 48 49 50 51 52 53 54 55 56 57 58 59 60 61 62 63 64 65 66 67 68 69 70 71 72 73 74 76 77 78 79 80 81 82 83 84 85 86 87 88 89 90 91 92 93 94 95 96 97 98 100 101 102 103 104 105 106 107 108 109 110 111 112 113 114 115 116 117 118 119 120 121 122 123 79 99 124 125 126 127 128 129 130 132 133 134 135 136 11 75 19 112 79 99 112 11 42 1 31 131 137 138 139 140 108 29 30 20 ...

Page 27: ...rk Plug F6RTC 1 69 1 5789 0855 Flange Bolt M8 55 4 70 23 040017 00 Oil Seal Valve 2 71 21 040003 00 Valve Spring 2 Part Number Description Qty 72 21 040007 00 Retainer Exhaust Valve Spring 1 73 21 040001 00 Retainer Intake Valve Spring Up 1 74 21 040008 00 Rotator Exhaust Valve 1 75 24 040202 00 Shaft Rocker Arm 1 76 22 040009 00 Rocker Arm 2 77 22 040012 00 Screw Valve Adjustment 2 78 21 040021 0...

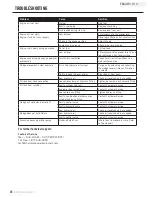
Page 28: ...ilated area Wedge movement is slow or erratic Air in the hydraulic oil system Purge air by extending and retracting the wedge several times until motion is smooth Debris lodged in beam guides Clear debris from beam Low hydraulic oil Check oil level and add as needed Oil leak from hose connection Loose hose clamp or hydraulic fitting Tighten hose clamp or hydraulic fitting Oil leak from cylinder Fa...

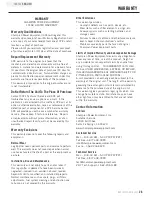
Page 29: ... Use and Maintenance This warranty will not apply to parts and or labor if this log splitter is deemed to have been misused neglected involved in an accident abused loaded beyond its limits modified and installed improperly Normal maintenance such as spark plugs air filters adjustments fuel system cleaning and obstruction due to buildup is not covered by this warranty Other Exclusions This warrant...

Page 30: ... parts and labor For engines less than or equal to 80cc only the fuel tank and fuel line is subject to the evaporative emission control warranty requirements of this section MANUFACTURER S EMISSION CONTROL SYSTEM WARRANTY COVERAGE This emission control system is warranted for two years subject to provisions set forth below If during the warranty period emission related part on your engine is defec...

Page 31: ... be warranted for the period of time prior to the first scheduled replacement point for that part If the part fails prior to the first scheduled replacement the part shall be repaired or replaced by CPE according to Subsection d below Any such emissions related part repaired or replaced under the ECS Warranty shall be warranted for the remainder of the ECS Warranty Period prior to the first schedu...

Page 32: ...kets Carburetor Purge Port Connector TO OBTAIN WARRANTY SERVICE You must take your CPE engine or the product on which it is installed along with your warranty registration card or other proof of original purchase date at your expense to any Champion Power Equipment dealer who is authorized by Champion Power Equipment Inc to sell and service that CPE product during his normal business hours Alterna...

Reviews: