background image

100776 - 10,000 LB. (4536 KG) WINCH

MAINTENANCE

13

MAINTENANCE

The owner/operator is responsible for all periodic 
maintenance.

Complete all scheduled maintenance in a timely manner. 
Correct any issue before operating the winch.

!


WARNING

Never operate a damaged or defective winch.

!


WARNING

Improper maintenance will void your warranty.

"


NOTICE

For service or parts assistance, contact our help line 
at 1-877-338-0999.

Lubrication

All moving parts within the electric winch have been 
lubricated using high-temperature lithium grease at the 
factory. No internal lubrication is required. Lubricate rope 
assembly periodically using a light penetrating oil.

Steel Rope Replacement

It is recommended that any modifications be performed 
by a manufacturer’s authorized repair facility, and that 
only manufacturer-supplied parts be used.

1.  Move the clutch to the “Out” position.

2.  Extend rope to its full length. Note how the existing 

rope is connected to the inside of the drum.

3.  Remove old rope and attach new one. 

4.  Retract rope onto drum, being careful not to allow 

kinking.

Synthetic Rope Replacement 
(Optional)

1.  It is recommended that any modifications be 

performed by a manufacturer’s authorized repair 
facility, and that only manufacturer-supplied parts 
be used.

2.  Move the clutch to the “Out” position.

3.  Extend synthetic rope to its full length. Note how 

the existing rope is connected to the inside of the 
drum.

4.  Remove old synthetic rope and attach new one.

5.  Retract synthetic rope onto drum being careful not 

to allow kinking.

Synthetic Rope

Periodically rinse the synthetic rope with water to 
remove any sand, dirt, mud, or debris that can become 
embedded or build up in the rope during use. This will 
help extend the life of the rope.

"


NOTICE

Inspect rope before and after each use. If rope 
becomes frayed it must be replaced.

Summary of Contents for 100776

Page 1: ...s important safety precautions which should be read and understood before operating the product Failure to do so could result in serious injury This manual should remain with the product Specification...

Page 2: ...uired 7 Assembly Parts 7 Assembly 8 Mounting the Winch 8 Wiring the Winch 10 Operation 11 General Tips for Safe Operation 11 Self Recovery 11 Winching Techniques A Z 12 Maintenance 13 Lubrication 13 S...

Page 3: ...re each use Please always exercise common sense and always err on the side of caution when operating the product to ensure no accident property damage or injury occurs We want you to continue to use a...

Page 4: ...ack in the rope Shock loads can far exceed the rate capacity for the rope and drum Do not accelerate your vehicle while winching Loss of traction can cause a shock load on the rope WARNING Batteries c...

Page 5: ...made for intermittent use and should not be used in constant duty applications CAUTION Never release the free spool clutch when there is a load on the winch CAUTION Use hook strap when handling the ho...

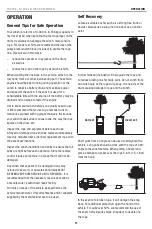
Page 6: ...e rope depending on the remote winch switch 3 Roller Fairlead When using the winch at an angle the roller fairlead acts to guide the rope onto the drum and minimizes damage to the rope from abrasion o...

Page 7: ...in Hitch pin 1 R Pin 1 Roller fairlead 1 Bolt M10 35 2 2 16mm wrench or socket Washer 10 2 Lock washer 10 2 Lock nut M10 2 Winch body 1 Bolt M10 35 4 1 16mm wrench or socket Washer 10 4 Lock washer 10...

Page 8: ...5 or better and torque to 34 ft lb CAUTION If utilizing a mounting plate ensure that the three major sections motor drum and gear housing are properly aligned Proper alignment of the winch will allow...

Page 9: ...in the middle of the mounting channel 5 Attach using the 4 M10 cap screws with 4 lock washers and flat washers into the hole 6 Disengage the clutch by moving pulling the clutch handle to the Out posit...

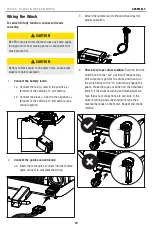
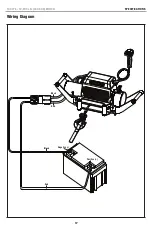
Page 10: ...of the vehicle s 12 volt battery see wiring diagram black 2 Connect the quick connect leads 2a Insert the male quick connect into the female quick connect to complete the wiring 3 Attach the remote l...

Page 11: ...placement rope with the exact specifications Inspect the winch installation and bolts to ensure that all bolts are tight before each operation Store the remote control inside your vehicle in a place t...

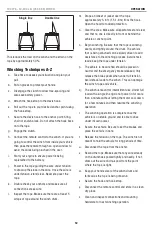
Page 12: ...ectators stand clear and that no one is directly in front or behind the vehicle or anchor point o Begin winching Be sure that the rope is winding evenly and tightly around the drum The vehicle that is...

Page 13: ...parts be used 1 Move the clutch to the Out position 2 Extend rope to its full length Note how the existing rope is connected to the inside of the drum 3 Remove old rope and attach new one 4 Retract ro...

Page 14: ...8000 10000 KG 0 907 1814 2722 3629 4536 Line Speed 12V DC FPM 15 7 9 8 7 2 5 9 4 9 3 9 MPM 4 8 3 0 2 2 1 8 1 5 1 2 Max Current A 115 175 220 280 320 400 Run Time Minutes 1 1 1 1 1 1 Cooling Time Minu...

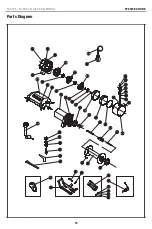
Page 15: ...0 LB 4536 KG WINCH SPECIFICATIONS 15 Parts Diagram 30 10 29 45 46 47 4 1 2 3 26 27 24 6 25 32 28 28 7 24 23 22 33 8 21 20 12 13 14 15 16 17 19 18 11 31 44 51 9 48 5 34 35 36 37 38 39 42 43 34 35 37 36...

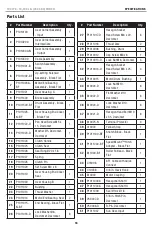
Page 16: ...ust Washer 1 24 P1011014 Motor End Bearing Seal 2 25 P1011015 N BF End Bearing Black Flat 1 26 P1011016 D Lock Washer 6 Dacromet Dacromet 8 Part Number Description Qty 27 P1011017 D Hexagon Socket Hea...

Page 17: ...100776 10 000 LB 4536 KG WINCH SPECIFICATIONS 17 Wiring Diagram Black Black Red Red Positive Negative...

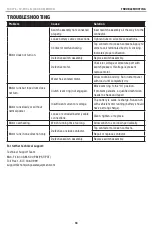
Page 18: ...load until completely dry Motor runs but rope drum does not turn Clutch cam ring not engaged Move cam ring to the In position If problem persists a qualified technician needs to check and repair Motor...

Page 19: ...een misused neglected involved in an accident abused loaded beyond the product s limits modified installed improperly or connected incorrectly to any electrical component Normal maintenance is not cov...

Reviews: