background image

REV 41552-20130323  

24

41552


ENGLISH

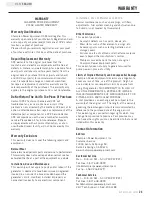
WARRANTy

CHAMPION POWER EQUIPMENT

2 YEAR LIMITED WARRANTY

Warranty Qualifications

Champion Power Equipment (CPE) will register this 
warranty upon receipt of your Warranty Registration Card 
and a copy of your sales receipt from one of CPE’s retail 
locations as proof of purchase.
Please submit your warranty registration and your proof 
of purchase within ten (10) days of the date of purchase.

Repair/Replacement Warranty

CPE warrants to the original purchaser that the 
mechanical and electrical components will be free of 
defects in material and workmanship for a period of one 
year (parts and labour) and two years (parts) from the 
original date of purchase (90 days (parts and labour) 
and 180 days (parts) for commercial and industrial 
use). Transportation charges on product submitted 
for repair or replacement under this warranty are the 
sole responsibility of the purchaser. This warranty only 
applies to the original purchaser and is not transferable.

Do Not Return The Unit To The Place Of Purchase

Contact CPE’s Technical Service and CPE will 
troubleshoot any issue via phone or e-mail. If the 
problem is not corrected by this method, CPE will, at its 
option, authorize evaluation, repair or replacement of the 
defective part or component at a CPE Service Center. 
CPE will provide you with a case number for warranty 
service. Please keep it for future reference. Repairs 
or replacements without prior authorization, or at an 
unauthorized repair facility, will not be covered by this 
warranty.

Warranty Exclusions

This warranty does not cover the following repairs and 
equipment:

Normal Wear

Generators need periodic parts and service to perform well. 
This warranty does not cover repair when normal use has 
exhausted the life of a part or the equipment as a whole.

Installation, Use and Maintenance

This warranty will not apply to parts and/or labour if this 
generator is deemed to have been misused, neglected, 
involved in an accident, abused, loaded beyond the 
generator’s limits, modified, installed improperly or 
connected incorrectly to any electrical component. 

Installation, Use and Maintenance Cont’d. 

Normal maintenance such as spark plugs, air filters, 
adjustments, fuel system cleaning and obstruction due 
to buildup is not covered by this warranty.

Other Exclusions

This warranty excludes:


– Cosmetic defects such as paint, decals, etc.


– Wear items such as filter elements, o-rings, etc.


– Accessory parts such as starting batteries, and 

storage covers.


– Failures due to acts of God and other force majeure 

events beyond the manufacturer’s control.


– Problems caused by parts that are not original 

Champion Power Equipment parts.

This warranty does not apply to generators used for 
prime power in place of a utility.

Limits of Implied Warranty and Consequential Damage

Champion Power Equipment disclaims any obligation to 
cover any loss of time, use of this product, freight, or 
any incidental or consequential claim by anyone from 
using this generator. THIS WARRANTY IS IN LIEU OF 
ALL OTHER WARRANTIES, EXPRESS OR IMPLIED, 
INCLUDING WARRANTIES OF MERCHANTABILITY OR 
FITNESS FOR A PARTICULAR PURPOSE. 
A unit provided as an exchange will be subject to the 
warranty of the original unit. The length of the warranty 
governing the exchanged unit will remain calculated by 
reference to the purchase date of the original unit.
This warranty gives you certain legal rights which may 
change from province to province. Your province may 
also have other rights you may be entitled to that are not 
listed within this warranty.

Contact Information

Address

Champion Power Equipment, Inc.
Customer Service
10006 Santa Fe Springs Rd.
Santa Fe Springs, CA 90670
www.championpowerequipment.com

Customer Service

Mon – Fri 8:30 AM – 5:00 PM (PST/PDT)
Toll Free: 1-877-338-0999
info@championpowerequipment.com
Fax no.: 1-562-236-9429

Technical Service

Mon – Fri 8:30 AM – 5:00 PM (PST/PDT)
Toll Free: 1-877-338-0999
tech@championpowerequipment.com
24/7 Tech Support: 1-562-204-1188

WARRANTy

Summary of Contents for 41552

Page 1: ...Fe Springs CA 90670 USA 1 877 338 0999 www championpowerequipment com SAVE THESE INSTRUCTIONS Important Safety Instructions are included in this manual MADE IN CHINA REV 41552 20130323 41552 MODEL NUMBER 9000 Starting Watts 7200 Rated Watts PORTABLE GENERATOR Electric start ...

Page 2: ...re Team Toll Free at 1 877 338 0999 AN IMPORTANT MESSAGE ABOUT TEMPERATURE Your Champion Power Equipment product is designed and rated for continuous operation at ambient temperatures up to 40 C 104 F When your product is needed your product may be operated at temperatures ranging from 15 C 5 F to 50 C 122 F for short periods If the product is exposed to temperatures outside this range during stor...

Page 3: ...r 14 Spark Arrester 15 Cleaning 15 Adjustments 15 Maintenance Schedule 15 Generator Maintenance 15 Storage 16 Generator Storage 16 Battery 16 Charge the Battery 16 Disconnect the Battery 16 Specifications 17 Engine Specifications 17 Generator Specifications 17 Fuel 17 Oil 17 Spark Plugs 17 Maintenance Valve Clearance 17 An Important Message About Temperature 17 Wiring Diagram 18 Parts Diagram 19 P...

Page 4: ...s information available when ordering parts and when making technical or warranty inquiries Accessories Champion Power Equipment manufactures and sells accessories designed to help you get the most from your purchase To find out more about our covers and power cables please visit our web site at www championpowerequipment com This Booklet Every effort has been made to ensure the accuracy and compl...

Page 5: ...y hazardous situation which if not avoided may result in minor or moderate injury CAUTION CAUTION used without the safety alert symbol indicates a potentially hazardous situation which if not avoided may result in property damage CAUTION DANGER indicates an imminently hazardous situation which if not avoided will result in death or serious injury DANGER WARNING indicates a potentially hazardous si...

Page 6: ...s metal decking Use approved transfer equipment to isolate generator from your electric utility and Notify your utility company before connecting your generator to your power system DANGER Sparks can result in fire or electrical shock When servicing the generator Disconnect the spark plug wire and place it where it cannot contact the plug DO NOT check for spark with the plug removed Use only appro...

Page 7: ...al equipment in the off position and then turn them on for operation Turn electrical equipment off before stopping the generator DO NOT tamper with the governed speed DO NOT modify the generator in any way CAUTION Fuel and fuel vapours are highly flammable and extremely explosive Fire or explosion can cause severe burns or death Unintentional startup can result in entanglement traumatic amputation...

Page 8: ...the engine 3 Fuel Valve Turn this valve to the ON position to supply fuel to the engine 4 Air Cleaner Protects the engine by filtering dust and debris from the intake air 5 Recoil Starter Used to start the engine 6 Low Oil Sensor Senses the level of oil in the crankcase and shuts the engine down if the level falls too low 7 Oil Filler Cap Check and fill engine oil level 8 Battery Used to start the...

Page 9: ...t AC 30 Amp single phase 60 Hz electrical loads 3 120 240V 30A Twist Lock Receptacle NEMA L14 30R May be used to supply electrical power for the operation of 120 and or 240 Volt AC 30 Amp single phase 60 Hz electrical loads 4 120V 20A Duplex 2 NEMA 5 20R May be used to supply electrical power for the operation of 120 Volt AC 20 Amp single phase 60 Hz electrical loads 5 Ground Terminal Consult an e...

Page 10: ...lowing parts Wheel Kit 10 in Wheel 2 Bushing 2 Flange Bolt M10x120 for Wheel 2 Flat Washer ø10 2 Nut M10 2 Support Leg w vibration mounts 1 Flange Bolt M8x16 for Support Leg 2 Nut M8 2 Other Oil Funnel 1 Spark Plug Socket 1 Cap Screw M5x10 for Battery Terminals 2 Nut M5 2 Controls and Features Battery Bolts ...

Page 11: ...g tools to install the wheels 17 mm wrench OR adjustable wrench not included Socket wrench with a 16 mm socket not included Pliers not included 1 Before adding fuel and oil tip the generator on it s side 2 Slide the wheel bolt M10x120 through the washer sleeve and wheel 3 Slide the bolt through the mount point on the frame 4 Fasten securely with the M10 nut 5 Repeat steps 2 4 to attach the second ...

Page 12: ...in period Refer to the Maintenance section for recommended service intervals NOTE The generator rotor has a sealed pre lubricated ball bearing that requires no additional lubrication for the life of the bearing NOTE DO NOT attempt to crank or start the engine before it has been properly filled with the recommended type and amount of oil Damage to the generator as a result of failure to follow thes...

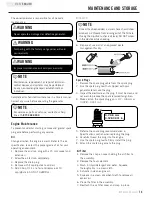
Page 13: ... warranty It is advisable to always shut off the fuel supply run the engine to fuel starvation and drain the tank when the equipment is not in use for more than 30 days NOTE Add Fuel Cont d Add Fuel 1 Use clean fresh regular unleaded fuel with a minimum octane rating of 85 and an ethanol content of less than 10 by volume 2 DO NOT mix oil with fuel 3 Clean the area around the fuel cap 4 Remove the ...

Page 14: ...vehicle Please consult your local authority In some areas generators must be registered with the local utility Generators used at construction sites may be subject to additional rules and regulations Generators should be on a flat level surface at all times Even while not in operation Generators must have at least five feet of clearance from all combustible material In addition to clearance from a...

Page 15: ...trician Connections must isolate generator power from utility power and must comply with all applicable laws and codes NOTE Operation Stopping the Engine 1 Turn off and unplug all electrical loads Never start or stop the generator with electrical devices plugged in or turned on 2 Let the generator run at no load for several minutes to stabilize internal temperatures of the engine and generator 3 T...

Page 16: ...nt Following the steps listed under Power Management will guarantee that only one device will be starting at a time Power Management Use the following formula to convert voltage and amperage to watts Volts x Amps Watts To prolong the life of your generator and attached devices follow these steps to add electrical load 1 Start the generator with no electrical load attached 2 Allow the engine to run...

Page 17: ...ap dipstick to add oil 5 Add 1 16 qt 1 1 L of oil and replace oil fill cap dipstick DO NOT OVERFILL 6 Dispose of used oil at an approved waste management facility Spark Plugs 1 Remove the spark plug cable from the spark plug 2 Use the spark plug tool that shipped with your generator to remove the plug 3 Inspect the electrode on the plug It must be clean and not worn to produce the spark required f...

Page 18: ...DO NOT expose the unit to extreme conditions excessive dust dirt moisture or corrosive vapors Use a damp cloth to clean exterior surfaces of the generator Use a soft bristle brush to remove dirt and oil Use an air compressor 25 PSI to clear dirt and debris from the generator Inspect all air vents and cooling slots to ensure that they are clean and unobstructed DO NOT use a garden hose to clean the...

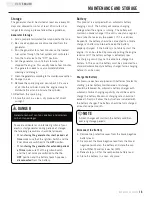
Page 19: ...ate the cylinder 10 Reattach the spark plug 11 Store the unit in a clean dry place out of direct sunlight Battery This product is equipped with an automatic battery charging circuit The battery will receive charging voltage when the engine is running The battery will maintain a proper charge if the unit is used on a regular basis about once every two weeks If it is used less frequently the battery...

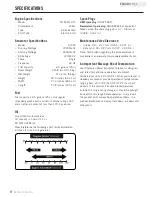
Page 20: ...pe 4 Stroke OHV Start Type Electric Start Maintenance Valve Clearance Intake 0 13 0 17 mm 0 005 0 007 in Exhaust 0 18 0 22 mm 0 007 0 009 in Note Tech bulletin regarding the valve adjustment procedure is on www championpowerequipment com Spark Plugs OEM spark plug NHSP F6RTC Replacement spark plug NGK BPR6ES or equivalent Make certain the spark plug gap is 0 7 0 8 mm or 0 028 0 031 in An Important...

Page 21: ...REV 41552 20130323 18 41552 ENGLISH Wiring Diagram Specifications ...

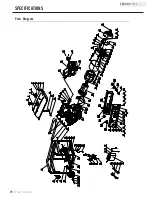
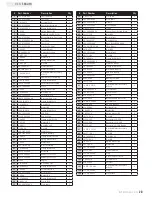
Page 22: ...25 26 27 28 29 25 30 31 32 33 34 35 36 37 38 39 40 41 42 43 44 46 47 48 49 50 53 56 57 58 59 60 61 62 64 65 66 67 68 69 70 71 72 73 74 75 76 77 78 79 81 83 84 85 86 87 88 89 90 91 92 93 94 95 96 52 97 98 99 100 101 102 103 104 105 106 107 108 109 14 32 31 25 63 52 43 6 80 54 55 16 82 18 19 20 21 22 45 51 51 51 45 ...

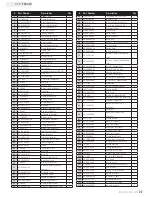
Page 23: ...2 Flange Bolt M6 12 7 52 1 862 06 Lock Washer Ø6 2 53 152 201200 00 Motor Mount 2 54 1 96 08 Washer Ø8 2 55 1 5789 0835 Flange Bolt M8 35 2 56 1 894 1 10 Circlip Ø10 2 57 152 200703 04 2 Pin Handle 2 Part Number Description Qty 58 1 894 1 08 Circlip Ø8 2 59 152 200703 02 Pin Handle 2 60 152 200701 02 2 Handle 1 61 152 200702 02 Cover Handle 1 62 6 5 225 417 2 Frame 1 63 152 200800 03 2 Control Pan...

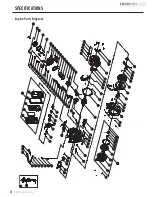
Page 24: ...85 10 1 2 3 4 5 6 7 8 9 11 12 13 14 15 16 17 18 19 20 16 24 25 26 27 28 29 30 31 33 34 35 12 36 30 37 38 23 39 41 42 43 44 46 47 48 49 50 51 52 53 12 54 55 57 58 59 60 61 62 65 66 68 69 70 71 72 73 74 75 76 77 78 79 80 81 82 86 87 88 67 83 84 56 94 95 96 111 89 97 98 99 100 101 2 21 22 23 93 89 112 63 32 92 113 114 90 91 ...

Page 25: ... 15 002 F6RTC Spark Plug F6RTC 1 58 2 08 014 Flange Bolt M10 80 4 59 46 020002 00 Gasket Cylinder Head Cover 1 Part Number Description Qty 60 47 021000 00 Cylinder Head Cover CPE 1 61 45 020001 02 Breather Tube 1 62 47 020100 00 Bolt Cylinder Head Cover 1 63 2 08 039 Bolt Drain M12 1 5 15 2 64 47 041000 01 Camshaft EPA 1 65 47 040004 00 Lifter Valve 2 66 47 040002 00 Valve Intake 1 67 47 040006 00...

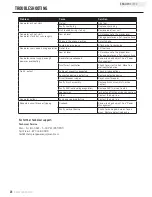
Page 26: ...d adjust See Power Management Insufficient ventilation Check for air restriction Move to a well ventilated area No AC output Cable not properly connected Check all connections Connected device is defective Replace defective device Circuit breaker is open Reset circuit breaker Faulty brush assembly Replace brush assembly Service Center Faulty AVR auto voltage regulator Replace AVR Service Center Lo...

Page 27: ... this generator is deemed to have been misused neglected involved in an accident abused loaded beyond the generator s limits modified installed improperly or connected incorrectly to any electrical component Installation Use and Maintenance Cont d Normal maintenance such as spark plugs air filters adjustments fuel system cleaning and obstruction due to buildup is not covered by this warranty Other...

Page 28: ...bject to provisions set forth below If during the warranty period emission related part on your engine is defective in materials or workmanship the part will be repaired or replaced by CPE OWNER WARRANTY RESPONSIBILITIES As the small off road engine owner you are responsible for the performance of the required maintenance listed in your Owner s Manual CPE recommends that you retain all your receip...

Page 29: ...hall be warranted for the remainder of the ECS Warranty Period c Any warranted emissions related part which is scheduled for replacement as required maintenance in the Owner s Manual shall be warranted for the period of time prior to the first scheduled replacement point for that part If the part fails prior to the first scheduled replacement the part shall be repaired or replaced by CPE according...

Page 30: ...stalled along with your warranty registration card or other proof of original purchase date at your expense to any Champion Power Equipment dealer who is authorized by Champion Power Equipment Inc to sell and service that CPE product during his normal business hours Claims for repair or adjustment found to be caused solely by defects in material or workmanship will not be denied because the engine...

Reviews: