9
REV 92500-20140519
ENGLISH
92500
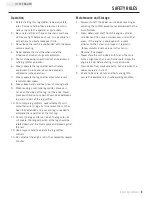
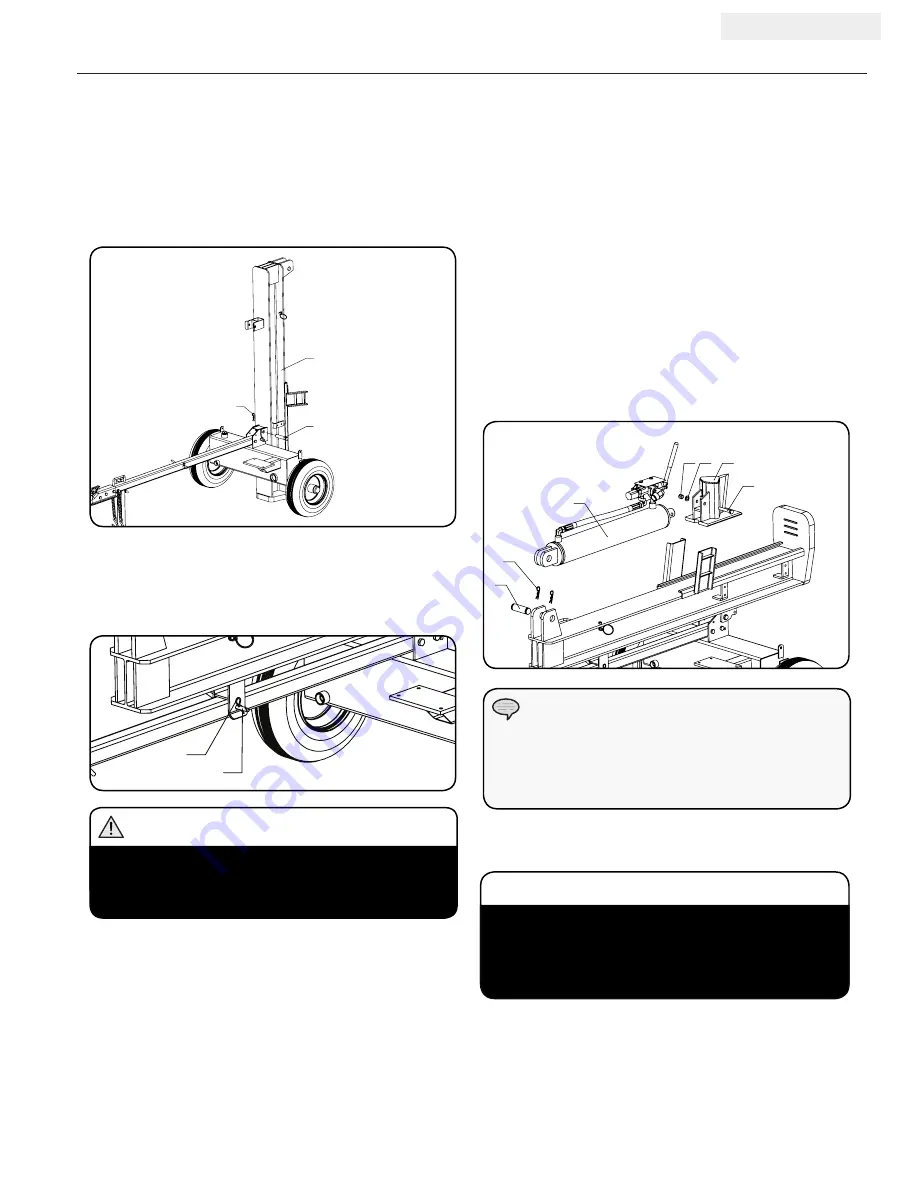
5) Install the Cylinder and Wedge
1. Slide the wedge (3) under the beam rails. Push
it toward the foot plate to make room for the
cylinder (16).
2. Position the cylinder clevis between the mounting
plates at the end of the beam.
3. Align the holes in the cylinder clevis to the holes on
the mounting channels on the beam.
4. Slide the cylinder pin (17) through the mounting
channel and cylinder clevis holes and secure with
the two R-clips (18).
5. Align the holes in the cylinder rod end with the
holes in the wedge.
6. Secure the cylinder rod end to the wedge with the
bolt (2), washer (4) and lock nut (5). Tighten, but
DO NOT over tighten.
ASSEMBLy
63
18
1
12.5
其余
3
16
22
67
2
5 4
3
16
17
18
2
5 4
12.5
其余
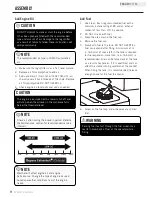
1. Attach the engine/pump to the engine mounting plate on
the hydraulic oil tank. (A) Secure with hardware provided.
2. Place O-ring into the outlet fitting on the top of the
pump. (A)
3. Connect hose to control valve first, then connect
the other end to the pump. Connect one end of the
4. Block the wheels to prevent the frame from rolling.
5. Pivot the beam to the horizontal position and secure
it with the lock pin (67) and R-clip (22) through the
tow bar.
The cylinder rod may need to be rotated slightly
in order to properly align the wedge. Insert a
screwdriver into the bolt hole in the cylinder rod
and slowly rotate as needed.
NOTE
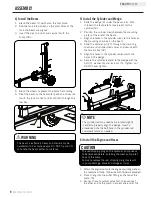
4) Install the Beam
1. Stand the beam (1) vertical on the foot plate.
2. Roll the tank into position so the pivot holes of the
tank and beam are aligned.
3. Insert the pivot pin (63) and secure it with the
R-clip (18).
The beam is extremely heavy and should only be
handled with 2 or more people. DO NOT try and lift
or handle the beam without assistance.
WARNING
6) Install the Engine and Hoses
The red shipping plug on the hydraulic pump needs
to be removed before installing the clear pump inlet
hose to the pump.
Failure to remove the red shipping plug may result
in pump damage, property damage or injury.
CAUTION


