100403 - 1200W PORTABLE GENERATOR
ASSEMBLY
12
Parts Included
Accessories
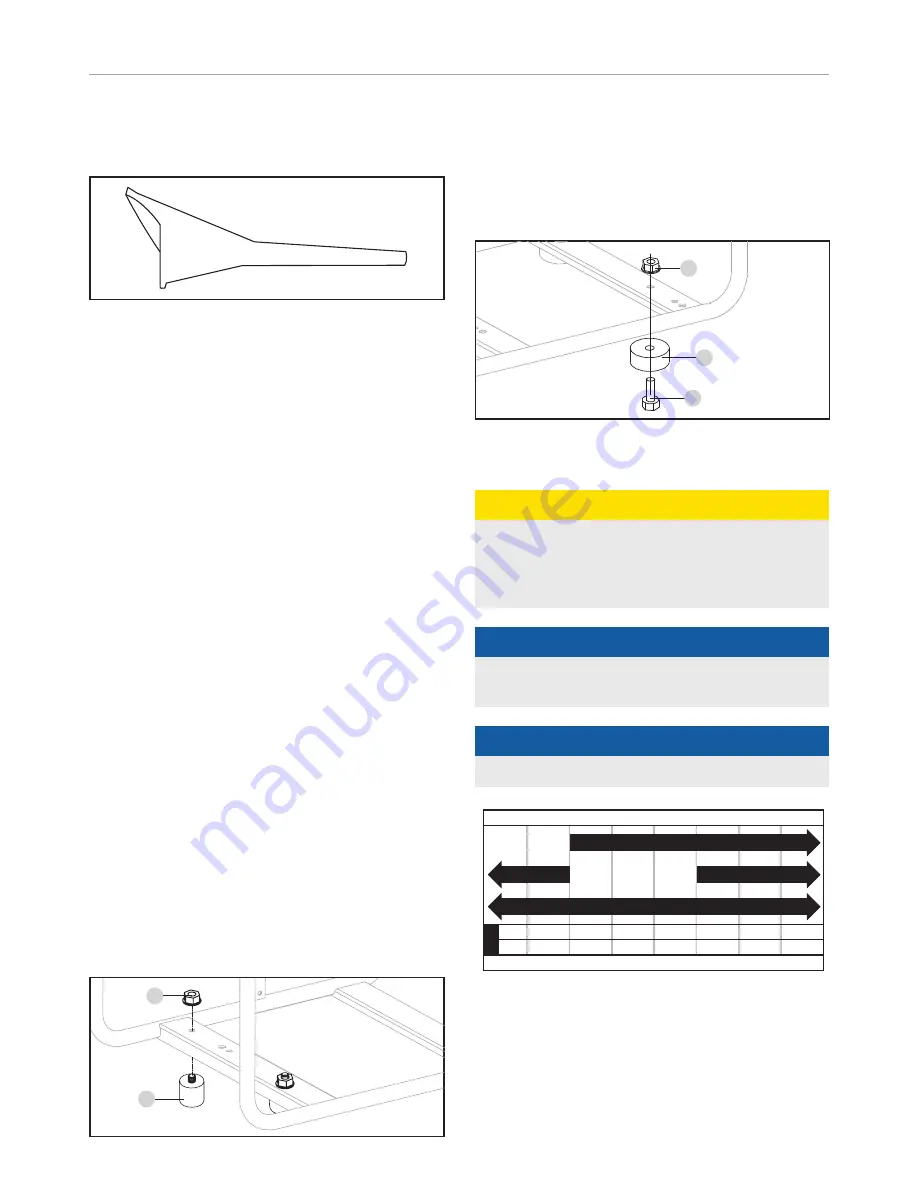
Oil Funnel ..............................................................................1
Assembly Parts
Vibration Mounts (engine side) (A) ..........................................2
Vibration Mounts (alternator side) (B) .....................................2
Flange Bolt M8
×
20 (C) ........................................................2
Lock Nut M8 (D) ....................................................................4
ASSEMBLY
Your generator requires some assembly. This unit ships from
our factory without oil. It must be properly serviced with fuel
and oil before operation.
If you have any questions regarding the assembly of your
generator, call our Technical Support Team at 1-877-338-0999.
Please have your serial number and model number available.
Unpacking
1. Set the shipping carton on a solid, flat surface.
2. Remove everything from the carton except the generator.
3. Carefully cut each corner of the box from top to bottom.
Fold each side flat on the ground to provide a surface area
to work with the generator.
Attach Vibration Mounts
Attach the Engine Vibration Mounts
1. Thread the vibration mount bolt (A) through the frame
(engine side).
2. Firmly secure the vibration mount bolt to the frame with
the M8 lock nut (D). DO NOT over tighten.
3. Repeat steps 1-2 for the remaining mount (2 total).
A
D
ONLY SHOW ACCESSORIES LINE ART, ASSEMBLY PARTS
Accessories
3.3 ft. (1 m) LPG Hose with Regulator ....................................1
25 ft. (7.6 m) Generator Cord..................................................1
Generator Cover ....................................................................1
Smart Charger .......................................................................1
Dual Port USB Adapter (2.1A and 1A ports) ............................1
Battery Charging Cables ........................................................1
Remote Key Fob ....................................................................1
Engine Oil ............................................................1.2 qt. (1.1 L)
Oil Funnel ..............................................................................1
Attach the Alternator Vibration Mounts
1. Thread the flange bolt (C) through the vibration mount (B)
and then through the frame (alternator side).
2. Firmly secure the bolt to the frame with the M8 lock nut
(D). DO NOT over tighten.
3. Repeat steps 1-2 for the remaining mount (2 total).
B
C
D
Add Engine Oil
!
CAUTION
DO NOT attempt to crank or start the engine before it has
been properly filled with the recommended type and amount
of oil. Damage to the generator as a result of failure to
follow these instructions will void your warranty.
"
NOTICE
The generator rotor has a sealed, pre-lubricated ball bearing
that requires no additional lubrication for the life of the bearing.
"
NOTICE
The recommended oil type is
10W-30 automotive oil
.
-20
0
20
40
60
Ambient temperature / Temperatura ambiente / Température ambiante
Recommended Oil Type / Tipo de aceite recomendado / Type d’huile recommandé
80
100
120
-28.9
°F
°C
-17.8 -6.7 4.4
15.6 26.7 37.8
48.9
10W-30
5W-30 Synthetic / Sintético / Synthétique
10W-40
5W-30
1. Place the generator on a flat, level surface.
2. Remove oil fill cap/dipstick to add oil.
3. Using a funnel, add up to 0.4 qt. (0.4 L) of oil (not included)
and replace oil fill cap/dipstick. DO NOT OVERFILL.


