background image


Maintenance 

Rev 73552i-20100621 E


15


Maintenance Schedule 

Follow the service intervals indicated in the 

following schedule.  

Service your generator more frequently 

when operating in adverse conditions.  

Contact our help line at 1-877-338-0999 to 

locate the nearest Champion Power 

Equipment certified service dealer for your 

generator or engine maintenance needs. 


Every 8  hours or daily 


Check oil level 


Clean around air intake and muffler 

First 10 Hours 


Change oil 

Every 50 hours or every season 


Clean air filter 


Change oil if operating under heavy load 

or in hot environments 

Every 100 hours or every season 


Change oil 


Clean/Adjust spark plug 


Check/Adjust valve clearance * 


Clean spark arrester 


Clean fuel tank and filter * 

Every 3 years 


Replace fuel line 


*  To be performed by knowledgeable, 

experienced owners or Champion Power 

Equipment certified service dealers 

Generator Maintenance 

Make certain that the generator is kept clean 

and stored properly. Only operate the unit 

on a flat, level surface in a clean, dry 

operating environment. DO NOT expose the 

unit to extreme conditions, excessive dust, 

dirt, moisture or corrosive vapors.  


Summary of Contents for 73552i

Page 1: ... 10006 Santa Fe Springs Road Santa Fe Springs CA 90670 USA Made in China 2000 Peak Watts 1600 Running Watts PORTABLE INVERTER GENERATOR SAVE THESE INSTRUCTIONS Important Safety Instructions are included in this manual Owner s Manual and Operating Instructions ...

Page 2: ......

Page 3: ...aintenance 13 Engine Maintenance 13 Oil 13 Spark Plugs 13 Air Filter 14 Cleaning 14 Spark Arrester Cleaning 14 Adjustments 14 Maintenance Schedule 15 Generator Maintenance 15 Storage 16 Specifications 17 Engine Specifications 17 Generator Specifications 17 Fuel 17 Oil 17 Spark Plugs 17 Valve Clearance 17 Parts Diagram 18 Parts List 19 Engine Parts Diagram 21 Engine Parts List 23 Wiring Diagram 25 ...

Page 4: ......

Page 5: ... Accessories Champion Power Equipment manufactures and sells accessories designed to help you get the most from your purchase To find out more about our covers power cables and storm kits please visit our web site at www championpowerequipment com This Booklet Every effort has been made to ensure the accuracy and completeness of the information in this manual We reserve the right to change alter a...

Page 6: ... imminently hazardous situation which if not avoided will result in death or serious injury WARNING WARNING indicates a potentially hazardous situation which if not avoided could result in death or serious injury CAUTION CAUTION indicates a potentially hazardous situation which if not avoided may result in minor or moderate injury CAUTION CAUTION used without the safety alert symbol indicates a po...

Page 7: ...otating parts Tie up long hair and remove jewelry Operate equipment with guards in place DO NOT wear loose fitting clothing dangling drawstrings or items that could become caught DANGER Generator produces powerful voltage DO NOT touch bare wires or receptacles DO NOT use electrical cords that are worn damaged or frayed DO NOT operate generator in wet weather DO NOT allow children or unqualified pe...

Page 8: ...ore away from sparks open flames pilot lights heat and other sources of ignition WARNING Rapid retraction of the starter cord will pull hand and arm towards the engine faster than you can let go Unintentional startup can result in entanglement traumatic amputation or laceration Broken bones fractures bruises or sprains could result When starting engine pull the starter cord slowly until resistance...

Page 9: ...cation and function of the controls and features Save this manual for future reference Generator 1 Carrying Handle 2 Fuel Lever Vent Turn this valve to the On position to supply air to the tank 3 Fuel Cap Remove to add fuel 4 Spark plug access cap 5 Muffler 6 Maintenance Cover Oil filler Air filter Carburetor access 7 Recoil Starter Used to start the engine ...

Page 10: ...or is overloaded 4 Economy Control Switch 5 Engine Switch 6 Fuel Valve Knob 7 120 V Duplex Use this duplex to operate 120 Volt AC single phase 60 Hz loads requiring up to 13 3 A 0r 1600 Watts of power 8 Ground Terminal Consult an electrician for local grounding regulations 9 Circuit Breaker 10 Parallel Operation Outlets 11 Parallel Operation Control 12 Choke Knob These outlets are used for connect...

Page 11: ...Controls and Features Rev 73552i 20100621 E 7 Parts Included Your 73552i Gasoline Powered Inverter Generator ships with the following parts Oil Funnel 1 piece Spark Plug Socket 1 piece ...

Page 12: ... to crank or start the engine before it has been properly filled with the recommended type and amount of oil Damage to the generator as a result of failure to follow these instructions will void your warranty 1 Place the generator on a flat level surface 2 Loosen the cover screw and remove the maintenance cover 3 Remove oil fill cap dipstick to add oil 4 Add 0 42 qt 0 4 L of oil and replace oil fi...

Page 13: ...ll fuel tank indoors DO NOT fill fuel tank when the engine is running or hot DO NOT overfill the fuel tank DO NOT light cigarettes or smoke when filling the fuel tank Grounding Your generator must be properly connected to an appropriate ground to help prevent electric shock WARNING Failure to properly ground the generator can result in electric shock A ground terminal connected to the frame of the...

Page 14: ...refully consider wind and air currents when positioning generator Starting the Engine 1 Make certain the generator is on a flat level surface 2 Disconnect all electrical loads from the generator Never start or stop the generator with electrical devices plugged in or turned on 3 Turn the fuel cap vent lever to the On position 4 Turn the fuel valve to the On position 5 Turn the engine switch to the ...

Page 15: ...urn the engine switch fuel valve to the Off position 4 Turn the fuel cap lever vent to the Off position Do Not Overload Generator Capacity Follow these simple steps to calculate the running and starting watts necessary for your purposes 1 Select the electrical devices you plan on running at the same time 2 Total the running watts of these items This is the amount of power you need to keep your ite...

Page 16: ... 5 Do not disconnect any cables after the engines have been started 6 Start both engines and observe the green output indicator light on both generator panels 7 Connect and turn on the electrical devices 8 The total electrical load must not exceed 3000 watts 9 Follow the instructions on the previous page for turning off the generators NOTE Never exceed the generator capacity when adding loads Watt...

Page 17: ... the oil filler cap 3 Tilt the generator on its side and allow the oil to drain completely 4 Add 0 42 qt 0 4 L of oil and replace oil fill cap dipstick 5 Reinstall the maintenance cover and tighten the cover screw 6 Dispose of used oil at an approved waste management facility Spark Plugs 1 Remove the maintenance cover 2 Remove the spark plug cable from the spark plug 3 Use the spark plug tool that...

Page 18: ...to clean exterior surfaces of the generator Use a soft bristle brush to remove dirt and oil Use an air compressor 25 PSI to clear dirt and debris from the generator Spark Arrester Cleaning 1 Loosen M6x22 bolts to remove two pillars 2 Remove 4 screws to remove the muffler cover assembly 3 Loosen the spark arrester clamp and remove the spark arrester 4 Carefully remove the carbon deposits from the s...

Page 19: ... Every 50 hours or every season Clean air filter Change oil if operating under heavy load or in hot environments Every 100 hours or every season Change oil Clean Adjust spark plug Check Adjust valve clearance Clean spark arrester Clean fuel tank and filter Every 3 years Replace fuel line To be performed by knowledgeable experienced owners or Champion Power Equipment certified service dealers Gener...

Page 20: ...ove the maintenance cover Drain all fuel completely from the fuel line and carburetor to prevent varnish build up 4 Turn the engine switch fuel valve ON loosen the carburetor drain screw and drain the gasoline into a suitable container 5 Remove the spark plug cap then pull the recoil grip 3 times to drain the gasoline from the fuel pump 6 Change the engine oil 7 Remove the spark plug and pour abou...

Page 21: ... 0 gallon 3 8 L Use regular unleaded gasoline with a minimum octane rating of 85 Oil Oil capacity is 0 42 qt 0 4 L Spark Plugs Your generator comes equipped with a 1 2 long reach plug 12 7mm Intermittent use less than 1 hour month or colder temperatures below 60 F NGK BR6HS or equivalent Moderate use less than 3 hours month or seasonal temperatures 50 80 F NGK BR7HS or equivalent Extreme use conti...

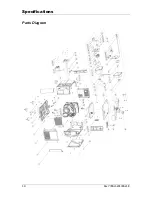
Page 22: ...Specifications 18 Rev 73552i 20100621 E Parts Diagram ...

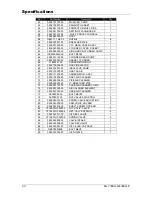
Page 23: ... 05502023 CSA RECEPTACLE 5 20R 1 24 GB5783 M5X14 03 BOLT M5X14 1 25 GB6170 M2 03 BOLT M2 4 26 0902 212100 A4 OUTPUT PANEL 1 27 GB41 M5 03 NUT M5 2 28 GB848 3 03 FLAT WASHERΦ3 2 29 GB859 3 03 SPRING WASHERΦ3 2 30 GB823 M3 6 03 SCREW M3 6 2 31 0902 210001 00 PARALLEL TERMINAL 2 32 GB818 M2 10 03 SCREW M2 10 4 33 GB818 M4 14 03 SCREW M4 14 10 34 22 012001 02 COMMUNICATION RECEPTACLE 1 35 GB93 4 03 SP...

Page 24: ...EL FILTER COMP 1 54 0902 200402 00 MAINTENANCE COVER 1 55 GB818 M6 14 03 SCREW M6 14 4 56 0902 200502 00 FUEL GUIDE PLATE 1 57 0902 200503 00 SEAL PLUG CAP 1 58 0902 070100 00 FUEL TANK CAP COMP 1 59 GB5287 6 03 FLAT WASHERΦ6 4 60 0902 200700 00 HOLDER ASSEMBLY 1 61 0902 200501 00 COVER TOP 1 62 ST02FD 05010703 BOLT M5 13 3 ...

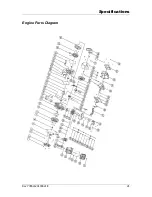
Page 25: ...Specifications Rev 73552i 20100621 E 21 Engine Parts Diagram ...

Page 26: ...Specifications 22 Rev 73552i 20100621 E ...

Page 27: ...TE 1 23 0902 030007 00 CRANKCASE COVER 1 24 0902 122000 00 TRIGGER ASSY 1 25 GB16674 M6X12 BOLT M6X12 2 26 0902 191100 01 STATOR COMP 1 27 GB5789 M6X35 BOLT M6X35 2 28 0902 191200 00 ROTOR COMP 1 29 0902 190006 01 RUBBER END COVER 2 1 30 0902 190006 00 RUBBER END COVER 1 1 31 GB5789 M6X22 03 BOLT M6X22 4 32 0902 190002 00 END COVER 1 33 06 025001 20 SPARK ARRESTER CLAMP 1 34 0902 101501 00 SPARK A...

Page 28: ...NSULATOR 1 68 0902 130001 00 INSULATOR CARB 1 69 0902 130003 00 GSKT CARB 1 70 0902 131000 00 CARBURETOR ASSY 1 71 0902 130004 00 GSKT AIR CLEANER 1 72 0902 090004 00 PIPE AIR CLEANER 1 73 0902 090003 00 JT BREATHER PIPE 1 74 0902 091100 00 CASE AIR CLEANER COMP 1 75 0902 091003 00 AIR CLEANER ELEMENT 1 76 0902 091200 00 CASE AIR CLEANER 1 77 08 006020 00 BOLT M6X20 1 78 02 005001 00 NUT VALVE ADJ...

Page 29: ...Specifications Rev 73552i 20100621 E 25 Wiring Diagram ...

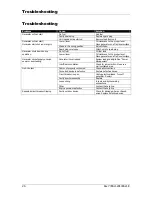
Page 30: ...e to the proper level Place generator on a flat level surface Generator cannot supply enough power or overheating Generator is overloaded Review load and adjust See Power Management Insufficient ventilation Check for air restriction Move to a well ventilated area No AC output Cable not properly connected Check all connections Connected device is defective Replace defective device Circuit breaker i...

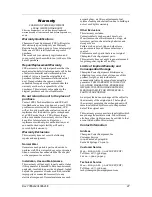
Page 31: ... Installation Use and Maintenance This warranty will not apply to parts and or labor if this generator is deemed to have been misused neglected involved in an accident abused loaded beyond the generator s limits modified installed improperly or connected incorrectly to any electrical component Normal maintenance such as spark plugs air filters adjustments fuel system cleaning and obstruction due t...

Reviews: