6
ASSEMBLy
Your generator requires some assembly. This unit ships
from our factory without oil. It must be properly serviced
with fuel and oil before operation.
If you have any questions regarding the assembly of your
generator, call your local dealer. Please have your serial
number and model number available.
Remove the Generator from the Shipping Carton
1. Set the shipping carton on a solid, flat surface.
2. Remove everything from the carton except the
generator.
3. Carefully cut each corner of the box from top to
bottom. Fold each side flat on the ground to provide a
surface area to install the wheel kit and support leg.
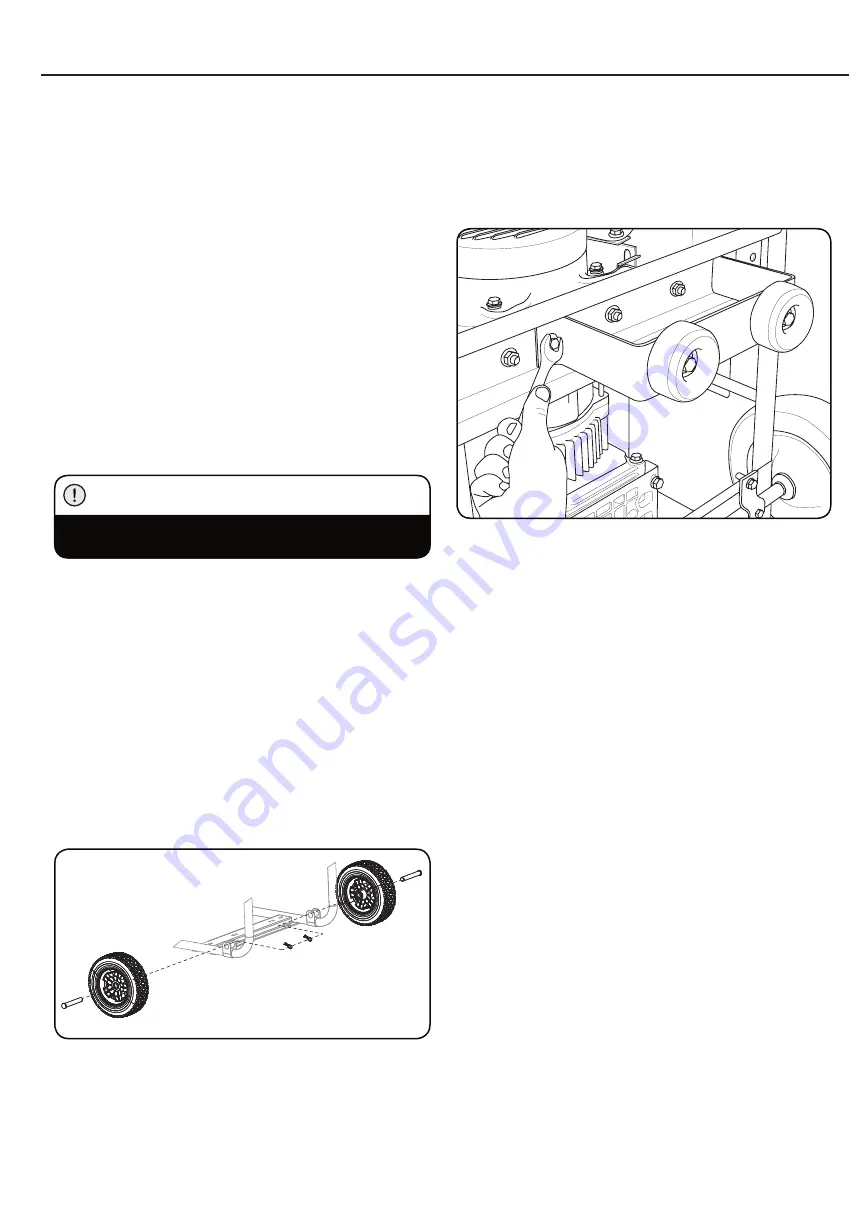
Install the Wheel Kit
You will need the following tools to install the wheels:
• Adjustable wrench (not included)
• Socket wrench (not included)
• Pliers (not included)
1. Before adding fuel and oil, tip the generator on it’s end.
2. Slide the Roll Pin through the Wheel from the
outside.
3. Slide the Roll Pin through the mount point on the
frame.
4. Secure with the R-clip .
5. Repeat to attach the second Wheel.
Install the Support Leg
1. Attach the support leg to the generator frame with
flange bolt and flange lock nuts.
2. Tip the generator slowly so that it rests on the
wheels and support leg.
The wheel kit is not intended for over-the-road use.
CAUTION
Connect the Battery
1. Remove the protective cover from the red (+) lead on
the battery.
2. Attach the red (+)lead to the red (+) terminal on the
battery with the flange bolt and secure with the
flange nut.
3. Repeat steps 1-2 for the black (–) battery lead.
Install the handle (selected models)
1. Place the handle over the mounting channel on the
frame.
2. Secure the handle to the frame using the two handle
bolts.
3. Place the lock nut on the end of each bolt and
fasten securely. DO NOT over tighten the lock nuts.
Summary of Contents for CPG5500E2DF-J
Page 2: ......
Page 21: ...19 Champion Generator 5500W JP...
Page 22: ...20...
Page 23: ...21 GFCI 91 4 cm 3 1 5 m 5 JP...
Page 24: ...22...
Page 25: ...23 OFF LPG LPG LPG PG OFF LPG LPG LPG LPG LPG 2 LPG LPG LPG LPG JP...
Page 26: ...24 1 2 3 1 2 3 4 R 5 2 1 2 1 2 3 1 2 1 2 2...
Page 28: ...26 10 30 1 2 3 4 5 6 4mm 6 4mm 6 85 6 4 mm...
Page 29: ...27 OPD LPG 12 AWG 2 052mm 3 309mm2 1 8kg 10kg LP LP LPG 1 2 LPG LPG LPG 3 4 LPG 5 LPG JP...
Page 30: ...28 1 5m 91 4cm 1 CSA UL1449 AC...
Page 34: ...32 1 2 3 1 2 1 1 2 3 4 5 6 7 5 6...
Page 35: ...33 1 2 3 4 5 6 7 1 2 3 4 0 7 0 8 mm 5 6 7 0 7 0 8 mm 0 028 0 031 in 1 15 mm 2 3 4 5 6 1 2 JP...
Page 36: ...34 25 PSI 1 2 3 4 5 6 25PSI 8 5 50 100 250 3 LPG...
Page 37: ...35 14 1 20 1 2 3 4 5 6 7 8 9 14 8mL 1 2 10 11 OFF 2 1 1 2 M5 10 M5 3 1 2 4 1 5 1 JP...
Page 38: ...36 OFF ON LPG AC AVR AVR https www youtube com watch v olRvvKBIyN0...
Page 46: ......
Page 47: ......
Page 48: ...814 0714 6 23 18...


