


REGULATING THE PRESSURE
The Chapin backpack sprayer has a built-in, adjustable regulator to control spray pressure. You
should adjust the regulator before
fi
lling the sprayer tank. To adjust,
fi
rst remove the tank cap and
fi
lter basket. Look into the tank to view the top of the regulator. There are four “
fi
ngers” on the
regulator’s knob. The
fi
ngers are numbered 1, 2, 3, and 4. The
fi
nger to the extreme left is #1 and to
the extreme right is #4. Finger 1=15 psi, Finger 2=30 psi, Finger 3=45 psi, and Finger 4=60 psi. The
higher you set the pressure, the more liquid will exit the sprayer in a given amount of time. Note: the
higher the pressure is set, the smaller the droplets. Therefore, there will be more “drift” in the
expelled liquid at higher pressures. When changing the spray pressure, excess pressure in the
pressure cylinder must be released into the tank through the spray wand. To adjust, push down the
regulator knob and rotate to align with the alignment pin to the desired number.
FILLING THE SPRAYER
Always mix the chemicals with the proper volume of water in a SEPARATE container. Make sure the
fi
lter basket is in place to keep debris from entering sprayer. Pour the mixture into the tank opening.
Note:
In order to
fi
ll the sprayer to the 4-gallon capacity you must set the pressure control valve to
the 3 or 4 setting (See “Regulating the Pressure.”) and only add 2 or 3 gallons of your chemicals.
Prime the pump by pumping the sprayer handle. The volume of liquid will appear to decrease in the
chemical mix tank as the pressure cylinder
fi
lls. Liquid will exit through the top of the pressure
regulator when the cylinder is completely full. Then,
fi
ll the remaining liquid chemicals into the tank.
It is not necessary to
fi
ll the sprayer tank with each use. You can
fi
ll the tank with only the amount
needed for each application.
Always follow the manufacturer’s instructions included on their product label.
HELPFUL SPRAYING INFORMATION
Use RAPID pump strokes to prime the pump. You will know the pressure chamber is
fi
lling with
liquid when you feel
fi
rm resistance from the pump. The air in the pressure chamber is slowly com-
pressed from repeated piston strokes. By pressing the hand lever, the valve opens. The hand lever
valve has a retaining clip to keep the valve in the “OPEN” position for continuous spraying, if desired.
For easy pump action use the END of the pump handle. The amount of liquid delivered during
spraying depends on the pressure set in the pump (see above: Regulating the Pressure).
Note:
If you experience a rapid drop in pressure, drain the sprayer completely and pump the handle
with an empty tank. The air chamber will
fi
ll with the required volume of air to repressurize. Chapin
advises performing this procedure from time to time as routine maintenance.
POWDER-BASED CHEMICALS
Powder-based chemicals (powder mixed with liquids to make the spraying agent) are usually abrasive
and will cause wear to the collar, piston pump and cylinder of the sprayer. When you use a powder-
based chemical in your sprayer, make sure it is thoroughly dissolved in the liquid solution. Directly
after use you must remove the piston, clean and lubricate the collar with petroleum jelly. Thoroughly
clean and
fl
ush the sprayer components to extend the life of the sprayers parts.
SPRAYER COMPONENTS & USE INFORMATION, Continued
3E
WAND CLIP
The wand can be attached to
the metal frame using the
wand clips.
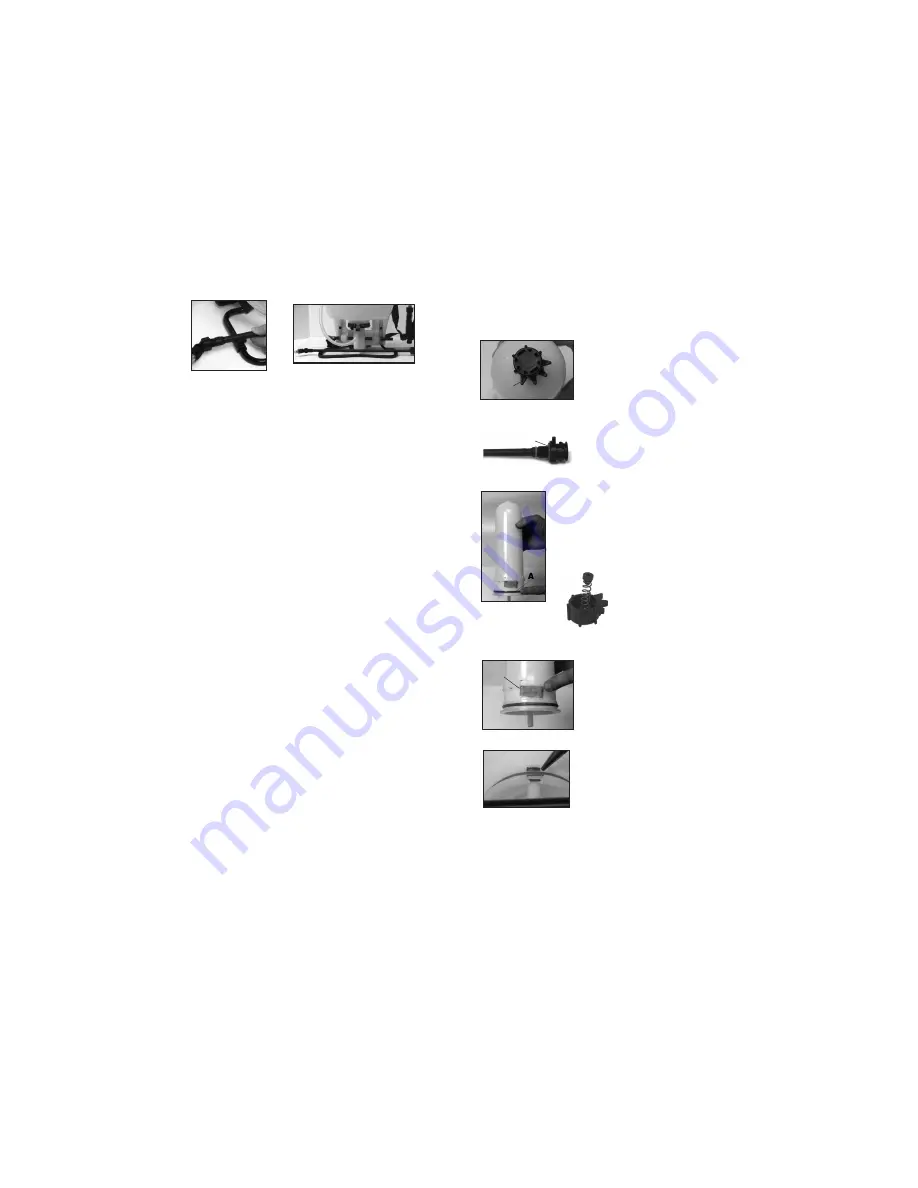
Only remove the pressure cylinder if the screen is clogged or the sprayer is
leaking from where the pressure cylinder and tank meet.
1) Loosen the screw on the black clamp around the pressure cylinder and
remove the clamp. Put the tank on the
fl
oor or ground and remove the control
knob (B) (Figure 13) from the top of the pressure cylinder by pushing the
control knob down and rotating it counter-clockwise and lifting it off. Unscrew
the valve body and set aside (Figure 14). Hold on to the neck of the tank with
one hand and grasp the pressure cylinder with your other hand. Move the
pressure cylinder back and forth and push down on it using all of your body
weight to free the cylinder from the tank. If that does not work, use a 12 - 18
inch piece of 2 x 4 lumber and a heavy hammer. Cover the top of the pressure
cylinder with a piece of cloth and lay the 2 x 4 over it. With a several blows from
the hammer the cylinder should pop out of the tank.
2) When the pump cylinder is removed you can replace the large O-ring (A)
(Figure 15). DO NOT stretch the O-ring over the
fl
ange at the bottom. Slide the
O-ring onto the pres-sure cylinder from the top to the recess.
3) Remove the other O-ring (C) on the valve body and replace as well. Apply
some grease to the O-ring and threads and reassemble (Figure 14).
5) If the pump handle snaps to the down position when you lift it up, this
means that the inlet screen (D) is clogged. It should be cleaned with a small
hard bristle brush and detergent before reassembling (Figure 17).
6) Replace the pressure cylinder by placing the tank upside down on the
fl
oor
and applying grease to the lip of the pressure cylinder and O-ring (Figure 18)
(E). Place the pressure cylinder into the tank making sure to line up the tab on
the tank with the notch (F) in the pressure cylinder. Push down forcefully and
rock the cylinder back and forth. If necessary, use a 12 - 18 inch piece of 2 x 4
lumber to apply downward force on the pres-sure cylinder. Be sure to use a
rag or piece of cloth between the sprayer and the 2 x 4 to protect the pressure
cylinder.
DISASSEMBLING AND REPAIRING THE PRESSURE CYLINDER
Figure 13
Figure 15
Figure 16
Figure 17
Figure 18
B
C
D
F
E
8E
Figure 14
4) Pull apart the spring and sealing piece on the control knob to
remove. Push the new ones together (Figure 16)


