background image

C H A P T E R    P R E F A C E   P L U S

Chapter 

 Preface Plus Line Stage

 Pre amplifier


The exception, not the rule...

www.chapterelectronics.co.uk

Summary of Contents for Preface Plus Line Stage

Page 1: ...C H A P T E R P R E F A C E P L U S Chapter Preface Plus Line Stage Pre amplifier The exception not the rule www chapterelectronics co uk ...

Page 2: ... 5 Unpacking your Pre Amplifier 6 Break In Period 6 Installation 7 Ventilation 7 Operating Voltage and Mains Conditions 8 Design Features 9 Front Panel 10 11 12 13 Rear Panel 14 Remote Control 15 Specifications 16 Conformity Acknowledgements 17 Warranty Information 18 Contact Information 19 ...

Page 3: ...ections must be used 3 To clean your Chapter product please use a soft damp cloth Never use flammable or combustible chemicals 4 Never operate this product with any covers removed 5 Never allow the inside of this unit to become wet or pour spill liquids directly onto it 6 Never block air flow through the vents on the side panel 7 Never bypass any fuse 8 Never replace a fuse with anything other tha...

Page 4: ...pter Preface Mk 2 From dream to reality Thank you for choosing the Chapter Preface Pre Amplifier It has been designed and manufactured to the highest possible standards in order to give you many years of musical enjoyment 4 ...

Page 5: ...l specifications By bringing together engineers and designers with a lifetimes experience in audio and power system design we believe this objective has been more than achieved The Chapter Preface is able to handle all of today s high resolution sources with the fidelity that you would expect of any Chapter product Our goal as always is to produce a true reference quality line stage A product that...

Page 6: ...nd such damage is not covered under warranty Please inspect your pre amplifier for possible damage due to shipping If you discover any contact your Chapter Audio dealer immediately Your Chapter Preface Pre Amplifier will deliver excellent performance straight out of the box however you should expect to hear it improve as it reaches its normal operating temperatures and its various components break...

Page 7: ...Pre Amplifier has been designed to drive the most demanding of cable runs and amplifier loads with ease The back of your Preface Pre amplifier has been laid out to keep every connection accessible We recommend that you leave some clearance behind the unit to fit cables without having to bend them excessively In order to conform with CE regulations your pre amp is fitted with a rocker style power s...

Page 8: ...l circuitry Using large custom made screened transformer and a fastidious attention to circuit layout gives the unit staggering noise performance whilst an advanced mains monitoring system allows the unit to ride through the most unsettled of mains conditions The input voltage from which the Preface will operate is factory set to either 110V or 230V As the transformers in the Chapter Preface are c...

Page 9: ...requency phase or power bandwidth Balanced ground layout Cancels the ground currents that can cause Inter modulation distortion and crosstalk in a conventional stereo design Full Immersion Gold Printed Circuit Boards Audio signals travel on gold track As you would imaging compared to copper and gold plate this is a very expensive to manufacture but the sonic benefits are hugely tangible in terms o...

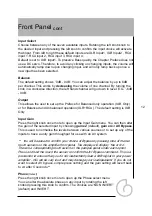
Page 10: ...lit To fully activate the unit touch any of the touch switch sensors or rotate press either of the knobs Once the amplifier is powered up the knobs will light blue the relays engage and the amplifier is ready to use To return the unit to standby mode touch and hold the Power button located on the amplifier front panel until you hear the relays disengage and the lights on the knobs go out If you wi...

Page 11: ...g the front panel knob will cycle through the menu functions they are as fol lows Volume control Default To reduce the volume rotate the knob anti clockwise to increase the volume rotate the knob in a clockwise direction The volume control can be adjusted in up down by 1dB 86 to 60dB 0 5dB steps between 60 and 50dB and 0 1dB steps from 50dB to 6dB input gain set to x2 or 12dB input gain set to x4 ...

Page 12: ... setting is XLR Only Input Gain Press the right knob once more to open up the Input Gain menu You can then alter the gain of the selected input by choosing gain x2 default gain x4 or AV Bypass This is used to normalise the levels between various sources or to set up any of the inputs to have a unity gain throughput for use with an AV system You will be asked to confirm your choice of Bypass by pre...

Page 13: ...ting of 100 Rotor Brightness You can adjust the brightness of the blue knobs on the amplifier front panel This can be varied from 1 to 100 in 1 increments Default is 77 You do not need to click the left knob to confirm this selection Rotor Brightness You can also adjust the touch sensors button brightness on the front panel of your Precis This can be varied from 1 to 100 in 1 increments Default is...

Page 14: ...tain absolute phase please check to make sure that your chosen source component has the same pin assign ments If not you can change the phase for that input through the PHASE option via the control knob 3 Single ended Inputs x 5 Labelled RCA INPUT 1 RCA INPUT 2 RCA INPUT 3 RCA INPUT 4 RCA INPUT 5 Your Chapter Preface accepts analogue signals via RCA single ended interconnect cables on the aforemen...

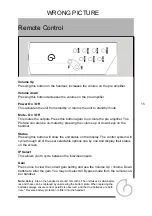
Page 15: ... the display The control system will cycle through all of the user selectable options one by one and display their status on the screen IP Select This allows you to cycle between the individual inputs Gain Press once to view the current gain setting and use the Volume Up Volume Down buttons to alter the gain You may not select AV Bypass mode from the remote con trol handset Note Battery Life on th...

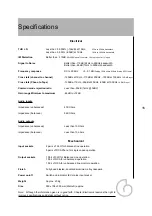
Page 16: ...than 90dB 1kHz 0dBV Gain range Minimum to maximum 86dB to 12dB Audio inputs Impedance unbalanced 47K Ohms Impedance balanced 94K Ohms Audio outputs Impedance unbalanced Less than 10 Ohms Impedance balanced Less than 10 ohms Mechanical Input sockets 2 pairs of XLR for balanced line operation 5 pairs of RCA Phono for single ended operation Output sockets 1 Pair of XLR for Balanced Line operation 1 P...

Page 17: ... fluctuations EN55020 1987 Immunity EN60065 1993 General requirements to include Components Electrical connections and mechanical fixings External flexible cords Fault conditions Heating under normal conditions Insulation requirements Ionising Marking mechanical strength Parts connected to the mains supply Shock hazards under normal operating conditions Terminal devices Chapter Electronics Ltd als...

Page 18: ...he purchase date of the product Please ensure that your equipment is insured by you during any transit or shipment Contact Information Chapter Electronics Ltd 5 Liberty Square Kings Hill West Malling Kent ME19 4AU United Kingdom Notice Each Chapter Preface Pre Amplifier is unique in its manufacture We use only the finest sup pliers with the metalwork being machined by a local ISO 9002 quality assu...

Page 19: ...Property of Chapter Electronics Ltd No unauthorised copying of this document is permitted without written consent of the Company Chapter Electronics Ltd 2005 ...

Reviews: