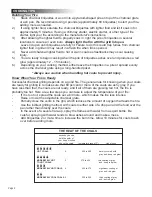
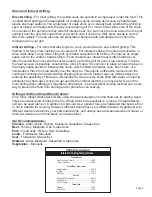

THE HEAT OF THE COALS
seconds you can
hold the palm of
your hand 4 inches
above the coals
temperature range (Fº)
visual cues
HOT COALS
2
400 to 450
barely covered with
gray ash; deep red glow
MODERATELY HOT
375 to 450
thin coating of gray
ash; deep red glow
MODERATELY HOT COALS
4
325 to 375
significant coating of
gray ash; red glow
MODERATELY COOL COALS
5
300 to 325
thick coating of gray
ash; dull red glow
3
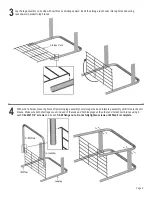
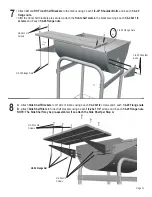
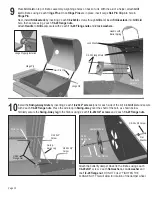
Building Your Fire
1.)
Stack charcoal briquettes or wood into a pyramid-shaped pile on top of the charcoal grate
or ash pan. We recommend using 4 pounds (approximately 60 briquettes) to start your fire,
adding more as needed.
2.)
If using lighter fluid, saturate the charcoal briquettes with lighter fluid and let it soak in for
approximately 5 minutes. If using a chimney starter, electric starter, or other type of fire
starter, light your fire according to the manufacturer's instructions.
3.)
After allowing the lighter fluid to properly soak in, light the pile of briquettes in several
locations to ensure an even burn.
Always light the fire with the grill lid open.
Leave lid open until briquettes are fully lit. Failure to do this could trap fumes from charcoal
lighter fluid in grill and may result in a flash fire when lid is opened.
4.)
Never add charcoal lighter fluid to hot or warm coals as flashbacks may occur causing
injury.
5.)
You are ready to begin cooking when the pile of briquettes ashes over and produces a red
glow (approximately 12 – 15 minutes).
6.)
Depending on your cooking method, either leave the briquettes in a pile or spread evenly
across the charcoal grate using a long-handled poker.
*Always use caution when handling hot coals to prevent injury.
Know When Your Fire is Ready
Successful charcoal grilling depends on a good fire. The general rule for knowing when your coals
are ready for grilling is to make sure that 80 percent or more of the coals are ashy gray. If you
have less than that, the coals are not ready, and if all of them are glowing red hot, the fire is
probably too hot. Here are a few steps you can take to adjust the temperature of your fire:
-
If it is too hot, spread the coals out a bit more, which makes the fire less intense.
-
Raise or lower the adjustable charcoal grate.
-
Partially close the vents in the grill, which reduces the amount of oxygen that feeds the fire.
-
Use the indirect grilling method, with coals to either side of a drip pan and the food over the
pan rather than directly over the coals.
-
In the event of a severe flare-up, spray the flames with water from a squirt bottle. Be
careful, spraying with water tends to blow ashes around and make a mess.
-
Add briquettes 2 or 3 at a time to increase the burn time. Allow 10 minutes for coals to ash
over before adding more.
COOKING TIPS
TO HOT COALS
Page 4