background image

Installationsanleitung der H-LINK-Platine (SPX-RAMHLK)

1. Überprüfen Sie das Zubehör der H-LINK-Platine.

Tabelle 1

Nr.

Teilebezeichnung

Menge

1

3

1

1

H-LINK-Platine

Platinenhalterung

14-poliges Kabel

Installationsanleitung

2. Installation der H-LINK-Platine

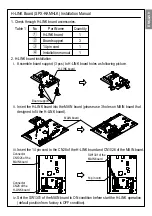
i.  Montieren Sie die Platinenhalterung (3 Stck.) wie in der nachstehenden Abbildung 

gezeigt in den Löchern der H-LINK-Platine.

ii.  Stecken Sie die H-LINK-Platine in die HAUPT-Platine ein (verwenden Sie die 3 Löcher 

an der HAUPT-Platine, die für die Aufnahme der H-LINK-Platine vorgesehen sind).

iii. Schließen Sie das 14-polige Kabel an CN28 der H-LINK-Platine und CN1026 der 

HAUPT-Platine an.

H-LINK-Platine

Platinenhalterung

Anschluss CN1026 
der HAUPT-Platine

Anschluss CN28 
der H-LINK-Platine

14-poliges Kabel

iv. Stellen Sie den SW1301 der HAUPT-Platine vor dem Start des H-LINK-Betriebs in die 

Stellung ON (werkseitige Standardstellung ist OFF).

SW1301 der 
HAUPT-Platine

HAUPT-Platine

DEUTSCH

Summary of Contents for SPX-RAMHLK

Page 1: ...latine ii Stecken Sie die H LINK Platine in die HAUPT Platine ein verwenden Sie die 3 L cher an der HAUPT Platine die f r die Aufnahme der H LINK Platine vorgesehen sind iii Schlie en Sie das 14 polig...

Page 2: ...instellung der Kreislaufnummer auf 15 Einstellen durch Einstecken eines Schraubendrehers Position DSW2 RSW1 Die werkseitigen Einstellungen f r DSW2 und RSW1 sind OFF bzw 0 PIN 1 ist ON Die Position is...

Page 3: ...i Ins rez la carte H LINK dans la carte M RE les trois trous de la carte M RE sont con us pour s adapter la carte H LINK iii Ins rez le c ble 14 broches dans le connecteur CN28 de la carte H LINK et l...

Page 4: ...u num ro du cycle sur 15 R glez le en ins rant un tournevis Position DSW2 RSW1 Par d faut DSW2 et RSW1 sont r gl s en usine sur OFF et 0 respectivement La branche n 1 est r gl e sur ON La position de...

Page 5: ...ato in figura ii Inserire la scheda H LINK nella scheda MAIN utilizzare 3 fori sulla scheda MAIN progettati per stare nella scheda H LINK iii Inserire il cavo 14 pin nel CN28 della scheda H LINK e CN1...

Page 6: ...cifre RSW1 una cifra Esempio Impostazione del numero del ciclo a 15 Impostarlo inserendo un cacciavite Posizione DSW2 RSW1 Le impostazioni predefinite di fabbrica sono OFF e 0 rispettivamente per DSW2...

Page 7: ...nsert the H LINK board into the MAIN board please use 3 holes on MAIN board that designed to fit the H LINK board iii Insert the 14 pin cord to the CN28 of the H LINK board and CN1026 of the MAIN boar...

Page 8: ...xample Setting cycle number to 15 Set it inserting a screwdriver Position DSW2 RSW1 Default setting from factory for DSW2 and RSW1 are set to OFF and 0 respectively Pin number 1 is ON The set position...

Reviews: