background image

35

>

>

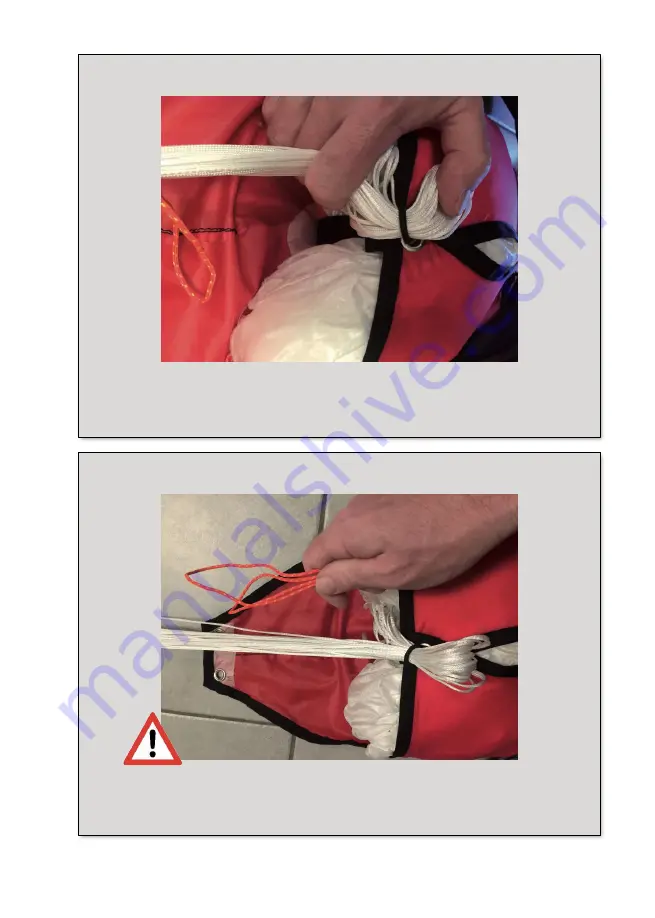
10.

Remove packing rope

>

Caution:

If the packing rope is not removed, the parachute

cannot open. This can cause malfunction, injuries or death!

9.

Close the container

>

Take the rubber loop and both leaves of the container and close
it with the bundle of lines.

Summary of Contents for DIAMONDcross 125 HG

Page 1: ...on steerable EP 185 2017 DIAMONDcross 220 HG non steerable EP 186 2017 Norm Nfl II 91 09 and LTF 35 03 Revision 0 Effective from Production year 2018 Last update Nov 2018 Finsterwalder GmbH Charly Produkte Pagodenburgstr 8 D 81247 München Tel 49 0 89 811 65 28 Fax 49 0 89 814 41 07 Mail office finsterwalder charly de Web http www finsterwalder charly de ...

Page 2: ......

Page 3: ...rehensive guide for the proper handling of your reserve parachute If you have any questions related to the use of this rescue system please contact CHARLY PRODUKTE directly If you need professional packing or repair service please contact your local dealer or CHARLY PRODUKTE For more information about this and other CHARLY products please visit www finsterwalder charly de We wish you great flights...

Page 4: ...our 13 9 Maintenance Cleaning 14 10 Storage 15 11 Packing and inspection intervals 15 12 What to do when damage is detected 16 13 Repairs 16 14 Checkup and packing preparations 17 15 Packing 18 16 Installation on the harness 18 17 Placement inside a harness rescue system container 18 18 Compatibility test 19 19 Transport 20 20 Pre flight checklist 20 21 Specifics for hang gliding winch launch 20 2...

Page 5: ...5 1 Overall illustration Front tip Main lines Rotor optional Hybrid riser Stabilo Canopy Upper center lines Bottom center lines ...

Page 6: ...a DIAMONDcross delta light non steerable DC 125 HG DC 160 HG DC 220 HG Surface 30 7 m 41 0 m 59 2 m Line length incl risers 9 96 10 32 m 9 96 10 35 m 10 60 10 90 m Centre line length incl risers 10 37 10 47 m 10 47 10 57 m 10 85 11 02 m Number of lines panels 18 16 22 20 26 24 Number of centre lines 5 2 8 2 9 2 Overall length 8 25 m 8 50 m 9 00 m Max load EN LTF 125 kg 160 kg 220 kg Min recommende...

Page 7: ...rly 6 Required documents Operation instruction Packing and inspection record The enclosed engineering specifications for this air sports equipment is part of these operating instructions 7 Mode of operation In the case of an emergency situation during flight deploy the reserve parachute by pulling the release handle with a firm and quick motion This causes the outer container to open and the parac...

Page 8: ...ignificantly responsible for a low sink rate and the high pendulum stability 8 Specific characteristics of the DIAMONDcross HG rescue system 8 1 Reserve parachute The trim of the DIAMONDcross HG is adjusted so that there is a short stall phase immediately after opening during which rotational energy is instantly reduced in an emergency situation Subsequently the DIAMONDcross HG automatically switc...

Page 9: ...essarily with the least possible volume Tests have shown that the container can be pulled out of the harness rescue compartment much easier and with less effort than cube like shaped containers sometimes even if they have a smaller volume Also the flat container deforms much more when it is pulled out by the pilot in upward direction It bends up so that the risk of getting caught in the harness is...

Page 10: ... prevent an early and thus uncontrolled opening of the rescue system This is a further measure to avoid the entangling of the reserve in the paraglider lines as it contributes to a defined deployment after the release Fabric coated rubber bands If the container is locked using packing rubber bands or rubber bands without protection there is a risk of early breakage as they are often not strong eno...

Page 11: ...iners suitable for their harnesses The DIAMONDcross has been certified in combination with its inner container and many of the container s details contribute to an optimal performance of the system Tests showed that the DC container performs significantly better in many aspects than the container that comes with a harness 5 years of experience with rescue system deployments on the G Force Trainer ...

Page 12: ...cient but similar to a wing also to the lift coefficient The higher aspect ratio that results from the diamond configuration is essential for the resulting flight and gliding qualities No pendulum tendency immediately after the opening By contrast to other reserve parachute systems the DIAMONDcross does not exhibit a pendulum tendency The pendulum tendency can lead to severe injuries particularly ...

Page 13: ...eed in combination with considerably lower sink rates is thus always associated with a lower risk of injury than an impact at right angle and higher vertical speed even if forward speed is increased by tailwind Lower sink rates allow for more time to react The low sink rate gives the pilot more time to prepare for landing We thus recommend the following course of action after rescue system deploym...

Page 14: ...oo late for the rescue parachute As long as there is a chance to deploy it is ALWAYS the better alternative If your altitude is low keep watching the ground and prepare for landing With the DIAMONDcross you are provided with the largest possible passive safety a rescue system can currently offer You have purchased a rescue system you can always rely on It went through a large number of on flight t...

Page 15: ...r circulation to avoid the formation of condensation Avoid unnnecessary exposure to the sun UV radiation Unpack the wet or damp canopy and let it dry at room temperature or outside in a shady place After salt water exposure immediately rinse the canopy thoroughly with fresh water Clean all components only with fresh water and if needed using neutral soap never use chemicals containing solvents 10 ...

Page 16: ...s of emergency parachutes must never be carried out Repaired seams can have significant influence on material strength Damages must be assessed in each individual case Therefore only the manufacturer or an authorised service centre after consultation with the manufacturer may carry out repairs using original materials Manufacturer approved repair instructions must be enclosed in the packing and in...

Page 17: ...acking aid you need a piece of cord or a parachute line of 50 cm length and the possibility to put the canopy under tension between the harness respectively the suspension point and the packing loop We recommend to attach an elastic cord with carabiner to the packing loop at the apex of the canopy Several small bags with lead scrap or sand can be used for weighing down the canopy which makes packi...

Page 18: ... interfere with moving parts such as a speed system webbings running through etc 17 Placement inside a harness rescue system container Follow the instructions from your harness manual to place your rescue system inside the container Additionally the following ponints must be strictly adhered to Only use the original release handle that is delivered with the harness Other release handles must not b...

Page 19: ...mbination of a rescue system and a harness must be tested for compatibility in a k test by an authorised person after the first packing Deployment from the flying position must be possible without any difficulty and according to the specifications of the manufacturer The release force should thereby not exceed 70 N and the inner container should deploy easily from the integrated or externally atta...

Page 20: ...cue system container and the proper fit of the release handle have to be checked prior to each takeoff If the rescue system connecting line is unhinged after each flight e g when using a front container system the pre flight check has also to include the correct attachment of the riser 21 Specifics for hang gliding winch launch For winch launching please pay attention to the harness hang glider an...

Page 21: ...isposal at the end of the operating period If you return the product to CHARLY PRODUKTE we will be glad to provide for proper disposal 24 Environment and nature friendly behaviour Finally please enjoy our amazing sport in such a way that nature and environment are treated with care ...

Page 22: ...llation packing service always the latest revision Packing rope to bundle lines and connect canopy Packing rubbers 6x Packing table clamps weights optional Packing and check confirmation Spare parts Note Every size of the DIAMONDcross can also be packed in the next smaller container if smaller packing volume is required Inner container for mounting in the bottom or back of the harness Standard fla...

Page 23: ...ain lines Check lines begin at the side of the harness and continue in the direction of the canopy 1 Connect parachute to main carabiner Route riser and connect with velcro along the main connection to the harness ...

Page 24: ...heck that all centerlines are between the two front and two rear fork lines CAUTION If the center lines are not between there is a line over and the canopy is inside out 2 1 Continue and separate the centerlines according to the picture ...

Page 25: ...er line check with red tip to the bottom 3 Presort canopy Pull back the material of the canopy around the contour of the parachute so that the main center and brake lines are pre tensioned This makes folding of the canopy easier ...

Page 26: ...nopy and saves time The loop is aligned with the tension stripe on which the red front tip is also connected 4 Position canopy for packing Bundle the lines with a packing rope and fold the right side of the canopy over the left side so that the red marking of the front tip that shows the flight direction faces you ...

Page 27: ...anel over the other Take care not to confuse the straps with the seams of the canopy 6 Fold the canopy Start with panel 01 The number is located on the panels close to the line attachment points Always apply tension with the right hand on the already folded panels when you take the next one ...

Page 28: ...a mark on the first half of the panels in this picture an inside container is used 6 2 On the side tips the stabilo triangles are located No special fold is required for this part Continue until the rear gap appears Panel 8 DC 125 Panel 10 DC 160 Panel 12 DC220 ...

Page 29: ... 4 Align the center lines in the middle of the canopy 5 lines DC 125 8 lines DC 160 9 lines DC220 Pull slightly to tension all center lines and move the material of the canopy in the center up as far as you can reach inside for better folding in the next steps ...

Page 30: ...30 6 7 Pull up the rear tip approx 30 cm and fold it to the left side see picture in the next step 6 8 6 6 Fold back half of the panels to the other side and remove the marking ...

Page 31: ...31 6 9 Fold panels two times at approx 1 3 of depth in direction of the center no S folding You may use packing clamps or weights 6 8 ...

Page 32: ... gap and hold it in position with the clamps 6 10 Fold the rear tip that was on the left side over the right side and wind up the left hand panels to the inside in the same way Left top in the picture and Right down in the picture always in flight direction ...

Page 33: ... webs together at the apex to about container width before the next step 6 12 When you throw your DIAMONDcross the rear tip catches air first with this packing method It provides you with immediate opening without time lag but it is still smooth without high shock load to the material ...

Page 34: ...Continue with vertical small S folds until the canopy is inside the container 8 Put canopy into the container Wind up approx 10 15 cm of the top of the canopy and put it into the bottom of the inside container ...

Page 35: ...Caution If the packing rope is not removed the parachute cannot open This can cause malfunction injuries or death 9 Close the container Take the rubber loop and both leaves of the container and close it with the bundle of lines ...

Page 36: ...ertent or too early opening during the extraction of the container from the harness 11 Bundle the lines Position the lines according the picture and bundle the lines with three loops on each side of the bundle Split line bundle and prepare lines and bundles to close the inside container ...

Page 37: ...container according to the manual of the harness manufacturer 13 Prepare container for installation in the harness Twist container 180 degrees and move the container position to the harness Install handle and bundle the riser according to the picture ...

Page 38: ...d including an inside container In some cases it has been proven that the original DIAMONDcross container has better extraction characteristics than the container that was delivered with the harness The same is valid for the opening phase of the reserve after the pilot dropped The original DIAMONDcross container gives you the highest safety level of the system in different cases of emergency For f...

Page 39: ......

Page 40: ...Finsterwalder GmbH Charly Produkte Pagodenburgstr 8 D 81247 München Phone 49 0 89 811 65 28 Fax 49 0 89 814 41 07 Mail office finsterwalder charly de Web http www finsterwalder charly de ...

Reviews: