background image

6

7

IMPORTANT - Remove any packaging before use, 
but retain the safety instructions and store them 
with this product.

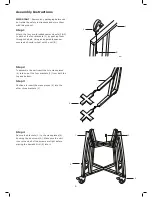
Step 1

Attach the four pre-threaded castor wheels (2 & 3) 
to each of the four brackets (1) by pushing them 
through the hole. Using an adjustable spanner 
secure each castor wheel with 1x nut (B). 

Step 2

To assemble the cart insert the two cross pieces 
(4) into one of the four brackets (1) from both the 
top and bottom. 

Step 3

Continue to insert the cross pieces (4) into the 
other three brackets (1).

Step 4

Secure the brackets (1) to the cross pieces (4) 
by using the 8x screws (A). Make sure the cart 
is secure and all of the screws are tight before 
placing the Kamado Grill (9) into it.

A

1

3

4

2

1

1

B

2

Assembly Instructions

Summary of Contents for Kamado CM155-024

Page 1: ...E INSTRUCTION BOOKLET DO NOT PLACE ARTICLES ON OR AGAINST THIS APPLIANCE DO NOT STORE CHEMICALS OR FLAMMABLE MATERIALS OR SPRAY AEROSOLS NEAR THIS APPLIANCE DO NOT OPERATE THE APPLIANCE INDOORS DO NOT OPERATE IN AN ENCLOSED AREA ACCESSIBLE PARTS MAY BE VERY HOT KEEP YOUNG CHILDREN AWAY Minimum clearances from combustible materials 3 metres FOR OUTDOOR USE ONLY ...

Page 2: ...properly After first use inspect all fasteners for tightness The metal band connecting your lid to the base will expand from the heat and this could become loose It is recommended you check and if neccessary tighten the band with a spanner You can now use your Kamado as normal Extinguishing To extinguish unit stop adding fuel and close all the vents and the lid to allow the fire to die naturally D...

Page 3: ...for at least 30 minutes prior to the first cooking on the kamado DO NOT cook before the fuel has a coating of ash Care Safe Use Guidelines It is recommended you don t stoke or turn the coals once they are alight This allows the charcoals to burn more uniformly and efficient Once alight ONLY use heat resistant gloves when handling hot ceramics or cooking surfaces See below for cooking instuctions d...

Page 4: ...meat and before eating Always keep raw meat away from cooked meat and other foods Before cooking ensure grill surfaces and tools are clean and free of old food residues DO NOT use the same utensils to handle cooked and uncooked foods Ensure all meat is cooked thoroughly before eating CAUTION eating raw or under cooked meat can cause food poisoning e g bacteria strains such as E coli To reduce the ...

Page 5: ...nts and hardware Great care has been taken during production to remove sharp edges but you should handle all components with care to avoid injury Check you have all components before beginning When applicable tighten all hardware connections by hand first Once the step is completed go back and fully tighten all hardware Follow all steps in order to properly assemble your product Typical assembly a...

Page 6: ...er secure each castor wheel with 1x nut B Step 2 To assemble the cart insert the two cross pieces 4 into one of the four brackets 1 from both the top and bottom Step 3 Continue to insert the cross pieces 4 into the other three brackets 1 Step 4 Secure the brackets 1 to the cross pieces 4 by using the 8x screws A Make sure the cart is secure and all of the screws are tight before placing the Kamado...

Page 7: ...mage occurs Step 7 Place the Kamado Grill on the cart with the bottom vent facing to the front of the cart allowing the vent to open and close without any interruption Step 8 When the grill is securely placed on the cart add the firebox 8 charcoal plate 7 and upper ring 6 inside of the Kamado Grill as displayed in the assembly diagram Step 9 Press down on the castor levers 2 to lock the castor whe...

Page 8: ...8 ...

Reviews: