background image

20

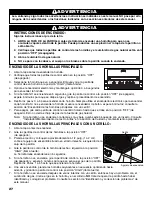
ES NUESTRO DESEO QUE ARME Y UTILICE SU PARRILLA EN LA FORMA MÁS

SEGURA POSIBLE. EL PROPÓSITO DE ESTE SÍMBOLO DE ALERTA DE SEGURIDAD

ES QUE USTED PRESTE ATENCIÓN A LOS POSIBLES PELIGROS CUANDO ARME

Y UTILICE SU PARRILLA.

¡CUANDO VEA ESTE SÍMBOLO DE ALERTA DE SEGURIDAD 

PRESTE ESPECIAL

ATENCIÓN A LA INFORMACIÓN A CONTINUACIÓN!

LEA DETENIDAMENTE TODAS LAS ADVERTENCIAS DE SEGURIDAD E

INSTRUCCIONES ANTES DE ARMAR Y USAR LA PARRILLA.

IMPORTANTES ADVERTENCIAS

DE SEGURIDAD

PELIGRO

SI HUELE GAS:

1. Apague el gas al artefacto.

2. Apague cualquier llama expuesta.

3. Abra la tapa.

4. Si el olor persiste, manténgase alejado del artefacto y llame de inmediato a su proveedor de gas

o a los bomberos.

1.

No guarde ni use gasolina ni otros líquidos o vapores inflamables en las cercanías de este o de
ningún otro artefacto.

2.

Un cilindro de propano líquido que no esté conectado para ser utilizado no debe ser mantenido
cerca de éste o ningún otro artefacto.

NO guarde cilindros de gas de propano líquido debajo o cerca de este artefacto.

Se puede producir un incendio y causar lesiones o hasta la muerte si no se siguen 
estas instrucciones en forma exacta.

ADVERTENCIA

PELIGRO

Summary of Contents for Stainless Steel Natural Gas Drop-In 4-Burner Grill

Page 1: ...A TODAS LAS ADVERTENCIAS E INSTRUCCIONES EN ESTE MANUAL PARA EVITAR LESIONES PERSONALES INCLUSO LA MUERTE O LOS DAÑOS MATERIALES Parrilla a Gas Natural Empotrable de 4 Hornillas de Acero Inoxidable OWNER S MANUAL MANUAL DEL PROPIETARIO NOTICE TO INSTALLER LEAVE THESE INSTRUCTIONS WITH THE GRILL OWNER FOR FUTURE REFERENCE AVISO PARA EL INSTALADOR ENTREGUE ESTAS INSTRUCCIONES AL PROPIETARIO DE LA PA...

Page 2: ...ARNINGS DANGER IF YOU SMELL GAS 1 Shut off gas to the appliance 2 Extinguish any open flame 3 Open Lid 4 If odor continues keep away from the appliance and immediately call your gas supplier or your fire department 1 Do not store or use gasoline or other flammable liquids or vapors in the vicinity of this or any other appliance 2 An LP cylinder not connected for use shall not be stored in the vici...

Page 3: ...Asked Questions 16 Parts List and Assembly Instructions 17 19 Warranty Information Back Cover TABLE OF CONTENTS DANGER Indicates an imminently hazardous situation which if not avoided will result in death or serious injury WARNING Be alert to the possibility of serious bodily injury if the instructions are not followed Be sure to read and carefully follow all of the messages CAUTION Indicates a po...

Page 4: ... and pets away from hot grill DO NOT allow children to use or play near this grill DO NOT leave the grill unattended while in use DO NOT allow the gas hose to come in contact with hot surfaces DO NOT allow grease from drain hole to fall on hose Keep any electrical supply cords away from water or heated surfaces Keep a fire extinguisher on hand acceptable for use with gas products Refer to your loc...

Page 5: ...ill and walls or other combustible material DO NOT use grill under overhead unprotected combustible construction DO NOT use or install this grill in or on a recreational vehicle and or boat WARNING DO NOT use hard metal piping of any kind to connect this type of grill to a natural gas source Use only hose specified by manufacturer Using hard metal piping or convoluted metal tubing is an unsafe pra...

Page 6: ... onto pipe nipple that leads to natural gas supply Figure A 2 After grill is completely assembled make sure natural gas supply valve is OFF and then connect natural gas hose to socket Push sleeve back on socket Figure B and insert plug until sleeve snaps forward locking plug into socket Be sure to leak test these connections prior to use Pipe nipple Quick disconnect coupler Plug Push sleeve back t...

Page 7: ... the natural gas supply or if any of the gas components are replaced Any time your grill has been moved At least once per year or if your grill has not been used for more than 60 days CHECKING FOR LEAKS 1 Create a mixture of 50 water and 50 liquid dishwashing soap 2 Open the lid 3 Insure all burner knobs are set to the OFF position 4 Turn on the natural gas supply 5 Apply the soap water mixture to...

Page 8: ...follow these safety steps These steps should be performed after the grill has been assembled stored moved cleaned or repaired DO NOT operate this grill until you have read and understand ALL of the warnings and instructions in this manual PRE START CHECK LIST Ensure that the grill is properly assembled Inspect the gas supply hose for burns chaffing kinks and proper routing before each use If it is...

Page 9: ...rner does not ignite using push button igniter wait 5 minutes see Match Lighting the Main Burners section 7 To turn off turn each control knob clockwise until it locks in the OFF position This does not turn off the gas flow from the natural gas supply Note If burner does not light or flame is too low you may have spider or other insect blockage in burner See Burner Assembly Maintenance under Prope...

Page 10: ... 2 cm from the lower edge of burner 4 Push and turn the control knob to the HIGH position Continue to push in control knob for 3 5 seconds while holding match under burner The burner should light within 5 seconds 5 Once burner is lit continue to push and hold control knob for 30 seconds 6 If the burner does not light turn the control knob to OFF and wait 5 minutes for gas to dissipate and repeat l...

Page 11: ... a dangerous situation for you and your grill Excessive flare ups result from the build up of grease on the top of the heat tents If this should occur DO NOT pour water onto the flames This can cause the grease to splatter and could result in serious burns or bodily harm If grease fire occurs close the lid and turn off the main burners until the grease burns out Use caution when opening the lid as...

Page 12: ...shock This plug should be plugged directly into a properly grounded 3 prong receptacle Never cut or remove the grounding plug Any extension cord must also have a 3 prong receptacle All electrical supply cords should be kept away from water and any hot surfaces of the grill WARNING GRILL COOKING TIPS CLEANLINESS Always wash hands thoroughly with soap and hot water prior to handling food and after h...

Page 13: ... s toll free Meat Poultry Hotline at 800 535 4555 To protect your grill from excessive rust the unit must be kept clean and covered at all times when not in use Wash cooking grills with hot soapy water rinse well and dry Lightly coat cooking grill with vegetable oil or vegetable oil spray Clean inside and outside of grill by wiping off with a damp cloth Apply a light coat of vegetable oil or veget...

Page 14: ...brush entire outer surface of burner to remove food residue and dirt 8 Check burner for damage if any large cracks or holes are found replace burner IMPORTANT Burner opening must slide over valve nozzle 9 Carefully replace burners 10 Replace cotter pins beneath each burner and follow the Gas Leak Testing section of this manual Relight burners to verify proper operation 11 Replace heat distribution...

Page 15: ...l indoors disconnect the hose from the natural gas supply Clean burner prior to use after storing at the beginning of grilling season or after a period of one month not being used Spiders and insects like to build nests in burner tubes especially during colder months These nests can cause fires in burner tubes or under grill If storing the grill outdoors cover the grill with a grill cover for prot...

Page 16: ...ucted See section on Burner Assembly Maintenance under Proper Care and Maintenance 2 Burner is improperly seated on control valve 3 Gas connections may be loose Leak Check and tighten all connections 1 Burner is obstructed See section on Burner Assembly Maintenance under Proper Care and Maintenance 1 Burner holes may be obstructed See section on Burner Assembly Maintenance under Proper Care and Ma...

Page 17: ...ning brush Cleaning Porcelain Finished Cast Iron Cooking Grills Wash grills with a mild detergent and rinse with hot water before initial use and as needed For stubborn food residue use a degreaser and fiber or brass cleaning brush Dry immediately using a soft cloth or paper towels Cleaning Heat Distribution Plate Heat distribution plates should be cleaned whenever food or grease drippings accumul...

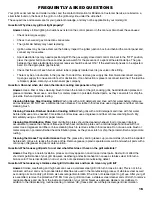
Page 18: ...to your built in grill base Vents should be placed on both sides of your grill base The upper vent opening should be at least 20 square inches 129 cm2 and located within 5 inches 12 7 cm of the top edge of your grill base The lower vent opening should be at least 10 square inches 64 5 cm2 and located within 1 inch 2 5 cm or less from floor level of your grill base 17 ASSEMBLY INSTRUCTIONS READ ALL...

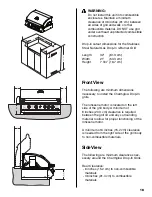
Page 19: ...lowing are minimum dimensions necessary to install the Charmglow Drop In grills The rotisserie motor is located on the left side of the grill body A minimum of 8 inches 20 3 cm clearance is required between the grill lid and any surrounding material to allow for proper functioning of the rotisserie motor A minimum of 6 inches 15 2 cm clearance is needed from the right side of the grill body to non...

Page 20: ...niter cap and insert battery with positive end of battery toward igniter cap Replace igniter cap and make sure the igniter is working properly Grease Tray Installation Insert main burner grease tray into opening on front side of main burners ...

Page 21: ...SI HUELE GAS 1 Apague el gas al artefacto 2 Apague cualquier llama expuesta 3 Abra la tapa 4 Si el olor persiste manténgase alejado del artefacto y llame de inmediato a su proveedor de gas o a los bomberos 1 No guarde ni use gasolina ni otros líquidos o vapores inflamables en las cercanías de este o de ningún otro artefacto 2 Un cilindro de propano líquido que no esté conectado para ser utilizado ...

Page 22: ...ación y Resolución de Problemas 34 Preguntas frecuentes 34 35 Lista de partes e instrucciones de armado 36 38 Información de la garantía Cubierta trasera ÍNDICE PELIGRO Indica una situación peligrosa inminente la cual si no se evita producirá lesiones graves o aún la muerte ADVERTENCIA Manténgase alerta a la posibilidad de lesiones corporales graves si no se siguen las instrucciones Asegúrese de l...

Page 23: ...ños y las mascotas alejados de la parrilla caliente NO permita que los niños usen o jueguen cerca de esta parrilla NO deje la parrilla desatendida mientras está en uso NO permita que la manguera de gas haga contacto con superficies calientes NO permita que la grasa del agujero de drenaje caiga sobre la manguera Mantenga todos los cables de alimentación eléctrica alejados del agua o superficies cal...

Page 24: ...illa y las paredes u otros materiales combustibles NO use la parrilla debajo de construcciones combustibles elevadas desprotegidas NO use ni instale esta parrilla en o sobre un vehículo recreativo y o un bote ADVERTENCIA NO use cañerías de metal duro de ningún tipo para conectar este tipo de parrilla a una fuente de gas natural Sólo utilice la manguera especificada por el fabricante El uso de cañe...

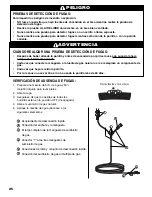
Page 25: ...se de que la válvula de suministro de gas natural esté en la posición OFF cerrada y luego conecte la manguera de gas natural a la boquilla Empuje el manguito en la boquilla hacia atrás Figura B e inserte el enchufe hasta que el manguito se desplace a presión hacia adelante y trabe el enchufe en la boquilla Asegúrese de probar las conexiones para verificar que no hay fugas antes de usar Acoplamient...

Page 26: ... la fuente de gas natural o si se reemplaza un componente de gas Cada vez que haya movido la parrilla Por lo menos una vez al año si no ha usado la parrilla más de 60 días VERIFICACIÓN DE AUSENCIA DE FUGAS 1 Prepare una mezcla de 50 de agua y 50 de jabón líquido para lavar platos 2 Abra la tapa 3 Asegúrese de que las perillas de todas las hornillas estén en la posición OFF de apagado 4 Abra el sum...

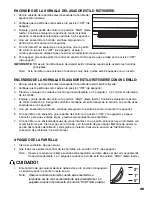
Page 27: ...mado almacenado movido limpiado o reparado la parrilla NO opere esta parrilla hasta que haya leído y entendido TODAS las advertencias e instrucciones en este manual LISTA DE VERIFICACIÓN PRELIMINAR AL ENCENDIDO Asegúrese de que la parrilla está armada correctamente Inspeccione la manguera de suministro de gas para detectar quemaduras rozaduras dobleces y verificar la trayectoria correcta antes de ...

Page 28: ...al usar el encendedor de botón espere 5 minutos consulte la sección de Encendido de las hornillas principales con un cerillo 7 Para apagar gire cada perilla de control en sentido horario hasta que se trabe en la posición OFF de apagado Esto no cierra el flujo de gas de la fuente de gas natural Nota Si la hornilla no se enciende o la llama es muy baja quizás esté bloqueada con un insecto Consulte I...

Page 29: ...del borde inferior de la hornilla 4 Empuje y gire la perilla de control a la posición HIGH llama fuerte Continúe empujando la perilla de control durante 3 a 5 segundos mientras mantiene el cerillo debajo de la hornilla La hornilla debe encenderse en 5 segundos 5 Una vez encendida la hornilla continúe empujando la perilla de control durante 30 segundos 6 Si la hornilla no se enciende gire la perill...

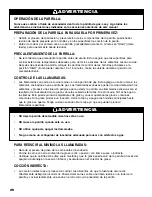
Page 30: ...ocinar demasiado los alimentos y producir una situación peligrosa para usted y la parrilla Las llamaradas excesivas son el resultado de la acumulación de grasa sobre las cubiertas térmicas Si esto ocurre NO eche agua a las llamas Esto puede producir salpicaduras de grasa y causar quemaduras graves o lesiones corporales Si la grasa produce un incendio cierre la tapa y apague las hornillas principal...

Page 31: ... proteger al usuario contra el electrochoque Este enchufe debe conectarse directamente a un receptáculo para tres clavijas conectado correctamente a tierra Nunca corte o quite el enchufe de conexión a tierra Cualquier cable de extensión también debe tener un receptáculo para tres clavijas Todos los cables de suministro eléctrico deben mantenerse alejados del agua y de las superficies calientes de ...

Page 32: ...re Carne y Pollo de USDA al número sin cargo 800 535 4555 Para proteger su parrilla contra la oxidación excesiva manténgala limpia y cubierta todo el tiempo cuando no la esté usando Lave las rejillas para cocinar con agua jabonosa caliente enjuáguelas bien y séquelas Aplique una capa ligera de aceite vegetal líquido o en aerosol a las rejillas para cocinar Limpie el interior y exterior de la parri...

Page 33: ...agujeros grandes reemplace la hornilla IMPORTANTE La abertura de la hornilla debe deslizarse sobre la boquilla de la válvula 9 Reinstale cuidadosamente las hornillas 10 Instale nuevamente las clavijas hendidas debajo de cada hornilla y siga las instrucciones en la sección Pruebas de detección de fugas de este manual Reencienda las hornillas para verificar el funcionamiento apropiado 11 Reinstale l...

Page 34: ...or desconecte la manguera del suministro de gas natural Limpie la hornilla antes de usar después del almacenaje al comienzo de la temporada de uso de la parrilla o si no usa la parrilla por un mes Las arañas y otros insectos pueden formar nidos en los tubos de las hornillas especialmente durante los meses de frío Estos nidos pueden producir llamaradas en los tubos de las hornillas o debajo de la p...

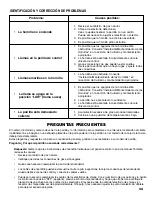
Page 35: ...está demasiado caliente Problema Causas posibles IDENTIFICACIÓN Y CORRECCIÓN DE PROBLEMAS El número de modelo y número de serie de la parrilla y la información para contactarse con el Servicio de atención al cliente de Brinkmann se incluyen en una etiqueta plateada en la parte posterior de la parrilla o en el costado de la caja de la misma debajo del estante lateral Estas preguntas y respuestas so...

Page 36: ... de alimentos persistentes utilice un desgrasador y un cepillo de limpieza de fibra o latón Nunca use un cepillo de alambre o raspador metálico en las placas de distribución de calor con acabado de porcelana ya que puede rayar o estropear el acabado de porcelana y fomentar la oxidación Limpieza de la bandeja para grasa y o la gaveta para grasa Es necesario inspeccionar la bandeja para grasa y o ga...

Page 37: ...ificios de ventilación a ambos lados de la base de la parrilla El orificio de ventilación superior debe ser de al menos 20 pulgadas cuadradas 129 cm2 y situarse a menos de 5 pulgadas 12 7 cm del borde superior de la base de la parrilla El orificio de ventilación inferior debe ser de al menos 10 pulgadas cuadradas 64 5 cm2 y situarse a menos de 1 pulgada 2 5 cm del nivel del piso de la base de la p...

Page 38: ... mínimas necesarias para instalar las parrillas empotrables Charmglow El motor del asador estilo rotisserie está situado al costado izquierdo de la caja de la parrilla Se debe mantener un espacio mínimo de 8 pulgadas 20 3 cm entre la tapa de la parrilla y los materiales circundantes para que el motor del asador estilo rotisserie pueda funcionar correctamente Se necesita un espacio mínimo de 6 pulg...

Page 39: ... pila con el extremo positivo hacia la tapa Coloque nuevamente la tapa y verifique que el encendedor funcione correctamente Instalación de la Bandeja para Grasa Inserte la bandeja para grasa de las hornillas principales en la abertura en el lado delantero de las hornillas principales ...

Page 40: ...ero inoxidable Brinkmann está libre de defectos de materiales o mano de obra Partes de acero inoxidable garantía de por vida Encendedor electrónico y hornillas 1 año de garantía El resto de las piezas 1 año de garantía Las obligaciones de The Brinkmann Corporation con respecto a esta garantía se limitan a lo siguiente Esta garantía no cubre parrillas que hayan sido alteradas modificado o dañadas d...

Reviews: