background image

Knee CPM Trolley

Setup

1. 

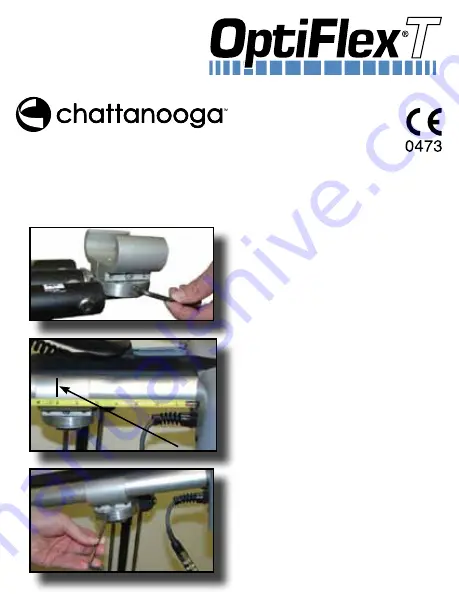
Using the 3/16” hex wrench 

(supplied), completely loosen 

the clamp hex screw. 


2. 

Measure 7” (17.8 cm) from 

the motor housing of the 

OptiFlex3 unit and place 

unit into clamp with the 7” 

(17.8 cm) mark in center of 

clamp. 

NOTE:  

It may be necessary to 

obtain another person’s help in 

mounting the OptiFlex3 unit to 

the OptiFlex T. 

3. 

Using the 3/16” hex 

wrench, tighten the clamp 

securely.

ISO 13485 Certified Company

DJO, LLC 

1430 Decision St 

Vista, CA  92081  USA 

Phone: 1-800-592-7329  USA 

Phone: 1-317-406-2209 

Fax: 1-317-406-2014
chattgroup.com
© 2010 DJO, LLC

45255D

Summary of Contents for OptiFlex T

Page 1: ...o clamp with the 7 17 8 cm mark in center of clamp NOTE It may be necessary to obtain another person s help in mounting the OptiFlex3 unit to the OptiFlex T 3 Using the 3 16 hex wrench tighten the clamp securely ISO 13485 Certified Company DJO LLC 1430 Decision St Vista CA 92081 USA Phone 1 800 592 7329 USA Phone 1 317 406 2209 Fax 1 317 406 2014 chattgroup com 2010 DJO LLC 45255D ...

Page 2: ...ex3 Know the limitations and hazards associated with the OptiFlex3 Observe any and all precautionary and operational decals placed on the unit Regularly monitor the proper operation of the trolley making sure to note any worn or wearing parts If the functional degradation of the trolley is apparent contact your DJO LLC dealer or Customer Service Department for assistance Never place your hands or ...

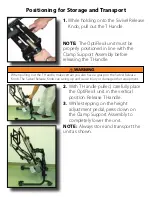
Page 3: ...pulling out the T Handle make certain you also have a grasp on the Swivel Release Knob The Swivel Release Knob can swing up and cause injury or damage other equipment 2 With T Handle pulled carefully place the OptiFlex3 unit in the vertical position Release T Handle 3 While stepping on the height adjustment pedal press down on the Clamp Support Assembly to completely lower the unit NOTE Always sto...

Page 4: ...terclockwise 3 Rotate the unit 90 as shown 4 Tighten the Swivel Release Knob NOTE The unit may be rotated in either direction or up to approximately 300 as desired 5 Step on the Height Adjustment Pedal and pull up on the Clamp Support Assembly to raise the unit When necessary step on the Height Adjustment Pedal while pressing down on the unit to lower the unit Positioning for Patient Use ...

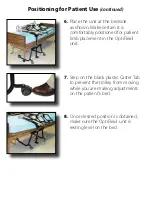
Page 5: ... limb placement in the OptiFlex3 unit 7 Step on the black plastic Caster Tab to prevent the trolley from moving while you are making adjustments on the patient s bed 8 Once desired position is obtained make sure the OptiFlex3 unit is resting level on the bed Positioning for Patient Use continued ...

Page 6: ...ne other than Company the selling dealer or a certified Company service technician Any malfunction or failure in the Product caused by product misuse including but not limited to the failure to provide reasonable and required maintenance or any use that is inconsistent with the Product User s Manual COMPANY SHALL NOT BE LIABLE IN ANY EVENT FOR INCIDENTAL OR CONSEQUENTIAL DAMAGES Some locations do ...

Reviews: