background image

Page 5 of 27

onAir IP Panel 1 User Manual Rev. 2

Setup

3. Setup

AC Power

The onAir IP Panel 1 has an auto-ranging power supply and it can work with an input voltage range of 100 

to 240 VAC, 50/60 Hz.

To determine the product’s power requirements (circuit breaker, power outlet, and wiring), use the current 

value listed on the label affixed to the product’s back panel, or refer to the product’s specifications chart. 

The listed current rating indicates the product’s average current draw under normal conditions.

AC Plug

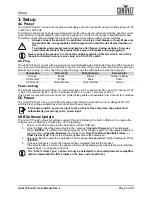
The onAir IP Panel 1 comes with a power input cord terminated with a Seetronic Powerkon IP65 connector 

on one end and an Edison plug on the other end (U.S. market). If the power input cord that came with your 

product has no plug, or if you need the change the plug, use the table below to wire the new plug.

Power Linking

The product supports power linking. You can power link up to 7 products at 100 V, up to 8 products at 120 

V, up to 15 products at 208 V, up to 16 products at 230 V, or up to 17 products at 240 V.

This product comes with a power input cord. Power linking cables are available from Chauvet for purchase.

DC Power

The onAir IP Panel 1 has a 3-pin IP65 XLR power input that can work with an input voltage of 28 VDC 

which is SELV voltage supplied by short-circuit-proof power supply.

USB Software Update

The onAir IP Panel 1 allows for software update through USB using the built-in USB port. To update the 

software using a USB type C flash drive, do the following:

1. Power on the fixture and plug the flash drive into the USB port.

2. Once the flash drive has been detected, the message “

Upgrade Firmware

” will be displayed. 

Press <

ENTER

>. If a different message appears on the display, search for the update software in 

the main menu (

Upgrade Firmware

) and select from 

Only This Fixture

Multiple Fixture

, or 

Other Fixture Type

. A list of the software update files will be displayed.

3. Select the file that needs to be uploaded. The message “

Are you sure?

” will be displayed. Press 

<

ENTER

>.

4. If the selected file is correct, the update will be completed. Restart the product.

If the selected file is incorrect, the update will fail, and the display will go back to the main interface. 

Repeat steps 1-3 using the correct file.

Always connect the product to a protected circuit (a circuit breaker or fuse). Make sure 

the product has an appropriate electrical ground to avoid the risk of electrocution or 

fire.

To eliminate unnecessary wear and improve its lifespan, during periods of non-use 

completely disconnect the product from power via breaker or by unplugging it.

Never connect the product to a rheostat (variable resistor) or dimmer circuit, even if the 

rheostat or dimmer channel serves only as a 0 to 100% switch.

Connection

Wire (U.S.)

Wire (Europe)

Screw Color

AC Live

Black

Brown

Yellow or Brass

AC Neutral

White

Blue

Silver

AC Ground

Green/Yellow

Green/Yellow

Green

If AC power and DC power are input to the product at the same time, the product will 

automatically give priority to AC power input.

The “Other Fixture Type” option can only be selected for connected products compatible 

with the Upload 03 (the first 2 digits on the item code must be 03).

Summary of Contents for onAirPanel1IP

Page 1: ...User Manual Model ID ONAIRPANEL1IP...

Page 2: ...se without written consent from Chauvet Document Printing For best results print this document in color on letter size paper 8 5 x 11 in double sided If using A4 paper 210 x 297 mm configure the print...

Page 3: ...ons 4 3 Setup 5 AC Power 5 AC Plug 5 Power Linking 5 DC Power 5 USB Software Update 5 Signal Connections 6 Control Personalities 6 DMX Linking 6 Remote Device Management RDM 6 Art Net Connection 6 sAC...

Page 4: ...1 CCT Control 21 Preset Buttons 21 HSV Control 21 XY Control 21 Preset CCTs 21 Manual Color Mixer 21 Effect Macros 22 Configuration Settings 22 Red Shift 22 Master Slave 22 DMX Loss 22 Dimmer Curve 22...

Page 5: ...could void the user s authority to operate the equipment RF Exposure Warning for North America and Australia Warning This equipment complies with FCC radiation exposure limits set forth for an uncontr...

Page 6: ...ver carry the product by the power cord Power and Wiring Make sure the power cord is not crimped or damaged Ensure that the product is connected to the proper voltage in accordance with the specificat...

Page 7: ...from 2800 K to 8000 K with high CRI and CQS Virtual color wheel with color matched to popular gel colors Green adjustment and emulated red shift via DMX or on board control RDM Remote Device Managemen...

Page 8: ...uction onAir IP Panel 1 User Manual Rev 2 Product Dimensions 13 98 in 355 mm 22 in 559 mm 11 81 in 300 mm 21 81 in 554 mm 16 18 in 411 mm 19 6 in 497 8 mm 5 74 in 146 mm 13 97 in 354 9 mm 17 05 in 433...

Page 9: ...he following 1 Power on the fixture and plug the flash drive into the USB port 2 Once the flash drive has been detected the message Upgrade Firmware will be displayed Press ENTER If a different messag...

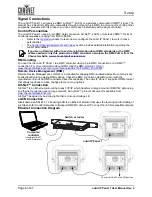
Page 10: ...te Device Management or RDM is a standard for allowing DMX enabled devices to communicate bi directionally along existing DMX cabling Check the DMX controller s User Manual or with the manufacturer as...

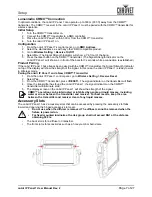
Page 11: ...isplay will show the strength of the signal In this case the onAir IP Panel 1 is ready to work in Wireless mode Pairing the onAir IP Panel 1 and a New CRMX Transmitter 1 From the onAir IP Panel 1 cont...

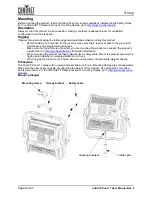
Page 12: ...poses Make sure that the structure onto which you are mounting the product can support the product s weight See the Technical Specifications for weight information When mounting the product overhead a...

Page 13: ...enu from the Home Screen press MENU To navigate to the desired option in the main menu press MENU repeatedly until the option is indicated or use UP or DOWN to navigate directly Press ENTER to select...

Page 14: ...channel dimmer RGBW strobe 8Ch1 8 channel RGBW 1 and 2 8Ch2 8 channel 16 bit RGBW 10Ch 10 channel dimmer RGBW 1 and 2 strobe 11Ch 11 channel dimmer RGBW strobe color temperature hue effect macros and...

Page 15: ...e Clouds Fireworks Paparazzi Lightning Red Shift On Enables or disables red shift Off Master Slave Master Standalone mode Slave Slave mode DMX Loss Hold Last Holds last signal received Stop DMX Holds...

Page 16: ...the IP address 10 239 Ethernet To DMX No Enables disables Ethernet to DMX Yes Information Fixture Hours _ _ _ _ _H Shows total hours the product has been powered on LED Hours _ _ _ _ _H Shows total h...

Page 17: ...rent preset or preset bank 4 Middle line shows current control mode Shows DIM GRN CCT in CCT mode DIM HUE SAT in HSV mode DIM X Y in XY Control mode Master Mode in master mode Slave Mode in slave mode...

Page 18: ...r IP Panel 1 1 Go to the Ethernet Setting main level 2 Select the Universe option 3 Set the universe from 000 255 for Art Net or from 001 256 for sACN Start Channel Each product will respond to a uniq...

Page 19: ...rt or Yes convert Control Channel Assignments and Values XYExtended 10 XYBasic 6 Channel Function Value Percent Setting 1 Dimmer 000 255 0 100 2 Fine dimmer 000 255 0 100 3 X coordinate 000 255 0 100...

Page 20: ...white 2 000 255 0 100 Channel Function Value Percent Setting 1 Dimmer 000 255 0 100 2 Red 1 000 255 0 100 3 Green 1 000 255 0 100 4 Blue 1 000 255 0 100 5 White 1 000 255 0 100 6 Red 2 000 255 0 100 7...

Page 21: ...mperature 000 255 See the Color Temperature Chart 13 Hue 000 001 0 002 255 25 25 14 Effect macros 000 010 No function 011 039 Color chase 040 068 Police car 069 096 Firetruck 097 125 Fire 126 154 Clou...

Page 22: ...nction Value Percent Setting 1 Dimmer 000 255 0 100 2 Red 1 000 255 0 100 3 Green 1 000 255 0 100 4 Blue 1 000 255 0 100 5 White 1 000 255 0 100 6 Red 2 000 255 0 100 7 Green 2 000 255 0 100 8 Blue 2...

Page 23: ...Blue 000 255 0 100 5 White 000 255 0 100 6 Strobe 000 010 No function 011 255 Strobe slow to fast Channel Function Value Percent Setting 1 Dimmer 000 255 0 100 2 Fine dimmer 000 255 0 100 3 Color temp...

Page 24: ...mode off 048 055 Square dimmer 120 127 Fan mode silent 056 063 Inverse square dimmer 128 255 Reserved for future use 064 071 Dimmer mode off Value Percent Setting Value Percent Setting 000 005 No fun...

Page 25: ...00 0 100 GRN HUE Increase or decrease the hue value from 000 360 CCT SATURATION Increase or decrease the saturation from 00 0 100 To set the product to HSV Control mode 1 Go to the Static main level...

Page 26: ...curve 1 Go to the Red Shift main level 2 Select from S Curve Linear Square or Inverse Square Dimmer Speed Mode To set the dimmer speed 1 Go to the Dimmer Mode main level 2 Select the dimmer speed mod...

Page 27: ...twork access to system information settings such as control protocol and starting address color output testing and the ability to change the Web Server password 1 Connect the product to a Windows comp...

Page 28: ...ow the instructions below 1 Unplug the product from power 2 Wait until the product is at room temperature 3 Use a vacuum or dry compressed air and a soft brush to remove dust collected on the external...

Page 29: ...K Europe Power Input Connectors Seetronic Powerkon IP65 3 pin IP65 XLR 28 VDC Seetronic Powerkon IP65 3 pin IP65 XLR 28 VDC Power Output Connector Seetronic Powerkon IP65 Seetronic Powerkon IP65 Power...

Page 30: ...equest Clearly label the package with an RMA number Chauvet will refuse any product returned without an RMA number Before sending the product clearly write the following information on a piece of pape...

Page 31: ...ookhill Road Industrial Estate Pinxton Nottingham UK Website www chauvetprofessional eu NG16 6NT Voice 44 0 1773 511115 Fax 44 0 1773 511110 Chauvet Europe BVBA Address Stokstraat 18 Email BNLtech cha...

Reviews: