background image

Setup 


COLORdash™ Accent Series User Manual Rev. 03c 


-7- 

Mounting 


Before mounting any of the fixtures in the COLORdash™ Accent Series, read and follow 
the safety recommendations indicated in the 

Safety Notes

  section  (page 2 of this 

manual).  


Orientation 


Always mount the fixtures in the COLORdash™ Accent Series in any safe position while 
making sure that there is adequate room around it for ventilation. 

Make sure to mount these fixtures away from any flammable material as indicated in the 

Safety Notes

 section. 


Rigging 


CHAUVET® recommends following the general guidelines below when mounting any of 
the fixtures in the COLORdash™ Accent Series. 


When selecting an installation location, consider ease of access to the fixture for 
operation, programming adjustments, and routine maintenance.  


Never mount any of these fixtures in places where rain, high humidity, extreme 
temperature changes, or restricted ventilation may affect it. 


If hanging any of these fixtures, make sure that the location where you are mounting 
the fixture can support its weight. Please see the 

Technical Specifications

 section of 

this manual for the weight requirement of this fixture. 


Procedure 


The  fixtures in the COLORdash™ Accent Series  come with a double bracket yoke to 
which you can attach “C” or “O” clamps. The double bracket yoke also serves  as floor 
mount support. You must supply your own “C” or “O” clamps as well as the safety cable.  


Product Mounting 

Diagram 


C clamp  
(not included) 

Truss Mount 

Floor Mount 

Summary of Contents for COLORdash Accent Series

Page 1: ...User Manual ...

Page 2: ...x 297 mm configure your printer to scale the content of this document to A4 paper Intended Audience Any person in charge of installing operating and or maintaining any of the fixtures in the COLORdash Accent Series should read the Guide that shipped with it as well as this manual in their entirety before installing operating or maintaining this product Disclaimer CHAUVET believes that the informat...

Page 3: ...tures 4 VW Fixtures 4 Product Dimension 5 3 Setup 6 AC Power 6 AC Plug 6 DMX Linking 6 DMX Modes 6 Master Slave Connectivity 6 Mounting 7 Orientation 7 Rigging 7 4 Operation 8 Control Options 8 Control Panel Description 8 Programming 9 Starting Address 9 STATIC Mode 10 AUTO Mode 10 DMX Values for RGBW Fixtures 11 STAGE 1 11 ARC 1 12 ARC 2 12 DMX Values for VW Fixtures 12 S1 D2 12 STD W 12 STD D 12...

Page 4: ...Table of Contents b COLORdash Accent Series User Manual Rev 03c RGBW Fixtures 16 UV Fixtures 17 VW Fixtures 17 Returns Procedure 18 Claims 18 Contact Us 18 Technical Specifications 19 ...

Page 5: ...values in the text 10 A DIP switch to be configured Claims A new term or a section or chapter in this document COLORado UM The name of another publication or manual SET A button on the fixture s control panel Settings A fixture function or a menu option MENU Settings A sequence of menu options 1 10 A range of menu values from which to choose in a menu Yes No A set of two mutually exclusive menu op...

Page 6: ...uct always secure it to a fastening device using a safety chain cable not provided Power and Wiring Always make sure that you are connecting this product to the proper voltage as per the specifications in this manual or on the product s sticker Never connect this product to a dimmer pack or rheostat Make sure the product s housing or power cable are not cracked crimped or damaged Never disconnect ...

Page 7: ...os Master Slave operation Compatible with the COLOR CON controller Lightweight black aluminum casing Natural convection cooling no fans High power 1 W 350 mA LEDs Double bracket yoke that doubles as a floor stand RGBW Features 3 4 or 9 channel RGBW LED wash fixture Operating modes 3 channel Red green blue 4 channel Red green blue white 9 channel Dimmer red green blue white macro strobe auto progra...

Page 8: ...tion 1 Red 2 Green 3 Blue ARC 2 DMX Channel Function 1 Red 2 Green 3 Blue 4 White UV Fixtures SV1 DMX Channel Function 1 Function 1 SV1 S DMX Channel Function 1 Function 1 2 Function 2 VW Fixtures S1 DS DMX Channel Function 1 Dimmer 2 Warm White 3 Cool White 4 White Macros 5 Strobe STD W DMX Channel Function 1 Warm White 2 Cool White STD D DMX Channel Function 1 Dimmer 2 Warm White 3 Cool White ST...

Page 9: ...Introduction COLORdash Accent Series User Manual Rev 03c 5 Product Dimension All versions Front View Rear View Side View Bracket Adjustment Knob Length Height Width ...

Page 10: ...cent Series to a DMX controller using a standard DMX serial connection If using other DMX compatible fixtures with any of these products it is possible to control them individually with a single DMX controller If you are not familiar with the DMX standard or if you need information about the DMX cables needed to link the fixtures in the COLORdash Accent Series to a DMX controller you may download ...

Page 11: ...eries When selecting an installation location consider ease of access to the fixture for operation programming adjustments and routine maintenance Never mount any of these fixtures in places where rain high humidity extreme temperature changes or restricted ventilation may affect it If hanging any of these fixtures make sure that the location where you are mounting the fixture can support its weig...

Page 12: ...ows the DIP switch setting to enable the various operating modes for each of the fixtures in the COLORdash Accent Series DIP Switch Assignments When the fixture is in DMX mode DIP switches 1 to 9 define the fixture s starting address When the fixture is in AUTO mode DIP switches 1 to 4 determine which program will run When the fixture is in STATIC mode DIP switches 1 to 4 determine the intensity o...

Page 13: ...ttings DIP Switch 1 2 3 4 5 6 7 8 9 Value 1 2 4 8 16 32 64 128 256 Procedure 1 Set DIP switches 10 through 12 to select a DMX operation mode as per the Operation Modes Table 2 Select the desired starting address 0 to 512 by setting DIP switches 1 through 9 to ON or OFF until the sum of the value of the DIP switches in the ON position matches the desired address number 3 Refer to the examples below...

Page 14: ...e 2 Select the color intensity as indicated in the corresponding STATIC Mode Configuration table above AUTO Mode The AUTO mode allows the user to select one of the available preset programs on the individual COLORdash Accent fixture as follows Fixture model RGBW UV VW Number of AUTO programs 32 10 12 Selection range 0 31 0 9 0 11 To select the AUTO program set DIP switches 1 through 5 as indicated...

Page 15: ... 2 3400 K White 3 4200 K White 4 4900 K White 5 5600 K White 6 5900 K White 7 6500 K White 8 7200 K White 9 8500 K 7 Strobe 000 004 005 255 No Function 0 20 Hz 8 Auto Select 000 020 021 030 031 040 041 050 051 060 061 070 071 080 081 090 091 100 101 110 111 120 121 130 131 140 141 150 151 160 161 170 171 180 181 190 191 200 201 210 211 220 221 223 224 226 227 229 230 232 233 235 236 238 239 241 24...

Page 16: ...4 White Macros 000 010 011 050 051 080 081 110 111 140 141 255 No Function White 1 3 200 K White 2 3 400 K White 3 4 200 K White 4 4 900 K White 5 5 600 K 5 Strobe 000 255 0 100 STD W Channel Function Value Percent Setting 1 Warm White 000 255 0 100 2 Cool White 000 255 0 100 STD D Channel Function Value Percent Setting 1 Dimmer 000 255 0 100 2 Warm White 000 255 0 100 3 Cool White 000 255 0 100 S...

Page 17: ...ommendations below Unplug the fixture from power Wait until the fixture is cold Use a vacuum or dry compressed air and a soft brush to remove dust collected on the external vents and reachable internal components Clean all external optics and glass surfaces with a mild solution of glass cleaner or isopropyl alcohol and a soft lint free cotton cloth or a lens cleaning tissue Apply the solution dire...

Page 18: ...power up No power Check for power on power outlet Loose or damaged power cord Check power cord Faulty internal power supply Replace internal power supply Fixture does not respond to DMX Wrong DMX addressing Check DMX mode and unit addressing Damaged DMX cables Check DMX cables Wrong polarity on the controller Check polarity switch settings on the controller Loose DMX cables Check cable connections...

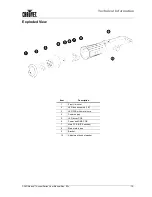
Page 19: ...r Manual Rev 03c 15 Exploded View Item Description 1 Front rim cover 2 LED lens assembly 18º 3 LED PCB with metal core 4 Power supply 5 LED driver PCB 6 Power and DMX PCB 7 Main PCB DIP Switches 8 Main metal case 9 Bracket 10 Adjustment knob w washer ...

Page 20: ...Technical Information 16 COLORdash Accent Series User Manual Rev 03c Photometrics RGBW Fixtures ...

Page 21: ...Technical Information COLORdash Accent Series User Manual Rev 03c 17 UV Fixtures VW Fixtures ...

Page 22: ...kaging will be the customer s responsibility As a suggestion proper UPS packing or double boxing is always a safe method to use CHAUVET reserves the right to use its own discretion to repair or replace returned product s Claims The carrier is responsible for any damage incurred during shipping to this product or any part that shipped with it Therefore if the received merchandise appears to have da...

Page 23: ...20º Field angle 37 5º UV Fixtures Photo Optic Luminance 1 m 11 44 lux Luminance 2 m 2 86 lux Lens angle 18º Beam angle 20º Field angle 37 5º VW Fixtures Photo Optic Luminance 1 m 1 108 lux Luminance 2 m 258 33 lux Lens angle 18º Beam angle 25º Field angle 43 7º Cooling Cooling system Natural convection Maximum operating temperature 104º F 40ºC Control Programming Data input Locking 3 pin XLR male ...

Page 24: ...CHAUVET 5200 NW 108th Avenue Sunrise FL 33351 USA 800 762 1084 954 929 1115 FAX 954 929 5560 www chauvetlighting com COLORdash Accent Series User Manual Rev 03c August 2010 ...

Reviews: