background image

SlimPAR 56 GRR 

IT 

29 

Contatti 

Per richiedere assistenza o restituire l'apparecchiatura, al di fuori di Stati 
Uniti, Regno Unito,  Irlanda, Messico, o Benelux  contattare il distributore 
locale. Per informazioni sui contatti, visitare il sito Web 

www.chauvetlighting.com

Che cosa è 

Incluso 

SLIMPAR56: 

SLIMPACK56LT: 


SlimPAR 56 


Cavo di alimentazione  


Scheda di garanzia 


Guida Rapida 


4x SlimPAR 56 


3x Cavi DMX 


4x Cavi di alimentazione 


Borsa  


Scheda di garanzia 


Guida Rapida 

Per Iniziare 

Disimballare SlimPAR 56 ed accertarsi di aver ricevuto tutti i componenti 
integri. Se l'imballo appare danneggiato, farlo immediatamente presente al 
trasportatore e non a Chauvet.  

Descrizione 

del Prodotto 

SlimPAR 56 è un proiettore a LED che può essere utilizzato praticamente 
dovunque. Ha 108 LED rossi, verdi e blu, controllo DMX a 3 o 7 canali. 

Vista d'Insieme 


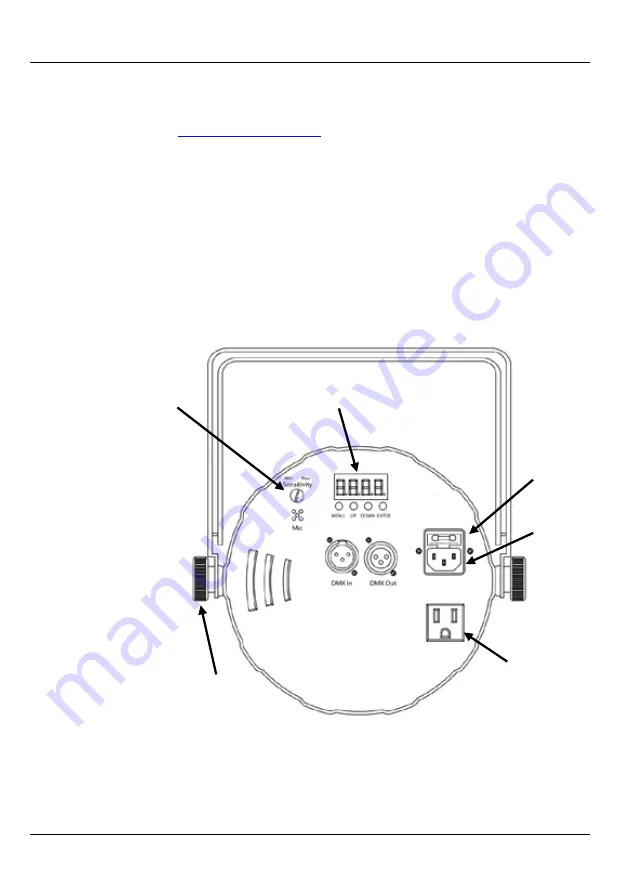
Vista Pannello Posteriore 

Pannello di controllo 

Display a LED 

Manopola 

regolazione 

staffa 

Uscita 

alimentazione 

Sensibilità microfono 

Manopola di 

regolazione 

Ingresso 

Potenza 

Portafusibile 


Summary of Contents for SLIMPAR 56

Page 1: ...Quick Reference Guide...

Page 2: ...t be within the range stated on the decal or rear panel of the product This product is for indoor use only IP20 To prevent risk of fire or shock do not expose this product to rain or moisture Always m...

Page 3: ...Power Cord Carry Bag Warranty Card Quick Reference Guide Product Description The SlimPAR 56 is an LED Par that can go almost anywhere It has 108 red green and blue LEDs with 3 or 7 channel DMX contro...

Page 4: ...50 V fuse in the SlimPAR 56 Disconnect the product from power 1 Wedge the tip of a flat head screwdriver into the slot of the fuse 2 holder Pry the safety cap out of the housing 3 Remove the blown fus...

Page 5: ...in a function ENTER Activates a menu option or selected value Menu Map Main Level Programming Levels Description P P1 7 color program switching P2 7 color program fading P3 3 color program switching P...

Page 6: ...nection The SlimPAR 56 uses the DMX data connection for its Master Slave mode Instructions for connecting and configuring this product for Master Slave operation are in the User Manual DMX Values 7 CH...

Page 7: ...s cerca de la unidad cuando est en funcionamiento NO toque este producto cuando est en funcionamiento pues podr a estar caliente La tensi n del enchufe al que conecte este producto ha de estar en el r...

Page 8: ...eta de garant a Gu a de Referencia R pida Para Empezar Desembale su SlimPAR 56 y aseg rese de que ha recibido todas las partes en buen estado Si la caja o los componentes parecen da ados notif queselo...

Page 9: ...0 VCA Sustituci n del Fusible Para sustituir el fusible F1A 250 V del SlimPAR 56 Desconecte el producto de la alimentaci n 1 Haga cu a con la punta de un destornillador plano en la ranura del 2 portaf...

Page 10: ...o de funcionamiento o sale del la opci n de men actual UP Se desplaza hacia arriba por la lista de men o aumenta el valor num rico cuando est en una funci n DOWN Se desplaza hacia abajo por la lista d...

Page 11: ...controlador DMX cuando se enlaza por conexiones serie DMX Las instrucciones para conectar y configurar este producto para funcionamiento DMX est n en el Manual de usuario Si no est familiarizado con...

Page 12: ...a r pido Estroboscopio 001 015 Sin funci n 016 255 Lento a r pido 6 Modo 000 031 Modo RGB 032 063 Efecto pulso 0 100 064 095 Efecto pulso 100 0 096 127 Efecto pulso 100 0 100 128 159 Transici n fade...

Page 13: ...on d utilisation et de maintenance Cet appareil n est pas con u pour tre utilis dans une installation permanente Connectez UNIQUEMENT ce produit un circuit prot g et reli la terre D branchez toujours...

Page 14: ...ouvrez PAS ce produit Il ne contient aucun composant susceptible d tre r par par l utilisateur Durant les p riodes de non utilisation pour viter tout usure inutile et pour prolonger la dur e de vie d...

Page 15: ...VCA Remplacement du Fusible Pour remplacer le fusible F1A de 250 V dans le SlimPAR 56 D branchez l appareil de l alimentation 1 Ins rez et calez la pointe d un tournevis t te plate dans la fente du 2...

Page 16: ...tion facile utilisez les diagrammes ci apr s afin de connecter physiquement vos SlimPAR 56 l Contr leur DMX Configuration DMX Raccordement en cha ne des unit s Pour des SlimPAR 56 suppl mentaires Pour...

Page 17: ...MENU S lectionne un mode de fonctionnement ou permet la sortie de l option de menu en cours UP Permet de parcourir les listes de menu vers le haut dans une fonction permet d augmenter les valeurs num...

Page 18: ...nnexions DMX en s rie Vous trouverez les instructions de connexion et configuration de cet appareil pour un bon fonctionnement en DMX dans le manuel d utilisation Si vous n tes pas familier avec le DM...

Page 19: ...ent rapide Stroboscope 001 015 016 255 Pas de fonction Lent rapide 6 Mode 000 031 Mode RVB 032 063 Effet pulsation 0 100 064 095 Effet pulsation 100 0 096 127 Effet pulsation 100 0 100 128 159 Transit...

Page 20: ...rwendung und Wartung des Ger ts Dieses Produkt eignet sich nicht f r eine permanente Installation SCHLIESSEN Sie dieses Produkt nur an einen mit der Masse verbundenen und abgesicherten Stromkreislauf...

Page 21: ...r gt 40 C Nehmen Sie das Ger t nicht bei h heren Temperaturen in Betrieb Bei ernsthaften Betriebsproblemen stoppen Sie umgehend die Verwendung des Ger ts Dieses Ger t NICHT ffnen Die eingebauten Kompo...

Page 22: ...der Netzstecker in die Schukosteckdose gesteckt wird und kann mit einer Eingangsspannung von 100 240 V AC 50 60 Hz arbeiten Um unn tigen Verschlei zu vermeiden und die Lebensdauer des Ger ts zu verl n...

Page 23: ...alters Hebeln Sie die Sicherheitsabdeckung vom Geh use weg ab 3 Entfernen Sie die durchgebrannte Sicherung von der Klemme am 4 Vorderteil der Sicherheitsabdeckung und ersetzen Sie diese durch eine Sic...

Page 24: ...ert eine Men option oder einen ausgew hlten Wert Men karte Hauptebene Programmierschritte Beschreibung P P1 7 Farben Programm Umschalten P2 7 Farben Programm Fading P3 3 Farben Programm Umschalten P4...

Page 25: ...es Ger ts und dem physischen Verbinden Ihrer SlimPAR 56 Ger te mit dem DMX Controller verwenden Sie folgende bersicht Einrichten f r DMX Einrichten f r Reihenschaltung An zus tzliche SlimPAR 56 Ger te...

Page 26: ...gang zu allen Kan len in jedem DMX Modus zu gew hrleisten betr gt die h chste empfohlene DMX Adresse 506 im 7 Kanal DMX Modus Um die Startadresse auszuw hlen gehen Sie wie folgt vor Bet tigen Sie wied...

Page 27: ...ist 000 255 Langsam schnell Stroboskop 001 015 016 255 Keine Funktion Langsam schnell 6 Modus 000 031 RGB Modus 032 063 Pulse Effekt 0 100 064 095 Pulse Effekt 100 0 096 127 Pulse Effekt 100 0 100 128...

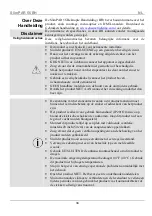
Page 28: ...ollocare materiale infiammabile vicino all unit mentre in funzione NON toccare l unit durante il funzionamento perch potrebbe essere molto calda La tensione della presa a muro cui si collega l apparec...

Page 29: ...limentazione Borsa Scheda di garanzia Guida Rapida Per Iniziare Disimballare SlimPAR 56 ed accertarsi di aver ricevuto tutti i componenti integri Se l imballo appare danneggiato farlo immediatamente p...

Page 30: ...e Per sostituire il fusibile F 1A da 250 V nello SlimPAR 56 Scollegare l unit dall alimentazione elettrica 1 Inserire la punta di un giravite a testa piatta nella fessura 2 dell alloggiamento del fusi...

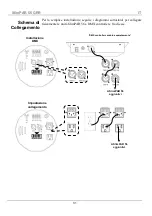
Page 31: ...lice installazione seguire i diagrammi sottostanti per collegare fisicamente le unit SlimPAR 56 a DMX controller e fra di esse Impostazione collegamento Installazione DMX A SlimPAR 56 aggiuntivi A Sli...

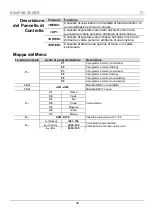
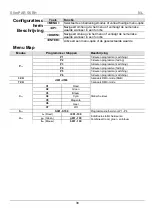
Page 32: ...te di attivare una opzione di men o un valore selezionato Mappa del Men Livello principale Livelli di programmazione Descrizione P P1 7 programma colore commutaz P2 7 programma colore fading P3 3 prog...

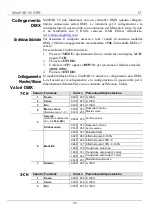
Page 33: ...In modalit Master Slave SlimPAR 56 utilizza il collegamento dati DMX Le istruzioni per il collegamento e la configurazione di questa unit per il funzionamento Master Slave sono contenute nel Manuale...

Page 34: ...tijdens gebruik RAAK het product NIET AAN wanneer het in werking omdat het dan heet zijn De spanning van het stopcontact waarop u dit product aansluit moet binnen het vermelde bereik op de sticker of...

Page 35: ...raagtas Garantiekaart Beknopte Handleiding Om te beginnen Pak uw SlimPAR 56 uit en zorg ervoor dat u alle onderdelen in goede staat hebt ontvangen Als de doos of inhoud beschadigd lijkt stel dan de ve...

Page 36: ...kering Om de F1A 250 V zekering in de SlimPAR 56 te vervangen Ontkoppel het apparaat van de stroom 1 Wig de punt van een platte schroevendraaier in de sleuf van de 2 zekeringhouder Druk de veiligheids...

Page 37: ...Voor eenvoudige installatie gebruik dan de volgende schema s om fysiek sluit uw SlimPAR 56 eenheden naar een DMX controller en elkaar Power gekoppeld Om extra SlimPAR 56s Om extra SlimPAR 56s DMX geko...

Page 38: ...lecteerde waarde Menu Map Modus Programmeer Stappen Beschrijving P P1 7 kleuren programma switching P2 7 kleuren programma fading P3 3 kleuren programma switching P4 3 kleuren programma fading P5 7 kl...

Page 39: ...ve verbinding De SlimPAR 56 maakt gebruik van de DMX dataverbinding voor haar Master Slave modus Instructies voor het aansluiten en configureren van dit product voor DMX bediening staan in de Gebruike...

Page 40: ...Information Address Unit 1C Brookhill Road Industrial Estate Pinxton Nottingham UK NG16 6NT Voice 44 0 1773 511115 Fax 44 0 1773 511110 Technical Support Email uktech chauvetlighting com World Wide W...

Reviews: